Photoshop Elements 15 - The Expert Workspace [COMPLETE]*
Figuration: Tutorial
Description
Full Guide here: http://bit.ly/adobeelements15
Enable SUBTITLES if you have trouble at understanding the narration. Leave feedback if you can!
Welcome to The Skills Factory™! Enter into a New Way of Learning the most famous products worldwide. SUBSCRIBE to start learning anything you need in less than 20 minutes.
We love you ♥
Metadata
| Video ID | 127 | Youtube URL | Photoshop Elements 15 - The Expert Workspace [COMPLETE]* |
|---|---|
| Captions Available | Yes |
| Captions Downloadable | Yes |
| Playlists | |
| Duration | 00:09:20 |
| Definition | hd |
| Keywords | |
| License | youtube |
| Embeddable | Yes |
| Views | 26013 |
| Likes | 170 |
| Dislikes | 4 |
| Favourites | 0 |
| Comments | 47 |
| Created | 2017-05-04 1:00:42 PM |
| Updated | 2017-05-04 1:11:08 PM |
Captions
ASR: en
0:00:08.420,0:00:15.450
hello there welcome to this video let's
0:00:12.059,0:00:18.480
see the amazing expert workspace inside
0:00:15.450,0:00:21.240
Photoshop Elements 15 in a short time
0:00:18.480,0:00:23.970
leave us comments below to make our
0:00:21.240,0:00:26.550
future videos better in the previous
0:00:23.970,0:00:28.890
beginner tutorial in this guide we have
0:00:26.550,0:00:31.260
seen the very basic features used to
0:00:28.890,0:00:34.829
edit your pictures with the quick and
0:00:31.260,0:00:37.110
the guided workspace but whenever you
0:00:34.829,0:00:39.690
want to go professional and start
0:00:37.110,0:00:42.899
editing photos precisely you have to
0:00:39.690,0:00:45.149
switch to the expert workspace what
0:00:42.899,0:00:47.850
really differs from the basic workspace
0:00:45.149,0:00:50.489
are the kinds of tools and features you
0:00:47.850,0:00:53.399
can use here these in fact allow you to
0:00:50.489,0:00:54.840
have a full control on each single pixel
0:00:53.399,0:00:57.270
of your photo
0:00:54.840,0:01:00.300
let's see shortly the most important
0:00:57.270,0:01:02.460
ones on the far left you have the main
0:01:00.300,0:01:04.769
toolbar that collects all the tools
0:01:02.460,0:01:08.220
available and divided in several
0:01:04.769,0:01:10.890
sections depending on what they do as
0:01:08.220,0:01:13.860
seen for the quick workspace you can use
0:01:10.890,0:01:15.960
the tool options panel at the bottom to
0:01:13.860,0:01:19.590
adjust the settings for the current tool
0:01:15.960,0:01:22.170
enabled under the modify cab you have
0:01:19.590,0:01:25.619
all the tools used to regulate the basic
0:01:22.170,0:01:27.869
photo appearance for example use the
0:01:25.619,0:01:30.150
crop tool to crop the picture as you
0:01:27.869,0:01:35.070
like cutting all that does not fall
0:01:30.150,0:01:37.409
within the cropping area use the
0:01:35.070,0:01:39.840
straighten tool to align the picture
0:01:37.409,0:01:43.049
according to the segment you draw on the
0:01:39.840,0:01:46.110
picture amazing is the content aware
0:01:43.049,0:01:48.090
move tool that is used to move a subject
0:01:46.110,0:01:51.210
inside your picture without leaving
0:01:48.090,0:01:53.250
vacant slots on the background just drag
0:01:51.210,0:01:56.189
on your picture to select the part you
0:01:53.250,0:01:58.710
need to move then if you click and drag
0:01:56.189,0:02:00.600
it you will move it freely and the
0:01:58.710,0:02:03.930
vacant background let will be
0:02:00.600,0:02:05.969
automatically covered the enhanced
0:02:03.930,0:02:08.580
section collects all the tools used to
0:02:05.969,0:02:11.640
improve any brightness contrast and
0:02:08.580,0:02:13.560
colours inside the picture for example
0:02:11.640,0:02:16.830
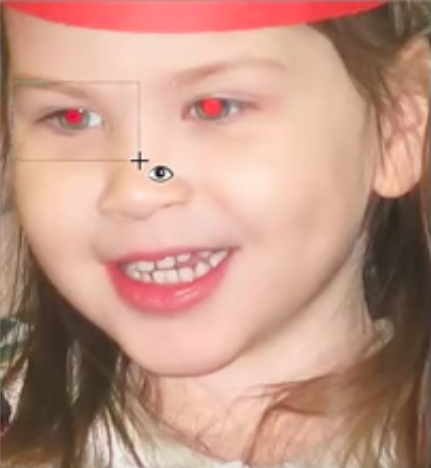
you have the red eyebrows
0:02:13.560,0:02:18.780
Google tool used to remove red eyes just
0:02:16.830,0:02:22.290
click and drag to create a selection
0:02:18.780,0:02:25.890
area if the red eye falls inside it it
0:02:22.290,0:02:28.319
will be automatically removed then you
0:02:25.890,0:02:30.269
have the healing brush tools these are
0:02:28.319,0:02:32.700
used to make heavy corrections that are
0:02:30.269,0:02:35.730
fully integrated within the colors and
0:02:32.700,0:02:38.849
the content inside the picture if you
0:02:35.730,0:02:42.420
choose the healing brush tool hold alt
0:02:38.849,0:02:44.580
down to fix a target point then when you
0:02:42.420,0:02:47.040
click and brush on the picture you will
0:02:44.580,0:02:49.680
paste exactly the details that fall
0:02:47.040,0:02:53.060
under the moving target without changing
0:02:49.680,0:02:55.590
the color that is under your brush
0:02:53.060,0:02:58.080
whereas to correct very small
0:02:55.590,0:03:01.019
imperfections it is better to use the
0:02:58.080,0:03:03.630
Spot Healing Brush in fact in this case
0:03:01.019,0:03:07.950
you just have to click on the spot to
0:03:03.630,0:03:11.519
get it removed automatically a similar
0:03:07.950,0:03:13.799
tools called clone stamp tool this works
0:03:11.519,0:03:16.890
just like the healing brush tool by
0:03:13.799,0:03:19.230
using a fixed target but when you click
0:03:16.890,0:03:21.690
and brush on the picture you will paste
0:03:19.230,0:03:24.630
exactly what you have under the target
0:03:21.690,0:03:25.760
so not just the details but also its
0:03:24.630,0:03:29.640
colors
0:03:25.760,0:03:32.819
remember to use ctrl + Z to undo in case
0:03:29.640,0:03:36.480
you make any mistake to zoom in and out
0:03:32.819,0:03:39.590
instead hold alt down and use your mouse
0:03:36.480,0:03:42.660
wheel to use your tools more precisely
0:03:39.590,0:03:46.769
Japan just hold the space bar and click
0:03:42.660,0:03:49.560
and drag on the picture the smart brush
0:03:46.769,0:03:52.200
tools are used to apply adjustments or
0:03:49.560,0:03:55.319
effects by brushing directly on the
0:03:52.200,0:03:57.299
picture the brush spreads on all the
0:03:55.319,0:04:02.430
parts of the picture that share the same
0:03:57.299,0:04:05.180
color and applies the effect chosen from
0:04:02.430,0:04:13.260
the tool options panel
0:04:05.180,0:04:15.709
moreover you can use the sponge the
0:04:13.260,0:04:15.709
Dodge
0:04:16.540,0:04:22.510
and the burn tools to adjust the picture
0:04:19.300,0:04:25.120
colors by adding or removing saturation
0:04:22.510,0:04:26.880
and by adding or removing brightness
0:04:25.120,0:04:30.040
respectively
0:04:26.880,0:04:35.080
whereas to adjust clarity you can use
0:04:30.040,0:04:40.120
the blur and the sharpen tools to adjust
0:04:35.080,0:04:42.310
the level of details use smudge to pick
0:04:40.120,0:04:44.160
and move the pixels of the picture as
0:04:42.310,0:04:46.810
you like
0:04:44.160,0:04:48.850
moreover you can also use all the
0:04:46.810,0:04:51.370
adjustments contained inside the
0:04:48.850,0:04:54.190
enhanced tab to improve your photo
0:04:51.370,0:04:57.610
appearance some of these are applied
0:04:54.190,0:04:59.830
automatically others work with a dialog
0:04:57.610,0:05:01.750
box which you can fix the correct
0:04:59.830,0:05:04.330
settings you want to apply on the
0:05:01.750,0:05:07.990
picture these kind of Corrections are
0:05:04.330,0:05:10.180
applied permanently in case you make a
0:05:07.990,0:05:14.190
mistake you can undo the latest
0:05:10.180,0:05:17.770
adjustment applied by using ctrl + Z
0:05:14.190,0:05:20.680
very important are also the tools under
0:05:17.770,0:05:22.960
the Select section used to select a
0:05:20.680,0:05:25.660
limited part of your picture with
0:05:22.960,0:05:28.210
regular or custom shapes in order to
0:05:25.660,0:05:32.470
apply all your modifications within it
0:05:28.210,0:05:34.810
only for example if you have any area
0:05:32.470,0:05:37.150
selected and you apply any correction
0:05:34.810,0:05:40.030
from the enhanced tab or by using the
0:05:37.150,0:05:41.200
tools just the selected area will be
0:05:40.030,0:05:43.300
affected
0:05:41.200,0:05:45.940
let's see how to use the selection tools
0:05:43.300,0:05:48.190
quickly the rectangular and the
0:05:45.940,0:05:51.160
elliptical marquee tools create a
0:05:48.190,0:05:53.530
rectangular or an elliptical selection
0:05:51.160,0:05:58.000
area by clicking and dragging on the
0:05:53.530,0:06:03.640
picture the quick selection tool select
0:05:58.000,0:06:06.190
areas by following the same color the
0:06:03.640,0:06:10.180
selection brush tool selects the parts
0:06:06.190,0:06:13.960
of the picture where you brushed on use
0:06:10.180,0:06:15.820
the magic wand tool to quickly select
0:06:13.960,0:06:19.990
parts of the picture that share the same
0:06:15.820,0:06:22.570
color in one shot to make customized
0:06:19.990,0:06:25.870
selections freehand you have to use the
0:06:22.570,0:06:28.150
lasso tools use the lasso tool to create
0:06:25.870,0:06:29.650
your free hand selection area by
0:06:28.150,0:06:32.889
clicking and dragging on
0:06:29.650,0:06:35.020
picture use the magnetic lasso tool to
0:06:32.889,0:06:37.630
make a free hand selection that follows
0:06:35.020,0:06:41.680
the boundaries created by a deep color
0:06:37.630,0:06:44.620
contrast use the polygon lasso tool to
0:06:41.680,0:06:47.280
create a polygon selection area by
0:06:44.620,0:06:50.289
fixing one point after another
0:06:47.280,0:06:52.690
when using the selection tools you will
0:06:50.289,0:06:56.740
always generate new selections by
0:06:52.690,0:06:59.199
default removing the old ones created to
0:06:56.740,0:07:01.690
make additional selections you can hold
0:06:59.199,0:07:04.330
shift down while dropping a new
0:07:01.690,0:07:09.070
selection area or remove existing
0:07:04.330,0:07:11.320
selected areas by holding alt down let's
0:07:09.070,0:07:13.810
now have a look at the adjustment layers
0:07:11.320,0:07:16.240
of very professional way to edit and
0:07:13.810,0:07:18.580
adjust your pictures differently from
0:07:16.240,0:07:20.650
the quick workspace you can apply
0:07:18.580,0:07:23.250
adjustments on the picture by using
0:07:20.650,0:07:26.620
layers that overlap the picture itself
0:07:23.250,0:07:28.900
if you enable the layers panel you can
0:07:26.620,0:07:31.330
see her picture as the default layer
0:07:28.900,0:07:34.180
available if you click on the third
0:07:31.330,0:07:36.220
button above you can add other layers on
0:07:34.180,0:07:37.210
the picture in order to adjust its
0:07:36.220,0:07:39.900
appearance
0:07:37.210,0:07:42.520
these are called adjustment layers
0:07:39.900,0:07:45.190
differently from the corrections inside
0:07:42.520,0:07:48.280
the enhanced tab the adjustment layers
0:07:45.190,0:07:51.220
can be edited and managed anytime and
0:07:48.280,0:07:54.430
applied in any order you like from up to
0:07:51.220,0:07:57.400
down in the layers list each adjustment
0:07:54.430,0:08:00.460
layer is composed by its settings on the
0:07:57.400,0:08:02.770
left and its layer mask on the right
0:08:00.460,0:08:06.099
used to define where such corrections
0:08:02.770,0:08:08.139
must be applied for example if the
0:08:06.099,0:08:10.479
adjustment is applied on the whole
0:08:08.139,0:08:12.070
picture the layer mask will be
0:08:10.479,0:08:14.650
completely white
0:08:12.070,0:08:16.870
if you apply any adjustment layer with
0:08:14.650,0:08:20.199
the selected area on the picture this
0:08:16.870,0:08:23.889
will be applied just within it as the
0:08:20.199,0:08:26.470
layer mask shows on the right you can
0:08:23.889,0:08:30.460
enable or disable each layer by clicking
0:08:26.470,0:08:34.409
on the eye icon on the Left four deleted
0:08:30.460,0:08:37.060
by clicking on the bin button above
0:08:34.409,0:08:42.070
whereas to edit the adjustment again
0:08:37.060,0:08:43.340
just double-click on the left icon on
0:08:42.070,0:08:45.590
the left you have other two
0:08:43.340,0:08:48.140
rules collected under the draw section
0:08:45.590,0:08:51.200
used to draw on the picture by brushing
0:08:48.140,0:08:53.120
on it thanks for watching this video
0:08:51.200,0:08:56.240
have a look at our channel to discover
0:08:53.120,0:08:58.750
more professional and free video guides
0:08:56.240,0:08:58.750
and tutorials
standard: en
Profiles
Profile 1
| Purpose | Tutorial (why) |
|---|---|
| Content | |
| Participants | nameless (f) model, Photoshop (m) geek |
| Form | Tutorial (how) |
| Time | |
| Place |
Profile 2
| Purpose | Tutorial |
|---|---|
| Content | Scene |
| Participants | Photoshop (m) geek |
| Form | Tutorial (how) |
| Time | Real time |
| Place | Desktop |