Photoshop Elements 12 - Tutorial for Beginners [COMPLETE]
Figuration: Tutorial
Description
Full Guide here: http://bit.ly/adobeelements12
Enable SUBTITLES if you have troubles at understanding the accent. Leave feedback if you can!
Welcome to The Skills Factory™! A new brilliant Latin teacher will guide you through the most important softwares awailable. Leave a comment to make tutorial requests! Subscribe to start learning anything! ♥ Muah!
Metadata
| Video ID | 175 | Youtube URL | Photoshop Elements 12 - Tutorial for Beginners [COMPLETE] |
|---|---|
| Captions Available | Yes |
| Captions Downloadable | Yes |
| Playlists | |
| Duration | 00:14:16 |
| Definition | hd |
| Keywords | |
| License | youtube |
| Embeddable | Yes |
| Views | 155592 |
| Likes | 311 |
| Dislikes | 48 |
| Favourites | 0 |
| Comments | 58 |
| Created | 2017-05-04 1:00:43 PM |
| Updated | 2017-05-04 1:11:52 PM |
Captions
ASR: en
0:00:09.650,0:00:15.540
hello people welcome to this video let's
0:00:12.929,0:00:18.500
see together adobe photoshop elements 12
0:00:15.540,0:00:21.420
and all the bases you need to use it
0:00:18.500,0:00:24.660
correct us in comments if you find
0:00:21.420,0:00:28.320
mistakes in our english to find what
0:00:24.660,0:00:32.040
interests you check the quick index in
0:00:28.320,0:00:35.520
the video description photoshop elements
0:00:32.040,0:00:39.000
12 can be seen as a smaller software
0:00:35.520,0:00:42.030
than photoshop that includes features to
0:00:39.000,0:00:45.329
adjust your photos fine this is a
0:00:42.030,0:00:48.120
software outside the rental model so you
0:00:45.329,0:00:51.600
can have it without any subscription to
0:00:48.120,0:00:54.559
Creative Cloud when you open the
0:00:51.600,0:00:57.899
software a Welcome window appears
0:00:54.559,0:01:01.829
Elements 12 is composed by two main
0:00:57.899,0:01:05.460
parts the photo editor the lets you edit
0:01:01.829,0:01:08.430
photos and the organizer use the to
0:01:05.460,0:01:11.970
manage photos create groups of them and
0:01:08.430,0:01:16.140
so on we will see this in another video
0:01:11.970,0:01:19.170
tutorial the photo editor is divided in
0:01:16.140,0:01:22.259
three main workspaces the quick mode
0:01:19.170,0:01:25.070
lets you edit a photo quickly easily and
0:01:22.259,0:01:29.520
without going too much in detail the
0:01:25.070,0:01:32.310
guided one goes more into deep but still
0:01:29.520,0:01:37.409
the software loss defect or the
0:01:32.310,0:01:41.009
correction added the expert mode is more
0:01:37.409,0:01:44.670
like Adobe Photoshop with editing and
0:01:41.009,0:01:47.270
effects rude fully on your own if you
0:01:44.670,0:01:50.600
are interested in the expert workspace
0:01:47.270,0:01:53.280
watch the related video in this show
0:01:50.600,0:01:56.689
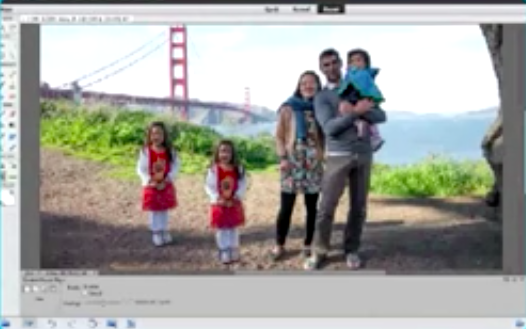
let's see now how to use the quick
0:01:53.280,0:02:01.530
workspace you can open an image fast
0:01:56.689,0:02:03.990
dragging it onto your workspace you can
0:02:01.530,0:02:06.240
open more of them and these will be
0:02:03.990,0:02:10.259
shown and listed through the photo bin
0:02:06.240,0:02:13.170
button simply double click on a photo to
0:02:10.259,0:02:16.880
show it in the main workspace above
0:02:13.170,0:02:20.250
click on photo being again to I the list
0:02:16.880,0:02:24.000
above the workspace you can use the zoom
0:02:20.250,0:02:27.209
bar to zoom in and out these can be done
0:02:24.000,0:02:31.680
anytime holding all down and using your
0:02:27.209,0:02:34.230
mouse wheel view on the Left lets you
0:02:31.680,0:02:38.130
see the after and the before of the
0:02:34.230,0:02:41.220
photo interested after simply means the
0:02:38.130,0:02:43.849
photo after your Corrections whereas
0:02:41.220,0:02:48.300
before is how the photo looks like
0:02:43.849,0:02:51.810
originally you can show them both to see
0:02:48.300,0:02:55.260
better the differences below you have
0:02:51.810,0:02:57.959
some important buttons rotate rotates
0:02:55.260,0:03:02.940
the image following the direction of the
0:02:57.959,0:03:06.180
icon clockwise or not next tweet you
0:03:02.940,0:03:10.700
have the undo and redo buttons to go
0:03:06.180,0:03:14.100
backward and forward the directions done
0:03:10.700,0:03:18.510
then you have the organizer button that
0:03:14.100,0:03:20.930
opens the organizer tool options shows
0:03:18.510,0:03:24.380
the settings of the current tool used
0:03:20.930,0:03:27.989
these tools are fully listed on the left
0:03:24.380,0:03:30.630
they are divided into groups the first
0:03:27.989,0:03:34.380
one collects all the tools to view your
0:03:30.630,0:03:40.590
image pattern to zoom you can use the
0:03:34.380,0:03:43.290
zoom tool to the end tool is useful when
0:03:40.590,0:03:46.140
the image is enlarged in your workspace
0:03:43.290,0:03:49.530
and you want to move to another part of
0:03:46.140,0:03:53.430
the image you can activate it any time
0:03:49.530,0:03:56.880
holding space down the second group of
0:03:53.430,0:04:00.060
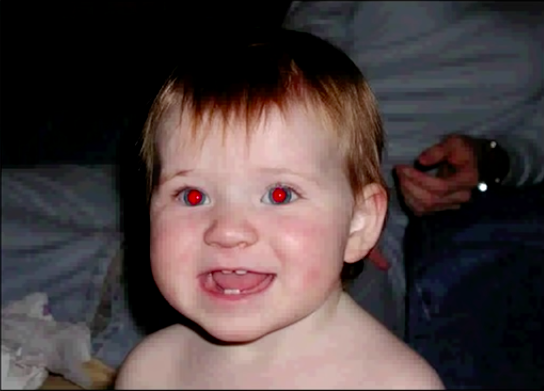
tools edits the photo instead the red
0:03:56.880,0:04:03.209
eye removal tool is used to remove red
0:04:00.060,0:04:06.810
eyes simply click and drag to create a
0:04:03.209,0:04:09.380
rectangle these must cover and most the
0:04:06.810,0:04:13.590
wall I to remove the red color
0:04:09.380,0:04:16.410
successfully use whiten teeth to enhance
0:04:13.590,0:04:19.410
people's teeth in your image the
0:04:16.410,0:04:23.310
corrected area will be indicated under
0:04:19.410,0:04:26.940
dash the contours spot telling brush
0:04:23.310,0:04:31.230
tool is used to make people's faces more
0:04:26.940,0:04:34.050
perfect it k correct spots small
0:04:31.230,0:04:37.350
injuries and read parts of the skin and
0:04:34.050,0:04:44.760
so on simply brush on the interested
0:04:37.350,0:04:47.070
area to make it more uniform in the tool
0:04:44.760,0:04:50.340
options so you can choose the other tool
0:04:47.070,0:04:53.010
the alien brush tool that is better in
0:04:50.340,0:04:55.830
case the bad part is too big to be
0:04:53.010,0:04:59.370
covered with the spot alien brush tool
0:04:55.830,0:05:04.380
in this case you need to define a search
0:04:59.370,0:05:07.370
all down and click to set the source so
0:05:04.380,0:05:10.350
where the brush must start copying from
0:05:07.370,0:05:13.170
while you brush it will be pasted what
0:05:10.350,0:05:18.690
is below the small cross you see that
0:05:13.170,0:05:21.570
represents the surface then you have the
0:05:18.690,0:05:25.170
crop tool use the to cut off parts of
0:05:21.570,0:05:28.320
the image you don't want click and drag
0:05:25.170,0:05:31.350
to set the area you can adjust it
0:05:28.320,0:05:33.930
through the tool options below for
0:05:31.350,0:05:38.850
example the kind of crop or the correct
0:05:33.930,0:05:42.480
sides click and drag inside to move drag
0:05:38.850,0:05:46.680
the squares to reside approach external
0:05:42.480,0:05:49.740
squares to rotate to crop a click on the
0:05:46.680,0:05:54.090
green icon remember that you can come
0:05:49.740,0:05:57.690
back using the undo button below the
0:05:54.090,0:06:01.020
text tool is used to add some text click
0:05:57.690,0:06:04.410
and drag to create a text box you can
0:06:01.020,0:06:07.620
set font and sides below you can manage
0:06:04.410,0:06:11.280
the text box just like the crop area
0:06:07.620,0:06:14.460
just seen if you all the control down
0:06:11.280,0:06:19.080
while resizing you will apply this also
0:06:14.460,0:06:21.780
to its text inside if you delete the
0:06:19.080,0:06:25.680
text content you will remove the text
0:06:21.780,0:06:29.040
box as well remember to apply using the
0:06:25.680,0:06:33.390
green icon you have other text tools
0:06:29.040,0:06:35.400
here below just try them out a very
0:06:33.390,0:06:39.330
important tool is the quick selection
0:06:35.400,0:06:40.740
tool this selects auto parts of the
0:06:39.330,0:06:44.280
images in a smart
0:06:40.740,0:06:48.319
way you can start with your selection
0:06:44.280,0:06:51.509
right clicking and going to deselect
0:06:48.319,0:06:58.919
selection brush tool is a selection made
0:06:51.509,0:07:01.130
depending on where you brush selection
0:06:58.919,0:07:03.960
is very important for the effects and
0:07:01.130,0:07:07.259
adjustments you will apply using the
0:07:03.960,0:07:09.960
panel on the right if nothing is
0:07:07.259,0:07:13.349
selected these will be applied on the
0:07:09.960,0:07:16.139
wall image if you have selected an area
0:07:13.349,0:07:19.919
just what is inside such will be
0:07:16.139,0:07:22.979
affected you have done the move tool
0:07:19.919,0:07:26.430
this is used to select and move objects
0:07:22.979,0:07:30.539
for example a text box or a selected
0:07:26.430,0:07:34.050
area on the bottom right corner you have
0:07:30.539,0:07:37.440
other different buttons adjustments is
0:07:34.050,0:07:39.630
used to correct the photo effects and
0:07:37.440,0:07:42.900
text tools are similar and always
0:07:39.630,0:07:46.979
applied on the wall image simply click
0:07:42.900,0:07:50.310
once to apply the effect use undo button
0:07:46.979,0:07:53.759
to come back to the original photo you
0:07:50.310,0:07:56.159
can even add frames to select one and
0:07:53.759,0:08:04.580
then adjust the photo inside with the
0:07:56.159,0:08:08.219
move tool lets see the adjustments panel
0:08:04.580,0:08:11.340
each section corrects a different aspect
0:08:08.219,0:08:14.610
of the image for example its color or
0:08:11.340,0:08:17.940
its lightness you can aid in different
0:08:14.610,0:08:22.229
ways you can scroll the bar to change
0:08:17.940,0:08:25.469
value you can select the sample picture
0:08:22.229,0:08:28.530
more at the bottom or if possible you
0:08:25.469,0:08:32.219
can click on auto to let the software
0:08:28.530,0:08:34.740
put the correct value the correct
0:08:32.219,0:08:36.659
settings on each section lets you
0:08:34.740,0:08:39.959
announce the photo quickly and very
0:08:36.659,0:08:43.730
easily let's see now the guided
0:08:39.959,0:08:47.070
workspace on the left you find again the
0:08:43.730,0:08:49.560
visualization tools and so the view and
0:08:47.070,0:08:53.040
the zoomable and the buttons at the
0:08:49.560,0:08:55.500
bottom what changes is the
0:08:53.040,0:08:58.050
panel on the right these lets you add
0:08:55.500,0:09:01.320
effects and editing is more in too deep
0:08:58.050,0:09:06.110
then with the quick mode since it is you
0:09:01.320,0:09:09.870
the set DS we not already made presets
0:09:06.110,0:09:12.870
there are three main sections that shops
0:09:09.870,0:09:17.480
is used to enhance the photo for the
0:09:12.870,0:09:17.480
effects to add effects the way you like
0:09:22.100,0:09:30.350
photo play our artwork so you can make
0:09:25.500,0:09:30.350
with your photo changing its appearance
0:09:31.009,0:09:37.829
let's see the touch-ups when you select
0:09:35.190,0:09:41.250
one of the adjustments the panel will
0:09:37.829,0:09:44.519
change the adjustment process is fully
0:09:41.250,0:09:47.639
guided but under your control at the
0:09:44.519,0:09:51.329
same time much more than in the quick
0:09:47.639,0:09:54.360
work space below you always have two
0:09:51.329,0:09:58.019
buttons click on done if you want to
0:09:54.360,0:10:02.670
apply the adjustment chosen use cancel
0:09:58.019,0:10:05.670
to forget about it some of these
0:10:02.670,0:10:08.519
adjustments have inside tools included
0:10:05.670,0:10:12.269
then you can activate clicking on the
0:10:08.519,0:10:14.329
tool name the structure is right made to
0:10:12.269,0:10:18.029
guide you through the enhancement
0:10:14.329,0:10:21.540
step-by-step point-by-point follow the
0:10:18.029,0:10:24.000
software to get through the same works
0:10:21.540,0:10:28.290
in the photo effects and the photo play
0:10:24.000,0:10:30.920
sections try them out once done with
0:10:28.290,0:10:34.170
your photo check the top right corner
0:10:30.920,0:10:38.130
use share to share the photon social
0:10:34.170,0:10:42.110
networks use file and then save as to
0:10:38.130,0:10:44.699
save and export your photo once adjusted
0:10:42.110,0:10:47.850
there are more things this software can
0:10:44.699,0:10:51.410
do in the top right corner you have
0:10:47.850,0:10:55.290
created these lets you create slideshows
0:10:51.410,0:10:58.230
calendars photo books and so on when you
0:10:55.290,0:11:01.319
create calendars or photo books so
0:10:58.230,0:11:04.920
different pages with photos the process
0:11:01.319,0:11:06.780
is fully guided you choose the preset
0:11:04.920,0:11:10.110
the number of page
0:11:06.780,0:11:13.290
if an accessory then with the move and
0:11:10.110,0:11:16.740
the text tools you can size and move the
0:11:13.290,0:11:19.920
photo and edit the preset text or add
0:11:16.740,0:11:25.710
some on your own on the right you can
0:11:19.920,0:11:28.560
check in each ship of paper change the
0:11:25.710,0:11:32.820
preset itself and the background to be
0:11:28.560,0:11:35.400
used there are plenty of options you can
0:11:32.820,0:11:39.000
fully customize the preset chosen at
0:11:35.400,0:11:41.850
first if you want to exit from the
0:11:39.000,0:11:45.600
create section simply click on the one
0:11:41.850,0:11:49.140
of the basic workspaces you won't lose
0:11:45.600,0:11:52.410
the create preset simply open the photo
0:11:49.140,0:11:55.560
bin the presets and the adjusted images
0:11:52.410,0:11:58.800
can be recognized for a small brush icon
0:11:55.560,0:12:01.710
in a corner when you want to create a
0:11:58.800,0:12:04.850
slideshow set all the settings and the
0:12:01.710,0:12:08.460
photo duration a new window will be open
0:12:04.850,0:12:11.760
through the organizer showing you all to
0:12:08.460,0:12:13.830
create a slideshow on the center you
0:12:11.760,0:12:18.090
have a preview of the photo and the
0:12:13.830,0:12:20.820
player below you have the timeline it is
0:12:18.090,0:12:24.030
composed by different slides the bigger
0:12:20.820,0:12:27.180
squares and the transitions indicated
0:12:24.030,0:12:30.270
through smaller squares the slides
0:12:27.180,0:12:33.020
represent a fixed picture the desert
0:12:30.270,0:12:35.700
duration in time indicated below and
0:12:33.020,0:12:39.840
property is indicated for the properties
0:12:35.700,0:12:43.500
section on the right this light can be a
0:12:39.840,0:12:47.790
unique photo a video or a composition of
0:12:43.500,0:12:51.330
them in fact you can drag on it photos
0:12:47.790,0:12:54.450
and videos from your computer to add new
0:12:51.330,0:12:57.800
slides instead you can click on add
0:12:54.450,0:13:01.290
media import from your computer or your
0:12:57.800,0:13:04.500
collections in the organizer at the
0:13:01.290,0:13:09.570
blank slide adds blank slide to your
0:13:04.500,0:13:14.070
Timeline open a slide clicking on it or
0:13:09.570,0:13:17.880
using your mouse wheel right click and
0:13:14.070,0:13:19.610
go to delete slide to delete it you can
0:13:17.880,0:13:22.399
add text to
0:13:19.610,0:13:26.269
click to add text to add text on the
0:13:22.399,0:13:29.750
selected slide you can manage it through
0:13:26.269,0:13:33.380
the properties section on the right you
0:13:29.750,0:13:36.620
can edit the transitions to select one
0:13:33.380,0:13:40.610
and go to properties on the right to set
0:13:36.620,0:13:44.209
duration and kind you can add body as
0:13:40.610,0:13:48.079
well go to add media and choose to add
0:13:44.209,0:13:52.190
audio it will right start when the slide
0:13:48.079,0:13:55.279
show starts to export your slideshow
0:13:52.190,0:13:59.300
click on output and choose sides on
0:13:55.279,0:14:01.550
location this is all check our show to
0:13:59.300,0:14:06.310
get more into adobe photoshop elements
0:14:01.550,0:14:06.310
12 thanks for watching
0:14:11.990,0:14:14.050
you
standard: en
Profiles
Profile 1
| Purpose | Tutorial (why) |
|---|---|
| Content | |
| Participants | nameless (f) model, nameless (m) model, Photoshop (f) geek |
| Form | Tutorial (how) |
| Time | |
| Place |
Profile 2
| Purpose | Tutorial |
|---|---|
| Content | Portrait, Scene |
| Participants | Photoshop (f) geek |
| Form | Tutorial (how) |
| Time | Real time |
| Place | Desktop |