Photoshop Tutorial - Flower Face Effects
Figuration: Tutorial
Description
SUBSCRIBE my channel for more tutorials ► http://bit.ly/rafy-A
Stock Credits
Model : https://pixabay.com/en/girl-eyes-makeup-sexy-glamor-237871/
Flowers Png : http://maky-orel.deviantart.com/art/PNG-STOCK-SET-Petunia-flower-1-355947340
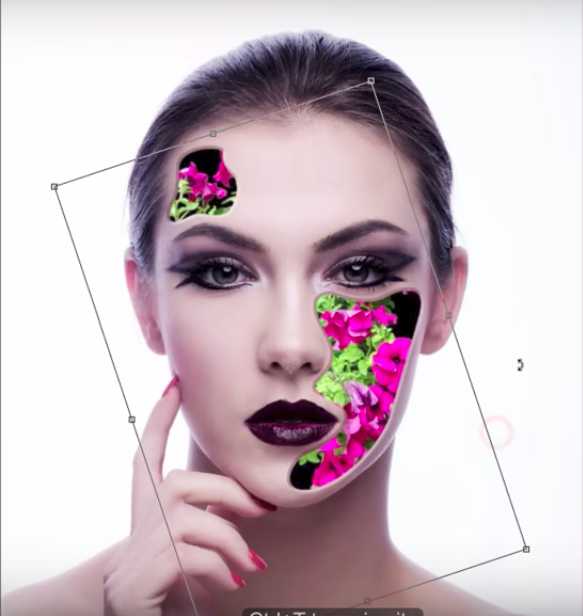
Stay Connected:
Facebook ► https://www.facebook.com/rafyA88
Google+ ► http://bit.ly/rafyA_
Intagram ► https://www.instagram.com/rafya88
Watch More Tutorials ► http://www.rafy-a.com
Thanks for watching.
____________________
Music by :
"Mesmerize" Kevin MacLeod (incompetech.com)
Licensed under Creative Commons: By Attribution 3.0 License
http://creativecommons.org/licenses/by/3.0/
Metadata
| Video ID | 182 | Youtube URL | Photoshop Tutorial - Flower Face Effects |
|---|---|
| Captions Available | Yes |
| Captions Downloadable | Yes |
| Playlists | |
| Duration | 00:10:34 |
| Definition | hd |
| Keywords | |
| License | youtube |
| Embeddable | Yes |
| Views | 53246 |
| Likes | 1030 |
| Dislikes | 10 |
| Favourites | 0 |
| Comments | 54 |
| Created | 2017-05-04 1:00:43 PM |
| Updated | 2017-05-04 1:11:58 PM |
Captions
standard: en
1
00:00:16,900 --> 00:00:20,900
so today we have some fun editing tricks by using photoshop, I hope you enjoying this video :)
2
00:00:21,333 --> 00:00:24,533
Let's get started!..
3
00:00:24,866 --> 00:00:32,932
first, create a new Solid Color (black) layer.
4
00:00:38,200 --> 00:00:44,733
duplicate the Model and drag it on the top.
5
00:00:46,533 --> 00:00:50,533
let me rename the layer as Model.
6
00:00:52,833 --> 00:00:56,833
select the Pen tool (P)
7
00:01:01,266 --> 00:01:05,266
we start to make selection on the face parts, see how it works.
8
00:01:27,833 --> 00:01:31,833
right Click & hit Make Selection then OK
9
00:01:34,100 --> 00:01:40,333
select Marquee tool (M), right Click & copy it via Cut
10
00:01:44,566 --> 00:01:48,566
and we got this result..
11
00:01:51,633 --> 00:01:59,366
now, I will make another one using the same technique.
12
00:02:21,833 --> 00:02:25,833
then it will look like this :D
13
00:02:28,533 --> 00:02:32,533
next, double Click on the Model & choose Bevel & Emboss
14
00:02:33,666 --> 00:02:37,666
and refer to the following settings
15
00:03:20,066 --> 00:03:24,066
* hiding layers *
16
00:03:25,966 --> 00:03:29,966
Drag the Flowers and drop it onto main project using Move tool (V)
17
00:03:33,266 --> 00:03:37,266
I will drag it to the bottom of the model
18
00:03:40,333 --> 00:03:44,333
Ctrl+T to resize it .
19
00:03:58,100 --> 00:04:00,566
press enter or Ok when you done!
20
00:04:01,033 --> 00:04:05,033
duplicate the layer & drag it on the top of the model
21
00:04:08,100 --> 00:04:12,100
load the selection, press Ctrl & Click on the model layer
22
00:04:15,766 --> 00:04:19,766
then adding a layer mask
23
00:04:19,900 --> 00:04:23,900
Ctrl+I to invert .
24
00:04:25,033 --> 00:04:39,533
use the Brush tool (B) with White, we will restore parts of the Flowers
25
00:05:05,700 --> 00:05:09,700
create a new layer on the top of the Flower, & use the Brush tool (B) with black.
26
00:05:13,466 --> 00:05:17,466
and paint it as follows .
27
00:05:27,466 --> 00:05:31,466
* reduce the Opacity *
28
00:05:46,166 --> 00:05:50,166
Ctrl+J to Duplicate layer & Ctrl+T to resize it
29
00:05:56,500 --> 00:06:14,866
and do it like the previous technique
30
00:06:26,433 --> 00:06:28,533
and it look like this :)
31
00:06:32,400 --> 00:06:36,400
* restore the hidden layer *
32
00:06:38,333 --> 00:06:41,066
Ctrl+T
33
00:07:03,200 --> 00:07:05,933
* restore the hidden layer *
34
00:07:08,466 --> 00:07:12,466
Ctrl+T to select it
35
00:07:14,333 --> 00:07:18,333
Double on the skin part & next, choose Bevel & Emboss, do like so ..
36
00:07:32,400 --> 00:07:36,400
oops.. I will reduce the Dept .
37
00:07:58,733 --> 00:08:02,733
now, select the Model layer, & create a new adjustment layer - Hue/Saturation.
38
00:08:04,400 --> 00:08:08,400
clip to layer below, & bring down the Saturation all the way (-100)
39
00:08:09,700 --> 00:08:13,700
and increase the Lightness just a bit
40
00:08:16,166 --> 00:08:20,166
making Group of skin part layer
41
00:08:26,266 --> 00:08:34,132
create a new - Hue/Saturation, clip layer below. and do like the model layer
42
00:08:45,200 --> 00:08:49,200
* let me fix this layer edges *
43
00:09:30,266 --> 00:09:34,266
last step, press Ctrl+Shift+Alt+E to merge visible
44
00:09:34,900 --> 00:09:40,500
I will add some textures to this project, see how it works :)
45
00:10:15,000 --> 00:10:19,000
and we done :)
46
00:10:19,933 --> 00:10:21,899
thanks for watching & liking :)
Profiles
Profile 1
| Purpose | Tutorial (why) |
|---|---|
| Content | |
| Participants | nameless (f) model, Photoshop geek |
| Form | Tutorial (how) |
| Time | |
| Place |
Profile 2
| Purpose | Tutorial |
|---|---|
| Content | Portrait |
| Participants | nameless (f) model |
| Form | Tutorial (how), music |
| Time | Real time |
| Place | Desktop |
Profile 4
| Purpose | |
|---|---|
| Content | Portrait |
| Participants | |
| Form | |
| Time | |
| Place |