Photoshop Tutorial: How to Transform a Photo into a Spray-painted, Stenciled Portrait!
Figuration: Tutorial
Description
IMPORTANT: TURN ON YOUR YOUTUBE ANNOTATIONS!
Tiled Wall PSD file:
http://bltvfiles.com/files/Tile%20Wall.zip
Vinca Stencil Regular font:
http://bltvfiles.com/files/vinca_stencil.ttf
Marilyn Monroe file:
http://goo.gl/pfPGBB
Public Domain License:
https://commons.wikimedia.org/wiki/File:Marilyn_Monroe_in_1952.jpg
In-depth tutorial on “Refine Edge”:
http://goo.gl/mYMiE2
In-depth tutorial on “Select and Mask”:
https://goo.gl/I9RhVC
Royalty-Free Music provided by http://www.beatsuite.com
High quality, copyright-free music for YouTube.
Music track: "Replay the Night"
For a limited time, get 20% off Photoshop CC + Lightroom + more all together for $7.99/month p/month!:
Click: http://goo.gl/QFznn7
Become a Patron to Blue Lighting TV:
https://www.patreon.com/bluelightningtv
BLTV TV Channel:
https://www.youtube.com/user/bluelightningtv
BLTV Website:
http://www.bluelightningtv.com/
BLTV Facebook:
https://www.facebook.com/Blue-Lightning-TV-330761246941375/
BLTV Facebook “Subscriber Page”:
https://www.facebook.com/BLTVsubscribers
Tumblr:
http://bluelightningtv.tumblr.com/
Twitter:
https://twitter.com/bluelightningtv
Google+:
https://plus.google.com/u/0/+MartyGeller
Pinterest:
https://www.pinterest.com/bluelightningtv/
LinkedIn:
www.linkedin.com/in/martygeller
Metadata
| Video ID | 183 | Youtube URL | Photoshop Tutorial: How to Transform a Photo into a Spray-painted, Stenciled Portrait! |
|---|---|
| Captions Available | Yes |
| Captions Downloadable | Yes |
| Playlists | |
| Duration | 00:10:21 |
| Definition | hd |
| Keywords | |
| License | youtube |
| Embeddable | Yes |
| Views | 30254 |
| Likes | 691 |
| Dislikes | 5 |
| Favourites | 0 |
| Comments | 146 |
| Created | 2017-05-04 1:00:43 PM |
| Updated | 2017-05-04 1:11:58 PM |
Captions
ASR: en
0:00:00.000,0:00:05.759
hi this is Marty from Blue Lightning TV
0:00:02.689,0:00:08.820
I'm going to show you how to transform
0:00:05.759,0:00:16.500
photos into the look of spray painted
0:00:08.820,0:00:19.560
stencil portraits with tags I provided a
0:00:16.500,0:00:21.270
PSD file so you can follow along it's
0:00:19.560,0:00:24.630
link is located in my video's
0:00:21.270,0:00:27.869
description or project files it includes
0:00:24.630,0:00:30.660
two layers a tiled wall which will place
0:00:27.869,0:00:33.210
our stencil portrait on two and a semi
0:00:30.660,0:00:35.760
transparent layer of the tiles grout and
0:00:33.210,0:00:38.520
grime which will place on top of our
0:00:35.760,0:00:39.840
portrait before we begin I want to
0:00:38.520,0:00:41.790
mention that I'll be going a little
0:00:39.840,0:00:44.850
faster in this tutorial for more
0:00:41.790,0:00:46.440
advanced users open a photo of someone
0:00:44.850,0:00:48.930
that you'd like to use for this project
0:00:46.440,0:00:51.539
if you'd like to use this public domain
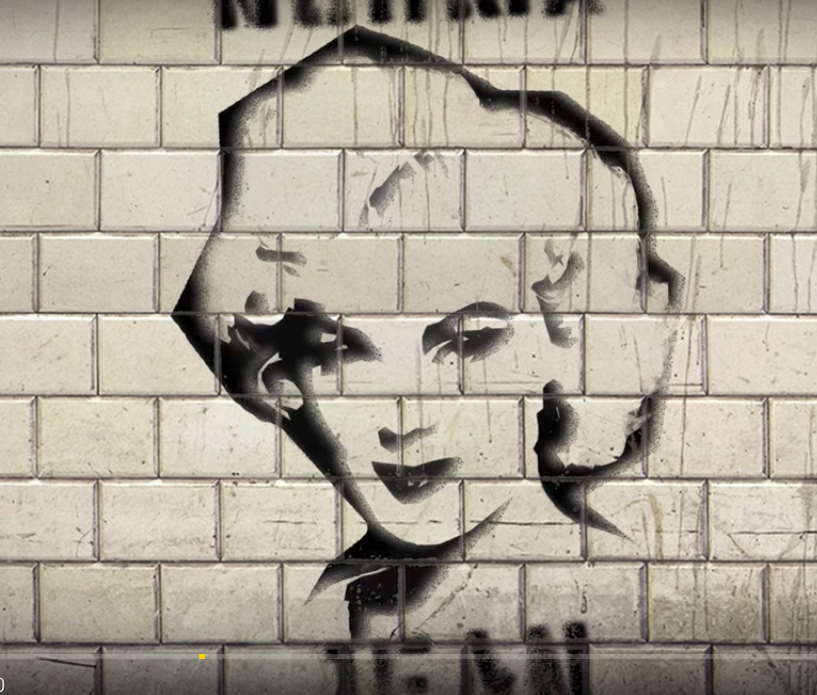
0:00:48.930,0:00:54.120
photo of Marilyn Monroe I provided its
0:00:51.539,0:00:57.090
link as well to place your image onto
0:00:54.120,0:00:58.920
the tiled background drag it onto the
0:00:57.090,0:01:01.859
tab of the background and without
0:00:58.920,0:01:05.430
releasing your mouse or pen drag it down
0:01:01.859,0:01:07.830
onto the image and release to resize and
0:01:05.430,0:01:11.850
position it open your transform tool by
0:01:07.830,0:01:13.830
pressing ctrl or command T go to a
0:01:11.850,0:01:16.890
corner and when you see a diagonal
0:01:13.830,0:01:20.400
double-arrow press and hold alt or
0:01:16.890,0:01:23.549
option + shift as you drag your photo in
0:01:20.400,0:01:26.369
or out leaving enough room for your text
0:01:23.549,0:01:28.439
next we'll make a selection around our
0:01:26.369,0:01:30.450
subject so we can cut it out from its
0:01:28.439,0:01:32.490
background there are many ways to do
0:01:30.450,0:01:34.680
this and your method should depend on
0:01:32.490,0:01:36.720
the characteristics of your photo for
0:01:34.680,0:01:39.509
this example I'll use the quick
0:01:36.720,0:01:42.990
selection tool if you're using this tool
0:01:39.509,0:01:45.720
as well drag it over your subject to
0:01:42.990,0:01:48.390
remove areas of the selection press and
0:01:45.720,0:01:50.909
hold alt or option as you drag over
0:01:48.390,0:01:53.130
those areas once your subject has a
0:01:50.909,0:01:55.860
selection surrounding it click your
0:01:53.130,0:01:58.110
refine edge tool or if you're working on
0:01:55.860,0:02:02.159
version twenty fifteen point five or
0:01:58.110,0:02:07.060
later click select and mask you can also
0:02:02.159,0:02:10.149
go to select and select and mask or we
0:02:07.060,0:02:11.950
fine edge I did in-depth tutorials on
0:02:10.149,0:02:15.810
both tools so if you'd like to watch
0:02:11.950,0:02:15.810
them I provided their links as well
0:02:16.790,0:02:23.870
I'll make the view mode on black
0:02:20.560,0:02:26.330
and click smart radius
0:02:23.870,0:02:28.580
I'll drag my brush over the edge of the
0:02:26.330,0:02:32.510
hair
0:02:28.580,0:02:35.980
and output it to a new layer
0:02:32.510,0:02:35.980
then click ok
0:02:37.090,0:02:41.960
ctrl-click or command click the new
0:02:39.380,0:02:45.140
layer icon to make a new layer below the
0:02:41.960,0:02:48.020
active layer will fill the empty layer
0:02:45.140,0:02:49.970
with white but first if your foreground
0:02:48.020,0:02:52.580
and background colors aren't black and
0:02:49.970,0:02:55.040
white respectively press D on your
0:02:52.580,0:02:58.820
keyboard since white is the background
0:02:55.040,0:03:02.090
color press ctrl or command + delete to
0:02:58.820,0:03:04.640
fill the layer with white make the top
0:03:02.090,0:03:06.680
layer active will convert it into a
0:03:04.640,0:03:09.320
smart object so we can modify it
0:03:06.680,0:03:11.540
non-destructively as well as allow us to
0:03:09.320,0:03:14.300
replace the photo with another without
0:03:11.540,0:03:15.890
having to redo all the effects click the
0:03:14.300,0:03:21.250
icon at the upper right of the layers
0:03:15.890,0:03:21.250
panel and click convert to smart object
0:03:23.840,0:03:30.940
go to image adjustments and threshold
0:03:31.460,0:03:37.910
the threshold level defaults to 128 for
0:03:35.420,0:03:40.040
most images this should be fine but feel
0:03:37.910,0:03:43.250
free to adjust this amount depending on
0:03:40.040,0:03:47.530
the characteristics of your photo go to
0:03:43.250,0:03:47.530
filter and filter gallery
0:03:49.460,0:03:57.980
open the artistic folder and click cut
0:03:53.390,0:04:02.660
out make the number of levels to the
0:03:57.980,0:04:06.920
edge simplicity 5 and the edge fidelity
0:04:02.660,0:04:09.930
one then click OK
0:04:06.920,0:04:12.900
next we'll paint out areas that we don't
0:04:09.930,0:04:14.790
want in our stencil and add black around
0:04:12.900,0:04:18.660
white areas so that we can ultimately
0:04:14.790,0:04:21.570
see those white areas click the layer
0:04:18.660,0:04:23.630
mask icon to make a layer mask next to
0:04:21.570,0:04:27.130
our subject
0:04:23.630,0:04:30.490
open your pencil tool
0:04:27.130,0:04:32.980
and pencil picker will adjust the size
0:04:30.490,0:04:35.980
in a moment with our bracket keys make
0:04:32.980,0:04:38.230
sure its hardness and opacity are both a
0:04:35.980,0:04:42.940
hundred percent then press Enter or
0:04:38.230,0:04:45.130
return adjust the pencil size and draw
0:04:42.940,0:04:47.890
over areas of black that you don't want
0:04:45.130,0:04:52.410
in your portrait to add black around the
0:04:47.890,0:04:56.350
white areas make the white layer active
0:04:52.410,0:04:58.540
adjust your pencil size and draw angular
0:04:56.350,0:05:01.810
shapes around the white areas of your
0:04:58.540,0:05:04.990
subject to remove unwanted black areas
0:05:01.810,0:05:07.270
press X on your keyboard and draw over
0:05:04.990,0:05:09.550
those areas you can also make a layer
0:05:07.270,0:05:12.670
above your subject to paint in white
0:05:09.550,0:05:14.620
over those unwanted black areas continue
0:05:12.670,0:05:17.290
to finesse your image until you're happy
0:05:14.620,0:05:19.660
with your stencil will make the two
0:05:17.290,0:05:23.020
layers that comprise our portrait into
0:05:19.660,0:05:25.420
one smart object shift-click the top
0:05:23.020,0:05:29.289
layer to make it active as well and
0:05:25.420,0:05:32.469
convert them into a smart object
0:05:29.289,0:05:36.029
make two copies of it by pressing ctrl
0:05:32.469,0:05:36.029
or command J twice
0:05:36.720,0:05:43.969
hide the two top layers and make the
0:05:40.680,0:05:50.320
bottom subject active
0:05:43.969,0:05:53.980
go to filter blur and Gaussian blur
0:05:50.320,0:05:56.490
blur it 10 pixels and click OK or press
0:05:53.980,0:05:59.759
Enter or return
0:05:56.490,0:06:06.289
make the next layer visible and active
0:05:59.759,0:06:06.289
and change its blend mode to lighten
0:06:07.040,0:06:15.610
make the top layer visible and active
0:06:10.850,0:06:19.830
and change its blend mode to dissolve
0:06:15.610,0:06:22.360
reduce its opacity to twenty percent
0:06:19.830,0:06:24.640
presently your image doesn't look much
0:06:22.360,0:06:28.720
different until you make the bottom
0:06:24.640,0:06:33.009
subject active and with your move tool
0:06:28.720,0:06:35.569
drag it a bit up and to the left
0:06:33.009,0:06:38.539
shift-click the top layer to highlight
0:06:35.569,0:06:42.520
all three subject layers and convert
0:06:38.539,0:06:42.520
them into one smart object
0:06:42.639,0:06:47.710
we're ready to add text if you want to
0:06:45.669,0:06:49.840
reposition your portrait to make room
0:06:47.710,0:06:52.509
for your text you can use the arrow keys
0:06:49.840,0:06:54.159
on your keyboard to move your portrait
0:06:52.509,0:06:55.990
don't be concerned when you see the
0:06:54.159,0:07:00.999
tiled background behind it it's
0:06:55.990,0:07:04.659
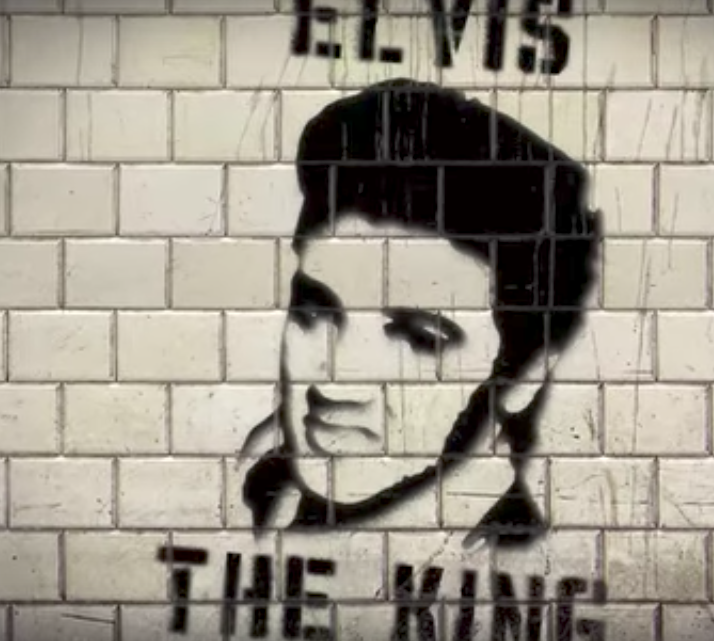
temporary open your type tool and pick a
0:07:00.999,0:07:06.939
stencil font i'm using vinca stencil
0:07:04.659,0:07:10.190
regular if you'd like to use it I
0:07:06.939,0:07:13.040
provided its link as well
0:07:10.190,0:07:17.680
I'll make it sighs a hundred sixty six
0:07:13.040,0:07:21.740
points sharp Center alignment and the
0:07:17.680,0:07:25.450
color is black click on your document
0:07:21.740,0:07:30.080
and type out your text to reposition it
0:07:25.450,0:07:33.020
open your move tool and move it to add
0:07:30.080,0:07:35.420
another line of text press T to open
0:07:33.020,0:07:37.690
back your type tool click on your
0:07:35.420,0:07:43.330
document and type out your text as
0:07:37.690,0:07:46.060
before open your move tool to move it
0:07:43.330,0:07:48.780
if you want to angle the text open your
0:07:46.060,0:07:48.780
transform tool
0:07:48.790,0:07:54.970
go to a corner and when you see a curved
0:07:51.880,0:07:57.190
double-arrow rotate it drag it to a
0:07:54.970,0:07:59.400
location you like and press Enter or
0:07:57.190,0:07:59.400
return
0:08:01.200,0:08:06.470
make the text layers into one smart
0:08:03.840,0:08:06.470
object
0:08:06.950,0:08:13.070
and make a copy of it
0:08:10.070,0:08:14.780
change the blend mode of the copy to
0:08:13.070,0:08:20.920
dissolve
0:08:14.780,0:08:25.810
go to filter blur and Gaussian blur
0:08:20.920,0:08:25.810
change the radius 25 pixels
0:08:27.490,0:08:33.760
make the bottom text layer active and
0:08:29.970,0:08:36.550
press ctrl or command F to repeat the
0:08:33.760,0:08:40.089
last filter which was a Gaussian blur of
0:08:36.550,0:08:43.029
five pixels drag the text layer to the
0:08:40.089,0:08:46.300
right a bit next we'll make our text
0:08:43.029,0:08:49.149
look more like it was spray painted
0:08:46.300,0:08:53.140
click the layer mask icon to make a
0:08:49.149,0:08:55.620
layer mask next to the active layer open
0:08:53.140,0:08:55.620
your brush tool
0:08:55.720,0:09:02.529
and brush picker make the hardness 0%
0:08:59.620,0:09:06.610
and the opacity and flow both a hundred
0:09:02.529,0:09:10.430
percent then press Enter or return
0:09:06.610,0:09:13.360
adjust your brush size and loosely brush
0:09:10.430,0:09:13.360
over your text
0:09:14.610,0:09:21.300
make the top text layer active and click
0:09:18.660,0:09:25.529
the layer mask icon to make a layer mask
0:09:21.300,0:09:28.950
next to it reduce the brushes opacity to
0:09:25.529,0:09:31.579
fifty percent and loosely brush over
0:09:28.950,0:09:31.579
your text
0:09:34.650,0:09:40.180
shift-click your portrait to highlight
0:09:37.300,0:09:42.710
it and your text layers and convert them
0:09:40.180,0:09:47.590
into a smart object
0:09:42.710,0:09:47.590
change its blend mode to multiply
0:09:48.930,0:09:54.570
and drag the layer between the tile
0:09:51.600,0:09:56.779
bevels layer and the tiled wall bottom
0:09:54.570,0:09:56.779
layer
0:09:57.529,0:10:03.620
if you want to angle your stenciled
0:09:59.899,0:10:06.820
image open your transform tool
0:10:03.620,0:10:06.820
and rotate it
0:10:12.980,0:10:19.700
this is Marty from Blue Lightning TV
0:10:16.070,0:10:19.700
thanks for watching
standard: en
0:00:00.520,0:00:03.080
Hi. This is Marty from Blue Lightning TV.
0:00:03.720,0:00:11.040
I'm going to show you how to transform photos
into the look of spray-painted, stencil portraits with text.
0:00:15.790,0:00:19.480
I provided a PSD file so you can follow along.
0:00:19.480,0:00:24.020
Its link is located in my video's description or project files.
0:00:24.020,0:00:30.100
It includes 2 layers: a tiled wall, which
we'll place our stenciled portrait onto and
0:00:30.100,0:00:36.440
a semi-transparent layer of the tiles' grout,
which we'll place on top of our portrait.
0:00:36.840,0:00:41.380
Before we begin, I want to mention that I'll
be going a little faster in this tutorial
0:00:41.390,0:00:43.210
for more advanced users.
0:00:43.620,0:00:47.040
Open a photo of someone that you'd like to
use for this project.
0:00:47.040,0:00:52.580
If you'd like to use this public domain photo
of Marilyn Monroe, I provided its link, as well.
0:00:52.920,0:00:58.780
To place you image onto the tiled wall background,
drag it onto the tab of the background and
0:00:58.790,0:01:04.420
without releasing your mouse or pen, drag
it down onto the image and release.
0:01:04.420,0:01:10.600
To resize and position it, open your Transform
Tool by pressing Ctrl or Cmd + T.
0:01:11.420,0:01:15.340
Go to a corner and when you see a diagonal, double-arrow,
0:01:15.340,0:01:21.780
press and hold Alt or Option +Shift as you drag out your photo in or out
0:01:21.780,0:01:23.999
leaving enough room for your text.
0:01:23.999,0:01:29.319
Next, we'll make a selection around our subject,
so we can cut it out from its background.
0:01:29.320,0:01:34.480
There are many ways to do this and your method
should depend on the characteristics of your photo.
0:01:34.480,0:01:38.280
For this example, I'll use the Quick Selection Tool.
0:01:38.280,0:01:42.260
If you're using this tool as well, drag it
over your subject.
0:01:42.780,0:01:49.420
To remove areas of the selection, press Alt
or Option as you drag over those areas.
0:01:49.860,0:01:55.380
Once your subject has a selection surrounding
it, click your Refine Edge Tool or if you're
0:01:55.389,0:02:01.780
working on version 2015.5 or later, click
"Select and Mask".
0:02:01.780,0:02:08.280
You can also go to Select and Select and Mask
or Refine Edge.
0:02:08.280,0:02:14.460
I did in-depth tutorials on both tools, so
if you'd like to watch them, I provided their links, as well.
0:02:17.310,0:02:23.110
I'll make the View Mode "On Black" and click
"Smart Radius".
0:02:24.460,0:02:31.400
I'll drag my brush over the edge of the hair
and output it to a "New Layer".
0:02:32.980,0:02:34.400
Then, click OK.
0:02:37.260,0:02:43.420
Ctrl-click or Cmd-click the new Layer icon
to make a new layer below the active layer.
0:02:43.960,0:02:49.560
We'll fill the empty layer with white, bur
first, if your foreground and background colors
0:02:49.560,0:02:53.860
aren't black and white respectively, press
"D" on your keyboard.
0:02:53.870,0:03:00.570
Since white is the background color, press
Ctrl or Cmd + Delete to fill the layer with white.
0:03:01.460,0:03:03.600
Make the top layer active.
0:03:03.600,0:03:08.040
We'll convert it into a Smart Object, so we
can modify it non-destructively,
0:03:08.040,0:03:13.920
as well as allow us to replace it with another photo without having to redo all the effects.
0:03:13.920,0:03:20.000
Click the icon at the upper right of the Layers panel and click "Convert to Smart Object".
0:03:24.360,0:03:29.340
Go to Image, Adjustments and Threshold.
0:03:31.880,0:03:35.220
The Threshold level defaults to 128.
0:03:35.220,0:03:40.000
For most images, this should be fine, but
feel free to adjust the amount depending on
0:03:40.000,0:03:42.140
the characteristics of your photo.
0:03:43.060,0:03:46.280
Go to Filter and Filter Gallery.
0:03:50.000,0:03:54.080
Open the Artistic folder and click "Cutout".
0:03:54.840,0:04:03.640
Make the number of Levels: 2, the Edge Simplicity:
5 and the Edge Fidelity: 1.
0:04:04.200,0:04:05.680
Then, click OK.
0:04:07.560,0:04:13.280
Next, we'll paint out areas that we don't
want in our stencil and add black around white
0:04:13.290,0:04:17.010
areas, so we can ultimately see those white areas.
0:04:17.940,0:04:22.860
Click the Layer Mask icon to make a layer
mask next to our subject.
0:04:24.160,0:04:28.940
Open your Pencil Tool and Pencil Picker.
0:04:29.500,0:04:32.820
We'll adjust the size in a moment with our Bracket keys.
0:04:32.820,0:04:37.140
Make sure its Hardness and Opacity are both 100%.
0:04:37.140,0:04:39.260
Then, press Enter or Return.
0:04:40.280,0:04:46.380
Adjust the pencil size and draw over areas
of black that you don't want in your portrait.
0:04:46.380,0:04:55.200
To add black around the white areas, make
the white layer active, adjust your Pencil size
0:04:55.200,0:04:59.480
and draw angular shapes around white
areas of your subject.
0:04:59.480,0:05:06.140
To remove unwanted black areas, press "x"
on your keyboard and draw over those areas.
0:05:06.140,0:05:12.120
You can also make a layer above your subject
to paint in white over those unwanted black areas.
0:05:12.120,0:05:15.920
Continue to finesse your image until you're
happy with your stencil.
0:05:16.560,0:05:21.360
We'll make the two layers that comprise our
portrait into one Smart Object.
0:05:21.640,0:05:28.580
Shift-click the top layer to make it active
as well, and Convert them into a Smart Object.
0:05:29.880,0:05:34.500
Make 2 copies of it by pressing Ctrl or Cmd + J twice.
0:05:37.020,0:05:42.760
Hide the top 2 layers and make the bottom
subject active.
0:05:44.560,0:05:49.500
Go to Filter, Blur and Gaussian Blur.
0:05:50.920,0:05:55.800
Blur it 10 pixels and click OK or press Enter or Return.
0:05:56.920,0:06:00.460
Make the next layer visible and active
0:06:01.380,0:06:04.500
and change its Blend Mode to Lighten.
0:06:07.680,0:06:15.020
Make the top layer visible ands active and change its Blend Mode to "Dissolve".
0:06:16.280,0:06:18.780
Reduce its opacity to 20%.
0:06:20.360,0:06:26.300
Presently, your image doesn't look much different until you make the bottom subject active
0:06:27.540,0:06:31.580
and with your Move Tool, drag it a bit up and to the left.
0:06:33.560,0:06:40.860
Shift-click the top layer to highlight all 3 subject layers and convert them into one Smart Object.
0:06:43.160,0:06:45.040
We're ready to add text.
0:06:45.040,0:06:48.800
If you want to reposition your portrait to make room for your text,
0:06:48.800,0:06:52.860
you can use the arrow keys on your keyboard to move your portrait.
0:06:52.860,0:06:56.900
Don't be concerned when you see the tiled background behind it. It's temporary.
0:06:57.920,0:06:59.440
Open your Type Tool
0:07:00.640,0:07:02.460
and pick a stencil font.
0:07:02.460,0:07:08.940
I'm using "Vinca Stencil Regular". If you'd like to use it, I provided its link, as well.
0:07:10.800,0:07:19.740
I'll make its size: 166 points, Sharp, Center Alignment and the color is black.
0:07:20.920,0:07:23.960
Click on your document and type out your text.
0:07:24.380,0:07:29.180
To reposition it, open your Move Tool and move it.
0:07:29.800,0:07:34.920
To add another line of text, press "T" to open back your Type Tool,
0:07:34.920,0:07:37.600
click on your document and type out your text.
0:07:37.940,0:07:42.220
As before, open your Move Tool to move it.
0:07:43.740,0:07:47.520
If you want to angle the text, open your Transform Tool,
0:07:49.440,0:07:53.900
go to a corner and when you see a curved, double-arrow, rotate it.
0:07:54.380,0:07:58.120
Drag it to a location you like and press Enter or Return.
0:08:01.620,0:08:04.740
Make the text layers into one Smart Object
0:08:07.500,0:08:08.920
and make a copy of it.
0:08:10.660,0:08:13.900
Change the Blend Mode of the copy to Dissolve".
0:08:15.400,0:08:20.520
Go toFilter, Blur and Gaussian Blur.
0:08:21.580,0:08:24.440
Change the Radius to 5 pixels.
0:08:28.040,0:08:30.480
Make the bottom text layer active
0:08:30.480,0:08:37.840
and press Ctrl or Cmd +F to repeat the last filter, which was a Gaussian Blur of 5 pixels.
0:08:38.660,0:08:45.300
Drag the text layer to the right a bit. Next, we'll make our text look more like it was spray-painted.
0:08:46.880,0:08:51.620
Click the Layer Mask icon to make a layer mask next to the active layer.
0:08:52.800,0:08:57.380
Open your Brush Tool and Brush Picker.
0:08:57.760,0:09:05.620
Make the Hardness: 0% and the Opacity and Flow both 100%. Then, press Enter or Return.
0:09:07.200,0:09:11.780
Adjust your brush size and loosely brush over your text.
0:09:15.140,0:09:22.600
Make the top text layer active and click the Layer Mask icon to make a layer mask next to it.
0:09:23.220,0:09:29.880
Reduce the brush's opacity to 50% and loosely brush over your text.
0:09:35.220,0:09:41.920
Shift-click your portrait to highlight it and your text layers and convert them into a Smart Object.
0:09:43.380,0:09:46.500
Change its Blend Mode to Multipy
0:09:49.100,0:09:55.320
and drag the layer between the "Tile Bevels" layer and the "Tiled Wall" bottom layer.
0:09:58.100,0:10:05.240
If you want to angle your stenciled image, open your Transform Tool and rotate it.
0:10:13.900,0:10:17.680
This is Marty from Blue Lightning TV. Thanks for watching!
Screenshots


Profiles
Profile 1
| Purpose | Tutorial (why) |
|---|---|
| Content | |
| Participants | Photoshop (m) geek, Celebrity (m), Celebrity (f) |
| Form | Tutorial (how) |
| Time | |
| Place |
Profile 2
| Purpose | Tutorial |
|---|---|
| Content | Portrait |
| Participants | Photoshop (m) geek, Celebrity (f) |
| Form | Tutorial (how), Close up |
| Time | Real time |
| Place | Desktop |