Photoshop CC Tutorial - Fantasy Looks Photo Effect Editing
Figuration: Tutorial
Description
SUBSCRIBE my channel for more tutorials ► http://bit.ly/rafy-A
Model Credit ► http://amethystdreams1987.deviantart.com/art/Sailor-Girl-6-118069209
Stay Connected:
Facebook ► https://www.facebook.com/rafyA88
Google+ ► http://bit.ly/rafyA_
Intagram ► https://www.instagram.com/rafya88
Watch More Tutorials ► http://www.rafy-a.com
Thanks for watching.
_____________________
Music by :
"Sovereign" Kevin MacLeod (incompetech.com)
Licensed under Creative Commons: By Attribution 3.0 License
http://creativecommons.org/licenses/by/3.0/
Metadata
| Video ID | 25 | Youtube URL | Photoshop CC Tutorial - Fantasy Looks Photo Effect Editing |
|---|---|
| Captions Available | Yes |
| Captions Downloadable | Yes |
| Playlists | |
| Duration | 00:15:29 |
| Definition | hd |
| Keywords | |
| License | youtube |
| Embeddable | Yes |
| Views | 1172555 |
| Likes | 12982 |
| Dislikes | 396 |
| Favourites | 0 |
| Comments | 590 |
| Created | 2017-05-04 1:00:42 PM |
| Updated | 2017-05-04 1:09:44 PM |
Captions
standard: en
1
00:00:16,166 --> 00:00:19,699
Let me started!!
2
00:00:21,633 --> 00:00:25,633
First , I will give the brightness in parts of the model because it looks a little dark
3
00:00:27,566 --> 00:00:34,599
Create a new adjustment layer - Curves and blend it to Screen
4
00:00:38,833 --> 00:00:42,299
Ctrl+I to invert..
5
00:00:42,733 --> 00:00:49,699
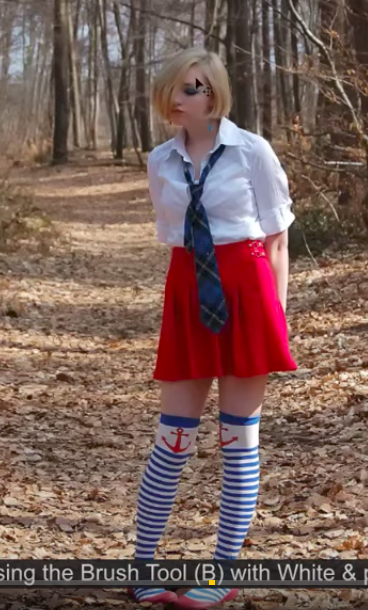
using the Brush Tool (B) with White & paint it on the dark area
6
00:01:58,033 --> 00:02:04,666
next, I will lower the brightness on some parts of the background
7
00:02:08,733 --> 00:02:12,733
Ctrl+I to invert
8
00:02:34,133 --> 00:02:38,999
Now I will merge all the layers
9
00:02:39,766 --> 00:02:42,899
duplicate the layer
10
00:02:44,600 --> 00:02:50,200
I need to cut out the model, I use Pen Tool (P) to make selection
11
00:02:59,500 --> 00:03:05,233
I will increase the speed to save your time..
12
00:03:23,433 --> 00:03:29,366
adding Layer Mask..
13
00:03:38,566 --> 00:03:42,566
now, I will remove this parts
14
00:04:17,266 --> 00:04:24,799
Load the selection by Holding CTRL & Click on the model mask
15
00:04:27,533 --> 00:04:35,199
go to Select - Modify - Expand (20-30px)
16
00:04:44,033 --> 00:04:48,033
choose the background layer
17
00:04:53,866 --> 00:04:59,066
then go to Edit - Fill (Shift+F5) by choosing Content-Aware and press OK
18
00:05:00,533 --> 00:05:04,533
Booooommm she is gone.......
19
00:05:04,533 --> 00:05:08,533
Ctrl+D to deselect
20
00:05:15,333 --> 00:05:20,666
I would Fixing this part because this part is very important
21
00:05:37,500 --> 00:05:41,500
duplicate layer..
22
00:05:42,166 --> 00:05:49,832
go to Filter + Blur Gallery + Tilt Shift... and do like so
23
00:06:37,533 --> 00:06:42,733
and I got this result...
24
00:06:50,733 --> 00:06:55,166
create a new layer. I will create some effects on the background
25
00:07:08,633 --> 00:07:12,633
Ctrl+T to resize it..
26
00:07:16,533 --> 00:07:21,966
use the Hard Light blend mode..& bring down the Opacity
27
00:07:29,533 --> 00:07:33,533
create a new layer again, i will make a bright one
28
00:07:34,666 --> 00:07:38,199
Ctrl+T to resize it..
29
00:07:38,700 --> 00:07:42,700
use Screen blend mode..
30
00:08:16,833 --> 00:08:20,833
create a new layer & Clip to layer below.
31
00:08:23,266 --> 00:08:27,266
press Shift+F5 (fill) by choosing 50% gray
32
00:08:29,866 --> 00:08:33,866
use Overlay blend mode..
33
00:08:35,200 --> 00:08:44,733
using the Burn Tool (O) to add dark effect on the models
34
00:09:37,933 --> 00:09:41,933
use the Dodge Tool (O) to make Hightlight effects on the model
35
00:10:57,966 --> 00:11:05,999
I use Smudge Tool with strength 80-90% to edit the hair
36
00:11:12,700 --> 00:11:29,833
if you use a Pen Tablet you 'll get great results , but I 'm using a Mouse
37
00:11:56,700 --> 00:12:00,700
Now I will give black effects around of this image..
38
00:12:05,366 --> 00:12:09,366
use the Brush Tool (B) with black and paint it on the Light Source
39
00:12:35,033 --> 00:12:39,033
create a new layer. I will give some Blue effects.. do like so
40
00:13:22,066 --> 00:13:27,932
create a new layer, and use Screen blend mode
41
00:13:39,166 --> 00:13:43,166
Ctrl+T to resize
42
00:14:09,733 --> 00:14:15,599
i use Curves to add color effects, and this is my and this is my favorite way
43
00:14:39,766 --> 00:14:43,766
and it looks good to me
44
00:14:57,300 --> 00:15:01,300
Ctrl+Shift+Alt+E to merge visible..use Linear Blend mode
45
00:15:02,000 --> 00:15:06,000
go to Filter - Other - High Pass, set radius about 0.8 - 2 px to get sharp on the image
46
00:15:12,166 --> 00:15:14,999
thanks for watching & liking :)
standard: es-419
0:00:16.166,0:00:19.699
¡comenzamos !!
0:00:21.633,0:00:25.633
En primer lugar, voy a dar el brillo en algunas partes del modelo, ya que se ve un poco oscuro
0:00:27.566,0:00:34.599
Crear una nueva capa de ajuste - Curvas y mezclarlo con la pantalla
0:00:38.833,0:00:42.299
Ctrl + I para invertir ..
0:00:42.733,0:00:49.699
Usando la herramienta cepillo (B) con blanco pintaremos en el área oscura
0:01:58.033,0:02:04.666
A continuación, voy a bajar el brillo en algunas partes del fondo
0:02:08.733,0:02:12.733
Ctrl + I para invertir
0:02:34.133,0:02:38.999
Ahora combinaré todas las capas
0:02:39.766,0:02:42.899
Duplicar la capa
0:02:44.600,0:02:50.200
Necesito cortar el modelo, yo uso la herramienta de la pluma (P) para hacer la selección
0:02:59.500,0:03:05.233
Voy a aumentar la velocidad para ahorrar su tiempo .
0:03:23.433,0:03:29.366
Agregando máscara de capa
0:03:38.566,0:03:42.566
Ahora, removeré estas partes
0:04:17.266,0:04:24.799
Cargar la selección manteniendo pulsada la tecla CTRL y hacer clic en la máscara del modelo
0:04:27.533,0:04:35.199
Vaya a Seleccionar - Modificar - Expandir (20-30px)
0:04:44.033,0:04:48.033
Elegir la capa de fondo
0:04:53.866,0:04:59.066
Luego vaya a Edit - Fill (Shift + F5) seleccionando Content Aware y pulse OK
0:05:00.533,0:05:04.533
Booooommm ella se ha ido
0:05:04.533,0:05:08.533
Ctrl + D para anular la selección
0:05:15.333,0:05:20.666
Yo fijaría esta parte porque esta parte es muy importante
0:05:37.500,0:05:41.500
duplicar capa
0:05:42.166,0:05:49.832
vaya a Filtro + Galería + falta de definición de inclinación Shift ... y hacer como por lo
0:06:37.533,0:06:42.733
Y conseguí este resultado
0:06:50.733,0:06:55.166
Crear una nueva capa. Voy a crear algunos efectos en el fondo
0:07:08.633,0:07:12.633
Ctrl + T para cambiar el tamaño
0:07:16.533,0:07:21.966
Utilizar el modo de mezcla de luz dura .. y reducir la opacidad
0:07:29.533,0:07:33.533
Crear una nueva capa de nuevo, voy a hacer una brillante
0:07:34.666,0:07:38.199
Ctrl + T para cambiar el tamaño
0:07:38.700,0:07:42.700
Utilizar el modo de mezcla de pantalla
0:08:16.833,0:08:20.833
Cree una nueva capa y clip a la capa a continuación
0:08:23.266,0:08:27.266
Presione Mayús + F5 (relleno) eligiendo 50% gris
0:08:29.866,0:08:33.866
Utilizar el modo de mezcla de superposición
0:08:35.200,0:08:44.733
Utilizando la herramienta de grabación (O) para añadir efecto oscuro en los modelos
0:09:37.933,0:09:41.933
Utilice la herramienta Dodge (DO) para realizar efectos de resalte en el modelo
0:10:57.966,0:11:05.999
Utilizo la herramienta de la mancha con la fuerza 80-90% para corregir el pelo
0:11:12.700,0:11:29.833
Si utiliza una tableta de lápiz obtendrá grandes resultados, pero estoy usando un ratón
0:11:56.700,0:12:00.700
Ahora voy a dar efectos negros alrededor de esta imagen
0:12:05.366,0:12:09.366
Utilice la herramienta Brush Tool (B) con negro y péguela en la fuente de luz
0:12:35.033,0:12:39.033
Crear una nueva capa. Voy a dar algunos efectos azules .. hacer así
0:13:22.066,0:13:27.932
Crear una nueva capa y utilizar el modo de mezcla de pantalla
0:13:39.166,0:13:43.166
Ctrl + T para cambiar el tamaño
0:14:09.733,0:14:15.599
Yo uso curvas para agregar efectos de color, y esta es mi forma favorita
0:14:39.766,0:14:43.766
Y me parece bien
0:14:57.300,0:15:01.300
Ctrl + Mayús + Alt + E para combinar visible..use Modo de mezcla lineal
0:15:02.000,0:15:06.000
Ir a Filtro - Otros - High Pass, establecer el radio alrededor de 0,8 - 2 px para obtener fuerte en la imagen
0:15:12.166,0:15:14.999
Gracias por mirar y gustar :)
standard: pt-BR
0:00:16.166,0:00:19.699
Vamos começar!!
0:00:21.633,0:00:25.633
Em primeiro lugar, vou dar o brilho em partes do modelo, porque parece um pouco escuro
0:00:27.566,0:00:34.599
Criar uma nova camada de ajuste - Curvas e misturá-la para a tela
0:00:38.833,0:00:42.299
Ctrl + I para inverter ..
0:00:42.733,0:00:49.699
utilizando a ferramenta Pincel (B) com White & pintá-lo sobre a área escura
0:01:58.033,0:02:04.666
Em seguida, vou diminuir o brilho em algumas partes do fundo
0:02:08.733,0:02:12.733
Ctrl + I para inverter
0:02:34.133,0:02:38.999
Agora vou mesclar todas as camadas
0:02:39.766,0:02:42.899
duplicar a camada
0:02:44.600,0:02:50.200
Eu preciso para cortar o modelo, eu uso Pen Tool (P) para fazer a seleção
0:02:59.500,0:03:05.233
Vou aumentar a velocidade para salvar o seu tempo ..
0:03:23.433,0:03:29.366
acrescentando Layer Mask ..
0:03:38.566,0:03:42.566
Agora, vou remover essas partes
0:04:17.266,0:04:24.799
Carregue a seleção, segurando CTRL e clique sobre a máscara modelo
0:04:27.533,0:04:35.199
vá em Select - Modificar - Expandir (20-30px)
0:04:44.033,0:04:48.033
escolher a camada de fundo
0:04:53.866,0:04:59.066
em seguida, vá em Editar - Preencher (Shift + F5) escolhendo Content-Aware e pressione OK
0:05:00.533,0:05:04.533
Booooommm ela se foi .......
0:05:04.533,0:05:08.533
Ctrl + D para desmarcar
0:05:15.333,0:05:20.666
Gostaria de fixação desta parte porque esta parte é muito importante
0:05:37.500,0:05:41.500
duplicar camada..
0:05:42.166,0:05:49.832
vá em Filter + borrão Galeria + SHIFT da inclinação ... e fazer como assim
0:06:37.533,0:06:42.733
e eu tenho este resultado ...
0:06:50.733,0:06:55.166
criar uma nova camada. Vou criar alguns efeitos no fundo
0:07:08.633,0:07:12.633
Ctrl + T para redimensionar-lo ..
0:07:16.533,0:07:21.966
usar o modo de mesclagem Hard Light .. & trazer para baixo a opacidade
0:07:29.533,0:07:33.533
crie uma nova camada mais uma vez, eu vou fazer um brilhante
0:07:34.666,0:07:38.199
Ctrl + T para redimensionar-lo ..
0:07:38.700,0:07:42.700
usar o modo de blend da tela ..
0:08:16.833,0:08:20.833
crie uma nova camada e clip para a camada abaixo.
0:08:23.266,0:08:27.266
pressione Shift + F5 (preenchimento), escolhendo 50% de cinza
0:08:29.866,0:08:33.866
usar o modo de blend Overlay ..
0:08:35.200,0:08:44.733
usando a Burn Tool (O) para adicionar efeito escuro nos modelos
0:09:37.933,0:09:41.933
use a ferramenta Dodge (O) para fazer efeitos hightlight sobre o modelo
0:10:57.966,0:11:05.999
Eu uso Smudge ferramenta com a força de 80-90% para editar o cabelo
0:11:12.700,0:11:29.833
se você usar um Pen Tablet você vai obter grandes resultados, mas estou usando um mouse
0:11:56.700,0:12:00.700
Agora vou dar efeitos pretas ao redor desta imagem ..
0:12:05.366,0:12:09.366
usar a ferramenta Pincel (B) com o preto e pintá-lo da fonte de luz
0:12:35.033,0:12:39.033
criar uma nova camada. Vou dar alguns efeitos azuis .. gosto assim
0:13:22.066,0:13:27.932
crie uma nova camada e usar o modo de blend da tela
0:13:39.166,0:13:43.166
Ctrl + T para redimensionar
0:14:09.733,0:14:15.599
i usar Curves para adicionar efeitos de cor, e esta é minha e esta é a minha maneira favorita
0:14:39.766,0:14:43.766
e parece bom para mim
0:14:57.300,0:15:01.300
Ctrl + Shift + Alt + E para mesclar visible..use modo de mistura linear
0:15:02.000,0:15:06.000
vá em Filter - Outros - High Pass, raio definido cerca de 0,8 - 2 px de obter afiada na imagem
0:15:12.166,0:15:14.999
obrigado por assistir e gostar :)
Profiles
Profile 1
| Purpose | Tutorial (why) |
|---|---|
| Content | |
| Participants | nameless (f) model |
| Form | Tutorial (how) |
| Time | |
| Place |
Profile 2
| Purpose | Tutorial |
|---|---|
| Content | Portrait |
| Participants | nameless (f) model, Photoshop geek |
| Form | Tutorial (how), music |
| Time | Real time |
| Place | Desktop |
Profile 4
| Purpose | |
|---|---|
| Content | Portrait |
| Participants | |
| Form | |
| Time | |
| Place |