How to Create Snowfall in Photoshop [Tutorial PSD + Custom Snow Brush Included ]
Figuration: Tutorial
Description
►Download PSD + Snow Brush file: http://photoshopdesire.com/create-realistic-falling-snow-photo-photoshop/
In this Photoshop effects tutorial, we'll learn how to create snow flake brush and how to use it.
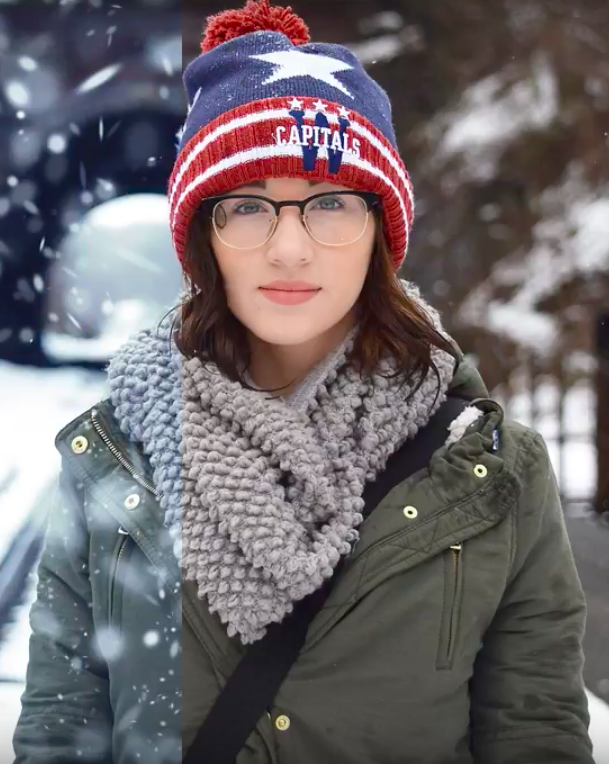
Using Photoshop, making a custom brush that will randomize snowflakes in different manners, such as shape, size, opacity, angle and placement can take a winter themed image to the next level.
Before starting, it is extremely important to pick a photo, that will seamlessly and most obviously fit with a winter theme.
I am using Photoshop cc 2017. However, this should work in most versions of Photo shop.
lets start creating custom brush for snow
add a new blank layer
select brush tool and choose a brush from the panel.
click on Brushes panel toggle icon, in the Options Bar at the top of the screen
select BRUSH TIP SHAPE
SIZE slider is the general actual size of the brush.
starting of at 100 pixels, but depending on the resolution of the image, the size of the brush will have to be adjusted.
The roundness setting will affect the shape of the snowflakes. To look most natural, the flake should be more oval than circular.
In general, setting the hardness to 15%, when placing snow around the subject works great.
spacing setting will control, how close & how packed the snowflakes will be in relation to each other. Spacing the flakes at 400% gives it a natural look.
now go to SHAPE DYNAMICS option
SIZE JITTER setting when set to 100% will randomize the size of the flakes.
keep MINIMUM DIAMETER 25%
Snow doesn't fall from the sky in a straight line, each flake flutters and makes its way down taking a unique path.
The angle jitter setting will randomize the angle of your brush, mirroring the path, snowflakes take on their way down.
keep roundness jitter 100%
and minimum roundness at 25%
move on to SCATTERING option
Make sure to check BOTH AXES box.
The scatter setting will scatter the cluster of flakes, so they don’t appear to be falling in a straight line.
Usually, 1000% does the job, however if you find that the clusters are too scattered, bringing down this setting can prove to be helpful.
According to the number set on count control, the amount of flakes that appear per click and drag will vary.
Leaving it the lower number, will give you better control of snowflake placement
On average, setting the count anywhere from 1 to 8 is great.
keep count jitter 100%
goto transfer option.
The opacity of each flake must be unique, so that the image will look more realistic. These settings will randomize the opacity.
Both opacity and flow jitter should be set to 100%
Make sure that all controls are set to “off.”
Smoothing helps reduce sharp angles as you drag your mouse or stylus.
now start painting with custom brush on the image
To save you the time, save the custom brush and name it
Read More@ www.photoshopdesire.com
This video tutorial also helps if you have question like below
How to Create Snow in Photoshop – An Easier Method. Photoshop Snow Effect - Add Falling Snow To A Winter Photo.
A Complete Beginner's Guide to Photoshop Weather Effects - Snow. How to Add Realistic Falling Snow to a Photo in Photoshop.
Learn How to Add Snow Effect to a Photo in Photoshop. Photoshop Tips: Snow & Rain Brushes | Free Photoshop Brushes.
Add snow to a photo in Photoshop For Photographers. Make Snow in Photoshop with Custom Brushes. snow overlay.
post processing - How to Make Great Falling Snow. Mastering Photo » Create a Winter Snow Scene with Photoshop.
Step-By-Step Create Snow in Photoshop: How to Make Brushes & use "Add Noise". post processing - Fake SNOW PHOTOGRAPHY TUTORIAL.
Snow Portrait Photography. How To Create A Winter Image with Snow in Photoshop, simple Ways To Manipulation images.
►Check out all tutorial here : https://www.youtube.com/photoshopdesiretv/videos
Thanks for watching our free Tutorials! If you enjoyed our video be sure to subscribe to our channel to receive free new videos.
►SUBSCRIBE: https://goo.gl/d31fld
Don't forget to COMMENT, LIKE and SHARE, to get more :)
Follow US:
--------------------
►Offical Website: http://www.photoshopdesire.com
►FACEBOOK : http://www.facebook.com/PhotoShopDesire
►GOOGLE+ : https://plus.google.com/+photoshopdesiretv
►Twitter : https://twitter.com/PSDesire
►Instagram: https://www.instagram.com/photoshopdesire
Softwares Used:
----------------------------
Photoshop cc 2014, 2015, 2017
Photoshop cs5, cs6,
After Effects cs5
Camtasia Studio
Music:
------------
Gymnopedie No3 (YouTube Library)
In this Photoshop effects tutorial, we'll learn how to create snow flake brush and how to use it.
Using Photoshop, making a custom brush that will randomize snowflakes in different manners, such as shape, size, opacity, angle and placement can take a winter themed image to the next level.
Before starting, it is extremely important to pick a photo, that will seamlessly and most obviously fit with a winter theme.
I am using Photoshop cc 2017. However, this should work in most versions of Photo shop.
lets start creating custom brush for snow
add a new blank layer
select brush tool and choose a brush from the panel.
click on Brushes panel toggle icon, in the Options Bar at the top of the screen
select BRUSH TIP SHAPE
SIZE slider is the general actual size of the brush.
starting of at 100 pixels, but depending on the resolution of the image, the size of the brush will have to be adjusted.
The roundness setting will affect the shape of the snowflakes. To look most natural, the flake should be more oval than circular.
In general, setting the hardness to 15%, when placing snow around the subject works great.
spacing setting will control, how close & how packed the snowflakes will be in relation to each other. Spacing the flakes at 400% gives it a natural look.
now go to SHAPE DYNAMICS option
SIZE JITTER setting when set to 100% will randomize the size of the flakes.
keep MINIMUM DIAMETER 25%
Snow doesn't fall from the sky in a straight line, each flake flutters and makes its way down taking a unique path.
The angle jitter setting will randomize the angle of your brush, mirroring the path, snowflakes take on their way down.
keep roundness jitter 100%
and minimum roundness at 25%
move on to SCATTERING option
Make sure to check BOTH AXES box.
The scatter setting will scatter the cluster of flakes, so they don’t appear to be falling in a straight line.
Usually, 1000% does the job, however if you find that the clusters are too scattered, bringing down this setting can prove to be helpful.
According to the number set on count control, the amount of flakes that appear per click and drag will vary.
Leaving it the lower number, will give you better control of snowflake placement
On average, setting the count anywhere from 1 to 8 is great.
keep count jitter 100%
goto transfer option.
The opacity of each flake must be unique, so that the image will look more realistic. These settings will randomize the opacity.
Both opacity and flow jitter should be set to 100%
Make sure that all controls are set to “off.”
Smoothing helps reduce sharp angles as you drag your mouse or stylus.
now start painting with custom brush on the image
To save you the time, save the custom brush and name it
Read More@ www.photoshopdesire.com
This video tutorial also helps if you have question like below
How to Create Snow in Photoshop – An Easier Method. Photoshop Snow Effect - Add Falling Snow To A Winter Photo.
A Complete Beginner's Guide to Photoshop Weather Effects - Snow. How to Add Realistic Falling Snow to a Photo in Photoshop.
Learn How to Add Snow Effect to a Photo in Photoshop. Photoshop Tips: Snow & Rain Brushes | Free Photoshop Brushes.
Add snow to a photo in Photoshop For Photographers. Make Snow in Photoshop with Custom Brushes. snow overlay.
post processing - How to Make Great Falling Snow. Mastering Photo » Create a Winter Snow Scene with Photoshop.
Step-By-Step Create Snow in Photoshop: How to Make Brushes & use "Add Noise". post processing - Fake SNOW PHOTOGRAPHY TUTORIAL.
Snow Portrait Photography. How To Create A Winter Image with Snow in Photoshop, simple Ways To Manipulation images.
►Check out all tutorial here : https://www.youtube.com/photoshopdesiretv/videos
Thanks for watching our free Tutorials! If you enjoyed our video be sure to subscribe to our channel to receive free new videos.
►SUBSCRIBE: https://goo.gl/d31fld
Don't forget to COMMENT, LIKE and SHARE, to get more :)
Follow US:
--------------------
►Offical Website: http://www.photoshopdesire.com
►FACEBOOK : http://www.facebook.com/PhotoShopDesire
►GOOGLE+ : https://plus.google.com/+photoshopdesiretv
►Twitter : https://twitter.com/PSDesire
►Instagram: https://www.instagram.com/photoshopdesire
Softwares Used:
----------------------------
Photoshop cc 2014, 2015, 2017
Photoshop cs5, cs6,
After Effects cs5
Camtasia Studio
Music:
------------
Gymnopedie No3 (YouTube Library)
Metadata
| Video ID | 329 | Youtube URL | How to Create Snowfall in Photoshop [Tutorial PSD + Custom Snow Brush Included ] |
|---|---|
| Captions Available | Yes |
| Captions Downloadable | No |
| Playlists | |
| Duration | 00:11:29 |
| Definition | hd |
| Keywords | |
| License | youtube |
| Embeddable | Yes |
| Views | 513 |
| Likes | 29 |
| Dislikes | 1 |
| Favourites | 0 |
| Comments | 3 |
| Created | 2017-05-04 1:00:45 PM |
| Updated | 2017-05-04 1:14:08 PM |
Captions
Captions for this video exist, but their contents were not available to download.
Screenshots
Filter:
Profiles
Profile 1
| Purpose | Tutorial |
|---|---|
| Content | |
| Participants | |
| Form | Tutorial (how), Close up, music |
| Time | |
| Place |
Profile 2
| Purpose | |
|---|---|
| Content | Portrait |
| Participants | nameless (f) model, nameless (m) model, Photoshop (f) geek |
| Form | |
| Time | |
| Place |