Photoshop Elements 15 - Tutorial for Beginners [+General Overview]*
Figuration: Tutorial
Description
Full Guide here: http://bit.ly/adobeelements15
Enable SUBTITLES if you have trouble at understanding the narration. Leave feedback if you can!
Welcome to The Skills Factory™! Enter into a New Way of Learning the most famous products worldwide. SUBSCRIBE to start learning anything you need in less than 20 minutes.
We love you ♥
Metadata
| Video ID | 348 | Youtube URL | Photoshop Elements 15 - Tutorial for Beginners [+General Overview]* |
|---|---|
| Captions Available | Yes |
| Captions Downloadable | Yes |
| Playlists | |
| Duration | 00:11:25 |
| Definition | hd |
| Keywords | |
| License | youtube |
| Embeddable | Yes |
| Views | 70790 |
| Likes | 263 |
| Dislikes | 14 |
| Favourites | 0 |
| Comments | 45 |
| Created | 2017-05-04 1:00:45 PM |
| Updated | 2017-05-04 1:14:25 PM |
Captions
ASR: en
0:00:08.120,0:00:14.280
hello followers welcome to this tutorial
0:00:11.120,0:00:16.920
let's see all the basic and most useful
0:00:14.280,0:00:20.130
tools and features to start with Adobe
0:00:16.920,0:00:22.830
Photoshop Elements 15 leave us feedback
0:00:20.130,0:00:25.740
to improve our future guides for Adobe
0:00:22.830,0:00:27.930
elements when you open Photoshop
0:00:25.740,0:00:30.449
Elements you can choose between the
0:00:27.930,0:00:33.989
three main software products inside
0:00:30.449,0:00:36.149
Adobe Elements Adobe organizer used to
0:00:33.989,0:00:38.730
collect and manage all your photos and
0:00:36.149,0:00:41.149
media Premiere Elements used to edit
0:00:38.730,0:00:44.190
your videos and make slideshows and
0:00:41.149,0:00:46.770
Photoshop Elements which is an amazing
0:00:44.190,0:00:50.070
photo editor and a great alternative to
0:00:46.770,0:00:52.530
Adobe Photoshop cc let's see how to use
0:00:50.070,0:00:55.289
it if you want to discover more about
0:00:52.530,0:00:57.780
the other two main products check out
0:00:55.289,0:01:02.039
our complete guides for Adobe Elements
0:00:57.780,0:01:05.220
15 Photoshop Elements 15 is divided into
0:01:02.039,0:01:08.970
four main workspaces as you can see at
0:01:05.220,0:01:10.920
the very top the Eloi tab is used to
0:01:08.970,0:01:14.729
check all the latest news and updates
0:01:10.920,0:01:17.040
from Adobe itself the quick workspace is
0:01:14.729,0:01:21.150
used to apply fast and effective
0:01:17.040,0:01:23.670
Corrections on your photos the guided
0:01:21.150,0:01:26.070
workspace lists lots of guided
0:01:23.670,0:01:29.280
step-by-step professional adjustments
0:01:26.070,0:01:31.799
and effects then there is the most
0:01:29.280,0:01:34.619
advanced and professional expert
0:01:31.799,0:01:37.020
workspace that we won't see in this
0:01:34.619,0:01:39.270
beginner tutorial check out our
0:01:37.020,0:01:43.290
following video to know how to use the
0:01:39.270,0:01:45.329
tools inside the expert workspace when
0:01:43.290,0:01:48.180
you start as a beginner the quick
0:01:45.329,0:01:51.119
workspace is made for you this is the
0:01:48.180,0:01:53.610
easiest workspace you can use to correct
0:01:51.119,0:01:57.540
and adjust your photos in a professional
0:01:53.610,0:01:59.969
way first of all import all the photos
0:01:57.540,0:02:02.299
you need to adjust by clicking on the
0:01:59.969,0:02:05.579
Open button in the top left corner
0:02:02.299,0:02:07.829
browse for your files and then click on
0:02:05.579,0:02:11.280
open to collect them all inside the
0:02:07.829,0:02:13.660
photo bin more below that you can open
0:02:11.280,0:02:17.140
and close by using the first
0:02:13.660,0:02:19.210
from the left the preview that occupies
0:02:17.140,0:02:22.360
the workspace shows the photo that is
0:02:19.210,0:02:24.430
selected from the photo bin button which
0:02:22.360,0:02:26.650
is ready to be edited and corrected
0:02:24.430,0:02:28.720
through the quick tools on the left and
0:02:26.650,0:02:32.050
the adjustments and the effects on the
0:02:28.720,0:02:35.620
far right photoshop elements is a photo
0:02:32.050,0:02:37.990
editor only to adjust any metadata or
0:02:35.620,0:02:40.780
insert your favorite photos and albums
0:02:37.990,0:02:43.540
and collections you can open Adobe
0:02:40.780,0:02:46.330
organizer through the organizer button
0:02:43.540,0:02:50.470
at the bottom let's see how to apply
0:02:46.330,0:02:53.380
basic editing on photos to rotate photos
0:02:50.470,0:02:55.690
by 90 degrees you can use the rotate
0:02:53.380,0:02:59.290
buttons below in a clockwise or
0:02:55.690,0:03:01.840
counterclockwise way on the left you
0:02:59.290,0:03:04.180
have several basic tools to adjust your
0:03:01.840,0:03:07.360
photos each of these have their own
0:03:04.180,0:03:10.720
settings all listed on the tool options
0:03:07.360,0:03:14.230
below if you don't see it just click on
0:03:10.720,0:03:16.660
the tool options button for example the
0:03:14.230,0:03:19.330
straighten tool rotates and crops the
0:03:16.660,0:03:21.790
image in order to align it to a virtual
0:03:19.330,0:03:24.970
segment that you draw by clicking and
0:03:21.790,0:03:27.520
dragging on the picture this is quite
0:03:24.970,0:03:30.340
useful because it applies the necessary
0:03:27.520,0:03:33.820
rotation you need and maintains the same
0:03:30.340,0:03:36.580
aspect ratio on the picture if you make
0:03:33.820,0:03:39.400
a mistake while using these tools use
0:03:36.580,0:03:42.430
the undo and the redo buttons below to
0:03:39.400,0:03:46.150
go backward or forward along your latest
0:03:42.430,0:03:48.250
actions made the crop tool is used to
0:03:46.150,0:03:50.620
crop the picture to remove parts you
0:03:48.250,0:03:53.290
don't like from it when the tool is
0:03:50.620,0:03:55.600
enabled a rectangular area appears
0:03:53.290,0:03:58.870
showing the part of the picture you want
0:03:55.600,0:04:01.630
to keep click and drag to move it drag
0:03:58.870,0:04:04.870
its nodes to scale or change the picture
0:04:01.630,0:04:09.850
aspect ratio or drag from outside to
0:04:04.870,0:04:13.450
rotate as you like once done just apply
0:04:09.850,0:04:15.880
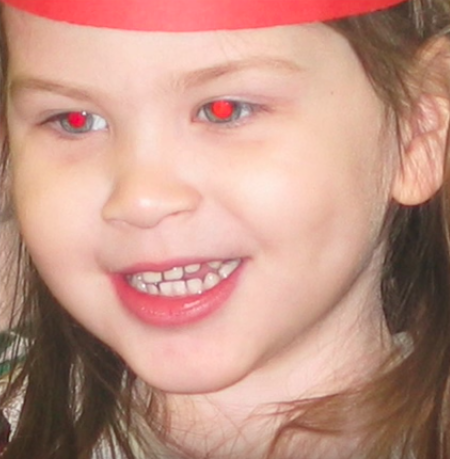
with the green checkmark to enhance a
0:04:13.450,0:04:18.370
person's appearance you can use the red
0:04:15.880,0:04:21.910
eye removal tool and the whiten teeth
0:04:18.370,0:04:23.979
tool the first one removes red eyes just
0:04:21.910,0:04:27.400
click and drag to create a selection
0:04:23.979,0:04:29.949
area above it if this include
0:04:27.400,0:04:31.930
it's just the I it will be corrected
0:04:29.949,0:04:35.590
according to the setting on the tool
0:04:31.930,0:04:38.410
options if you use the whiten teeth tool
0:04:35.590,0:04:41.130
it is sufficient to click and drag to
0:04:38.410,0:04:45.280
select the teeth to make them brighter
0:04:41.130,0:04:47.620
to use these tools precisely zoom in and
0:04:45.280,0:04:51.070
out the photo by using your mouse wheel
0:04:47.620,0:04:53.919
while holding alt down if the photo
0:04:51.070,0:04:56.470
preview is quite big you can pan by
0:04:53.919,0:04:58.350
holding the spacebar key and clicking
0:04:56.470,0:05:01.539
and dragging on the picture
0:04:58.350,0:05:02.350
besides tools you also have other panels
0:05:01.539,0:05:04.479
on the right
0:05:02.350,0:05:07.449
collecting amazing adjustments and
0:05:04.479,0:05:09.340
effects respect to the tools these do
0:05:07.449,0:05:11.830
not need to be brushed on the picture
0:05:09.340,0:05:13.900
since these are always applied on the
0:05:11.830,0:05:15.910
whole photo that is selected the
0:05:13.900,0:05:17.949
adjustments panel collects everything
0:05:15.910,0:05:22.060
you need to improve your general photo
0:05:17.949,0:05:24.849
appearance for example smart fix collect
0:05:22.060,0:05:27.690
several templates ready to use in order
0:05:24.849,0:05:31.150
to regulate the photo appearance
0:05:27.690,0:05:34.210
exposure regulates the photo exposure by
0:05:31.150,0:05:37.539
using the bar above or picking a ready
0:05:34.210,0:05:39.610
template between the ones shown you can
0:05:37.539,0:05:42.520
simply hover on these to check what they
0:05:39.610,0:05:44.530
look like on the direct preview lighting
0:05:42.520,0:05:46.780
sets the brightness level on each side
0:05:44.530,0:05:49.300
of the photo such as the darkest sides
0:05:46.780,0:05:52.449
with shadows the brightest ones with
0:05:49.300,0:05:57.880
highlights and the middle umma nated
0:05:52.449,0:06:01.090
ones with mid-tones inside color you can
0:05:57.880,0:06:05.080
use saturation and vibrance to regulate
0:06:01.090,0:06:09.909
the amount of color and hue to set the
0:06:05.080,0:06:16.240
color whereas to add a color filter use
0:06:09.909,0:06:19.389
temperature and tint under balance use
0:06:16.240,0:06:24.099
sharpen to adjust clarity by adding blur
0:06:19.389,0:06:26.530
or to make the picture sharper while you
0:06:24.099,0:06:28.930
correct and adjust the photo it is quite
0:06:26.530,0:06:31.990
useful to compare it with the original
0:06:28.930,0:06:34.150
one you had it first on the view bar in
0:06:31.990,0:06:37.330
the top left corner you can select
0:06:34.150,0:06:41.190
before and after to see the effects of
0:06:37.330,0:06:43.440
all your modifications you
0:06:41.190,0:06:45.930
can also apply all these adjustments on
0:06:43.440,0:06:48.930
selected parts of the photo only by
0:06:45.930,0:06:51.300
using the selection tools all collected
0:06:48.930,0:06:54.210
inside the first tool on the far left
0:06:51.300,0:06:57.560
when you enable a selection tool click
0:06:54.210,0:07:01.440
and hold on to extend a selection area
0:06:57.560,0:07:04.680
if you need you can browse while holding
0:07:01.440,0:07:08.070
alt down to remove and refine such
0:07:04.680,0:07:11.100
selection then when you are ready just
0:07:08.070,0:07:13.320
apply your favorite adjustment this will
0:07:11.100,0:07:17.190
affect just the selected part on the
0:07:13.320,0:07:21.390
preview to deselect all just use the
0:07:17.190,0:07:23.850
Escape key you also have other advanced
0:07:21.390,0:07:26.610
tools to make your photo special for
0:07:23.850,0:07:30.300
example the text tool is used to add
0:07:26.610,0:07:32.610
text on your picture as you can see from
0:07:30.300,0:07:35.160
the tool options you have several kinds
0:07:32.610,0:07:38.070
of tools over here but three are the
0:07:35.160,0:07:40.320
most important ones the horizontal and
0:07:38.070,0:07:43.640
the vertical text tool drops text
0:07:40.320,0:07:46.980
contained inside a defined text box
0:07:43.640,0:07:49.530
created by clicking and dragging on your
0:07:46.980,0:07:52.380
picture then depending on the tool
0:07:49.530,0:07:55.320
chosen you can type in horizontally or
0:07:52.380,0:07:57.900
vertically just make sure that the text
0:07:55.320,0:08:01.350
box is big enough or part of the text
0:07:57.900,0:08:05.390
will be hidden in this case just enlarge
0:08:01.350,0:08:07.950
the text box by dragging its nodes in
0:08:05.390,0:08:11.669
particular if you do so while holding
0:08:07.950,0:08:14.820
ctrl down you will also scale its text
0:08:11.669,0:08:17.790
inside once you have the text you can
0:08:14.820,0:08:21.360
use the tool options below to adjust the
0:08:17.790,0:08:23.820
text properties and color a second kind
0:08:21.360,0:08:26.669
of text is the one that follows a vector
0:08:23.820,0:08:29.760
path in this case you have to draw the
0:08:26.669,0:08:33.479
path first and then type it in for
0:08:29.760,0:08:36.000
example if you choose the text on shape
0:08:33.479,0:08:39.450
tool click and drag to drop the shape
0:08:36.000,0:08:42.450
and then click on one point to start
0:08:39.450,0:08:45.330
typing from there make sure to regulate
0:08:42.450,0:08:47.640
the text size correctly or part of the
0:08:45.330,0:08:51.690
text will be hidden as soon as all the
0:08:47.640,0:08:54.470
paths perimeter is covered if you choose
0:08:51.690,0:08:56.660
the text on selection tool you
0:08:54.470,0:09:00.170
have to click and hold on to create a
0:08:56.660,0:09:04.160
selection area its perimeter will define
0:09:00.170,0:09:07.100
the path that the text will follow the
0:09:04.160,0:09:09.710
text on custom path tool is the same a
0:09:07.100,0:09:12.950
little more advanced because it uses the
0:09:09.710,0:09:16.700
pen tool we won't see it in this video
0:09:12.950,0:09:20.270
a third type of text allows you to make
0:09:16.700,0:09:23.360
a selection area or a type mask with the
0:09:20.270,0:09:26.120
same shape of the type text in this way
0:09:23.360,0:09:28.340
if you apply any adjustment this will
0:09:26.120,0:09:33.230
affect the photo by following a cool
0:09:28.340,0:09:36.340
tech shop once text is made remember to
0:09:33.230,0:09:39.620
click on the check mark below to apply
0:09:36.340,0:09:42.770
whatever the kind of text it's content
0:09:39.620,0:09:45.680
is always linked to its container box if
0:09:42.770,0:09:48.440
you hold ctrl down and click and drag
0:09:45.680,0:09:52.130
you will move the text box but also the
0:09:48.440,0:09:54.890
text inside it so you can rotate both by
0:09:52.130,0:09:57.580
clicking and dragging from outside while
0:09:54.890,0:10:00.680
holding ctrl down
0:09:57.580,0:10:03.350
besides the adjustment panel you can use
0:10:00.680,0:10:06.680
the effects the textures and the frames
0:10:03.350,0:10:09.980
ones to apply several ready templates on
0:10:06.680,0:10:12.620
your picture click on one to apply it on
0:10:09.980,0:10:16.460
your picture and if you do not like it
0:10:12.620,0:10:19.160
just use the undo button you can also
0:10:16.460,0:10:21.770
apply more advanced effects by going to
0:10:19.160,0:10:23.780
the guided workspace this collects
0:10:21.770,0:10:27.350
several professional effects from the
0:10:23.780,0:10:29.480
basics to the photo merge tab for each
0:10:27.350,0:10:32.240
of these effects the quick workspace
0:10:29.480,0:10:34.700
opens showing you on the right all the
0:10:32.240,0:10:38.870
step-by-step instructions to apply the
0:10:34.700,0:10:45.860
effect as you need below use next to go
0:10:38.870,0:10:47.990
forward or use cancel to undo all once
0:10:45.860,0:10:51.020
all the modifications on the picture are
0:10:47.990,0:10:54.710
done save the photo by going to file and
0:10:51.020,0:10:57.470
then to save as choose the file name and
0:10:54.710,0:11:02.620
the correct file format such as the
0:10:57.470,0:11:05.660
Photoshop PSD or the render jpg or PNG
0:11:02.620,0:11:08.220
you can also use the create and the
0:11:05.660,0:11:10.590
share buttons in the top right corner
0:11:08.220,0:11:14.040
to export your picture to make books
0:11:10.590,0:11:16.680
calendars cards are uploaded on social
0:11:14.040,0:11:19.290
websites thanks for watching this video
0:11:16.680,0:11:23.210
check out our full guide for Adobe
0:11:19.290,0:11:23.210
Elements 15 to learn more
standard: en
Profiles
Profile 1
| Purpose | Tutorial (why) |
|---|---|
| Content | |
| Participants | nameless (f) model, Photoshop (m) geek |
| Form | Tutorial (how) |
| Time | |
| Place |
Profile 2
| Purpose | Tutorial |
|---|---|
| Content | Portrait, Text, Scene |
| Participants | Photoshop (m) geek |
| Form | Tutorial (how) |
| Time | Real time |
| Place | Desktop |