Photoshop Tutorial: How to Create an Invisible, Camouflage Effect!
Figuration: Tutorial
Description
Photos provided by Shutterstock.com
Images #:143984269, 271339997, 271785818
Music provided by Mysoundmarket
http://www.mysoundmarket.com
Title Track: "March into Oblivion”
Become a Patron to Blue Lighting TV:
https://www.patreon.com/bluelightningtv
Blue Lightning TV Channel:
https://www.youtube.com/user/bluelightningtv
My Website:
http://www.bluelightningtv.com/
For a limited time, get 20% off Photoshop CC + Lightroom + more all together for $7.99/month p/month!:
http://goo.gl/QFznn7
BLTV Facebook:
https://www.facebook.com/Blue-Lightning-TV-330761246941375/
BLTV Facebook “Subscriber Page”:
https://www.facebook.com/BLTVsubscribers
Tumblr:
http://bluelightningtv.tumblr.com/
Twitter:
https://twitter.com/bluelightningtv
Google+:
https://plus.google.com/u/0/+MartyGeller
Pinterest:
https://www.pinterest.com/bluelightningtv/
LinkedIn:
www.linkedin.com/in/martygeller
Metadata
| Video ID | 388 | Youtube URL | Photoshop Tutorial: How to Create an Invisible, Camouflage Effect! |
|---|---|
| Captions Available | No |
| Captions Downloadable | Yes |
| Playlists | |
| Duration | 00:08:40 |
| Definition | hd |
| Keywords | |
| License | youtube |
| Embeddable | Yes |
| Views | 469722 |
| Likes | 5108 |
| Dislikes | 113 |
| Favourites | 0 |
| Comments | 261 |
| Created | 2017-05-04 1:00:45 PM |
| Updated | 2017-05-04 1:14:41 PM |
Captions
ASR: en
0:00:07.670,0:00:14.370
hi this is Marty from Blue Lightning TV
0:00:11.160,0:00:17.460
I'm going to show you how to create an
0:00:14.370,0:00:22.279
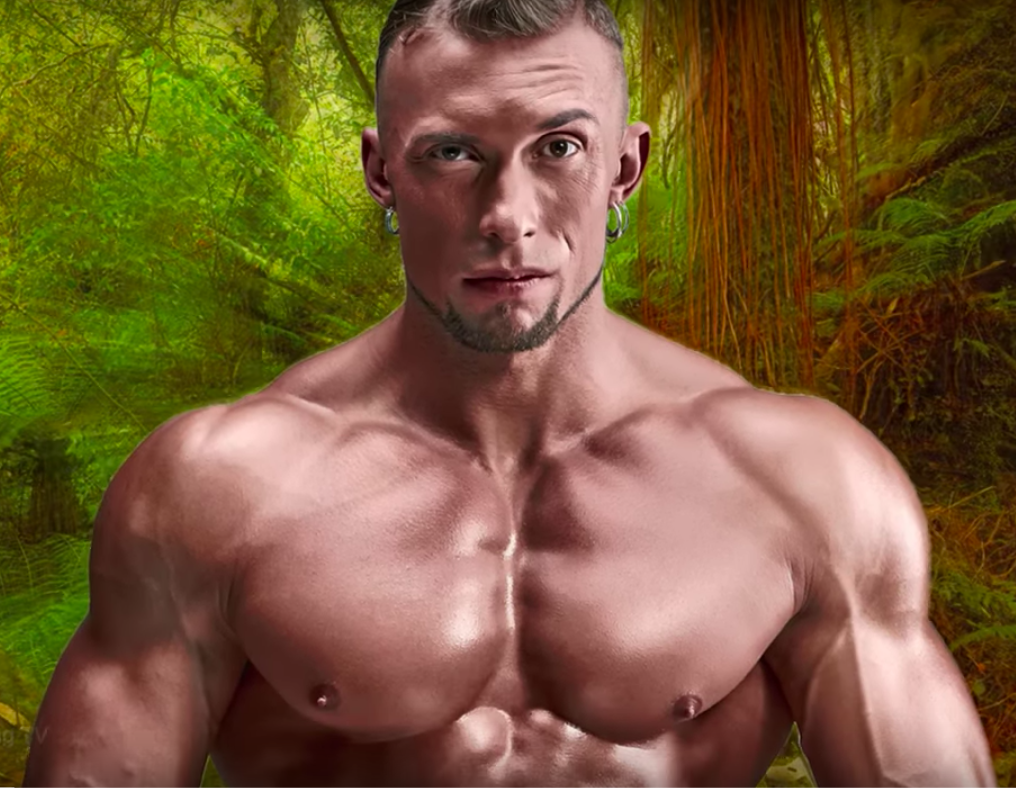
invisible camouflage effect and how you
0:00:17.460,0:00:22.279
can apply it to a variety of backgrounds
0:00:24.770,0:00:30.300
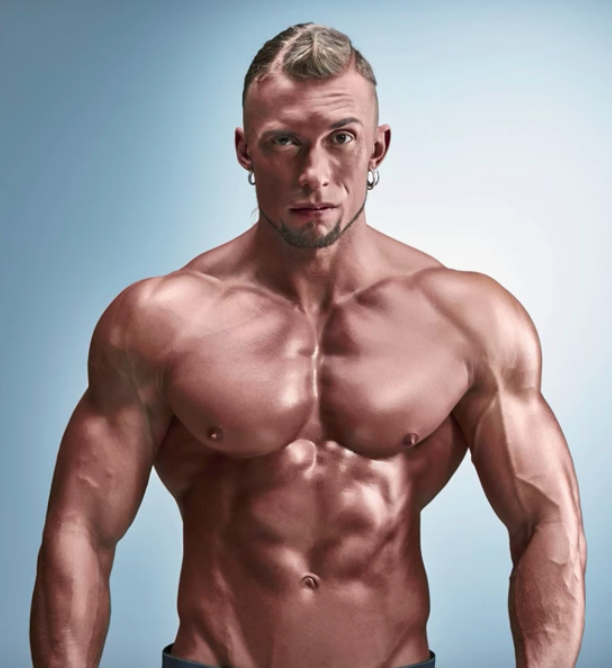
find an open background you'd like to
0:00:27.210,0:00:33.240
use as well as a subject you'd like to
0:00:30.300,0:00:36.030
place onto it your subject can be color
0:00:33.240,0:00:38.670
or black-and-white I downloaded both of
0:00:36.030,0:00:40.980
these images from Shutterstock the first
0:00:38.670,0:00:43.410
step is to make a selection around your
0:00:40.980,0:00:45.570
subject so we can separate it from its
0:00:43.410,0:00:47.940
background there are many ways to do
0:00:45.570,0:00:50.640
this and your choice should depend on
0:00:47.940,0:00:52.800
the characteristics of your photo for
0:00:50.640,0:00:56.160
this image I'll use the quick selection
0:00:52.800,0:00:58.830
tool if you're using this tool as well I
0:00:56.160,0:01:02.220
find that the radius of 5 to 10 pixels
0:00:58.830,0:01:05.159
works the best for most resolutions the
0:01:02.220,0:01:06.300
resolution for both of my images is 150
0:01:05.159,0:01:08.909
pixels per inch
0:01:06.300,0:01:11.880
you can check yours by going to image
0:01:08.909,0:01:14.790
and image size drag your tool either
0:01:11.880,0:01:17.760
over the outside or inside of your image
0:01:14.790,0:01:20.880
to remove areas of the selection press
0:01:17.760,0:01:23.300
and hold alt or option as you drag over
0:01:20.880,0:01:23.300
those areas
0:01:27.860,0:01:34.100
to check your selection press Q to open
0:01:31.010,0:01:37.670
your quick mask to revert it back into a
0:01:34.100,0:01:39.800
selection press Q again if you drag your
0:01:37.670,0:01:42.080
quick selection tool over the outside of
0:01:39.800,0:01:45.230
your subject we need to invert the
0:01:42.080,0:01:48.400
selection to do this press ctrl or
0:01:45.230,0:01:51.400
command shift I
0:01:48.400,0:01:56.030
cut and copy the subject on to its own
0:01:51.400,0:01:58.640
layer by pressing ctrl or command J
0:01:56.030,0:02:03.380
remove your subjects color by pressing
0:01:58.640,0:02:06.410
ctrl or command shift you to place it on
0:02:03.380,0:02:09.140
to your background document press V to
0:02:06.410,0:02:11.390
open your move tool and drag it onto the
0:02:09.140,0:02:14.510
tab of your background without releasing
0:02:11.390,0:02:17.630
your mouse or pen drag it down onto the
0:02:14.510,0:02:19.970
background and release to resize and
0:02:17.630,0:02:24.050
reposition it open your transform tool
0:02:19.970,0:02:26.360
by pressing ctrl or command T if your
0:02:24.050,0:02:31.130
subject is too large to see all of it
0:02:26.360,0:02:33.560
press ctrl or command 0 go to a corner
0:02:31.130,0:02:37.880
and when you see a diagonal double-arrow
0:02:33.560,0:02:41.870
press and hold alt or option + shift as
0:02:37.880,0:02:46.160
you drag it in or out to reposition it
0:02:41.870,0:02:49.480
go inside the transform and drag it then
0:02:46.160,0:02:49.480
press Enter or return
0:02:50.240,0:02:56.930
to fit it back onto your canvas press
0:02:52.580,0:02:59.330
ctrl or command 0 next will make your
0:02:56.930,0:03:01.280
subject into a displacement map which
0:02:59.330,0:03:04.190
will be used to wrap your background
0:03:01.280,0:03:07.340
around the contours of your subject to
0:03:04.190,0:03:10.210
do this click the icon at the upper
0:03:07.340,0:03:13.270
right of your layers panel and click
0:03:10.210,0:03:13.270
duplicate layer
0:03:13.410,0:03:23.630
open the flyout list click new and type
0:03:17.510,0:03:25.760
in displacement then click OK
0:03:23.630,0:03:29.160
since displacement maps have better
0:03:25.760,0:03:36.209
results when they're slightly blurred
0:03:29.160,0:03:40.140
go to filter blur and Gaussian blur
0:03:36.209,0:03:42.330
make the radius 1 2 3 pixels and click
0:03:40.140,0:03:47.280
OK
0:03:42.330,0:03:51.120
go to file and save as
0:03:47.280,0:03:56.210
save it to your desktop as a Photoshop
0:03:51.120,0:03:56.210
PSD file and click Save
0:03:56.630,0:04:03.980
then close the displacement file
0:04:01.640,0:04:07.400
click the eyeball next to your subject
0:04:03.980,0:04:10.700
to hide the layer make your background
0:04:07.400,0:04:14.830
active and make a copy of it by pressing
0:04:10.700,0:04:14.830
ctrl or command J
0:04:14.990,0:04:23.940
go to filter distort and displace
0:04:21.269,0:04:27.210
I'll make the horizontal and vertical
0:04:23.940,0:04:29.490
scales between 20 to 30 pixels however
0:04:27.210,0:04:31.500
keep in mind you may want to use
0:04:29.490,0:04:33.810
different amounts for all the effects
0:04:31.500,0:04:35.490
I'll be using in this tutorial depending
0:04:33.810,0:04:39.509
on the size and resolution of your
0:04:35.490,0:04:43.909
document tic stretch to fit and wrap
0:04:39.509,0:04:43.909
around then click OK
0:04:44.940,0:04:52.539
click the displacement PSD file that you
0:04:47.970,0:04:56.000
saved earlier and click open
0:04:52.539,0:04:58.430
immediately our background moved up and
0:04:56.000,0:05:00.830
to the left as it took on the contours
0:04:58.430,0:05:02.539
of our subject we'll get rid of the
0:05:00.830,0:05:05.990
aberrations on the bottom and right
0:05:02.539,0:05:09.110
edges of our image in a few minutes make
0:05:05.990,0:05:14.620
your subject visible and active and
0:05:09.110,0:05:14.620
change its blend mode to soft light
0:05:15.669,0:05:22.629
change its fill to 50% the fill reduces
0:05:20.229,0:05:24.699
your subjects opacity but it will retain
0:05:22.629,0:05:27.370
the full opacity of any effects that
0:05:24.699,0:05:31.629
we'll be adding to it double-click your
0:05:27.370,0:05:35.219
subject to open its layer Styles click
0:05:31.629,0:05:38.789
inner glow and change its blend mode to
0:05:35.219,0:05:38.789
color dodge
0:05:39.700,0:05:46.900
pasady to 20% and drag the choke and the
0:05:43.810,0:05:49.650
size all the way to the right then click
0:05:46.900,0:05:49.650
OK
0:05:51.450,0:05:58.340
make a copy of your subject
0:05:55.490,0:06:01.060
and double click inner glow on the copy
0:05:58.340,0:06:06.340
to see it in the layer style window
0:06:01.060,0:06:09.190
change its blend mode to soft light
0:06:06.340,0:06:12.310
drag its opacity all the way to the
0:06:09.190,0:06:15.610
right and drag the choke all the way to
0:06:12.310,0:06:17.920
the left I'll make the size 20 pixels
0:06:15.610,0:06:20.640
but again you may want to use a
0:06:17.920,0:06:20.640
different amount
0:06:23.540,0:06:27.310
make a copy of the lair
0:06:27.400,0:06:35.910
and hide the effects of this copy change
0:06:31.360,0:06:35.910
the blend mode to hard light
0:06:37.430,0:06:44.539
and reduce its fill to 30%
0:06:42.110,0:06:47.389
now that we can see our camouflaged
0:06:44.539,0:06:49.610
subject over our background were ready
0:06:47.389,0:06:53.270
to fill in the aberrations on the bottom
0:06:49.610,0:06:57.020
and right edges scroll to the bottom and
0:06:53.270,0:06:59.599
make your background copy active click
0:06:57.020,0:07:03.770
the layer mask icon to make a layer mask
0:06:59.599,0:07:06.129
next to the active layer open your brush
0:07:03.770,0:07:06.129
tool
0:07:06.670,0:07:12.520
brush picker will take care of the size
0:07:09.160,0:07:15.400
in a moment make the hardness 0% and
0:07:12.520,0:07:18.250
make sure the opacity and flow are a
0:07:15.400,0:07:21.730
hundred percent then press Enter or
0:07:18.250,0:07:23.740
return if your foreground and background
0:07:21.730,0:07:28.000
colors aren't black and white
0:07:23.740,0:07:30.670
respectively press D on your keyboard to
0:07:28.000,0:07:33.160
make your brush bigger or smaller press
0:07:30.670,0:07:36.850
the right or left bracket key on your
0:07:33.160,0:07:39.010
keyboard brush the areas on the bottom
0:07:36.850,0:07:40.810
to reveal the original background and
0:07:39.010,0:07:44.320
make sure you don't brush over your
0:07:40.810,0:07:47.250
subject continue to brush over the right
0:07:44.320,0:07:47.250
side as well
0:07:47.910,0:07:55.080
the background with a different one open
0:07:51.570,0:07:57.720
the new background press V to open your
0:07:55.080,0:07:59.910
move tool and drag it onto the tab of
0:07:57.720,0:08:02.730
your camouflage document without
0:07:59.910,0:08:06.870
releasing your mouse or pen drag it down
0:08:02.730,0:08:09.650
onto your image and release make a copy
0:08:06.870,0:08:13.520
of the new background
0:08:09.650,0:08:16.100
and press control or command F to repeat
0:08:13.520,0:08:19.280
the last filter you applied which was
0:08:16.100,0:08:23.060
displace to fill in the aberrations on
0:08:19.280,0:08:26.720
the bottom and right edges scroll to the
0:08:23.060,0:08:29.210
layer mask and press alt or option as
0:08:26.720,0:08:33.500
you drag a copy of it next to the copy
0:08:29.210,0:08:35.060
of the new background this is Marty from
0:08:33.500,0:08:38.110
Blue Lightning TV
0:08:35.060,0:08:38.110
thanks for watching
Profiles
Profile 1
| Purpose | Tutorial |
|---|---|
| Content | |
| Participants | |
| Form | Tutorial (how), Close up |
| Time | |
| Place |
Profile 2
| Purpose | |
|---|---|
| Content | Portrait, Scene |
| Participants | nameless (m) model, Photoshop (m) geek |
| Form | |
| Time | |
| Place |