Photoshop Tutorial: How to SMOOTH SKIN and remove blemishes and scars.
Figuration: Tutorial
Description
Updated "Smooth Skin" tutorial:
http://goo.gl/mtxpHr
Subscribe to Blue Lightning TV!:
http://goo.gl/HEpuJ4
Website:
http://www.bluelightningtv.com/
Get up to 20% off Photoshop + Lightroom! Only $7.99 p/month:
http://goo.gl/QFznn7
Facebook:
https://goo.gl/fHLJsh
Twitter:
https://twitter.com/bluelightningtv
Metadata
| Video ID | 414 | Youtube URL | Photoshop Tutorial: How to SMOOTH SKIN and remove blemishes and scars. |
|---|---|
| Captions Available | No |
| Captions Downloadable | Yes |
| Playlists | |
| Duration | 00:02:15 |
| Definition | hd |
| Keywords | |
| License | youtube |
| Embeddable | Yes |
| Views | 214041 |
| Likes | 1071 |
| Dislikes | 55 |
| Favourites | 0 |
| Comments | 87 |
| Created | 2017-05-04 1:00:46 PM |
| Updated | 2017-05-04 1:14:47 PM |
Captions
ASR: en
0:00:07.429,0:00:13.049
hi this is Marty from Blue Lightning TV
0:00:10.349,0:00:15.690
I'm going to show you a quick and
0:00:13.049,0:00:18.330
effective way to smooth the skin while
0:00:15.690,0:00:22.199
removing blemishes acne and other skin
0:00:18.330,0:00:26.609
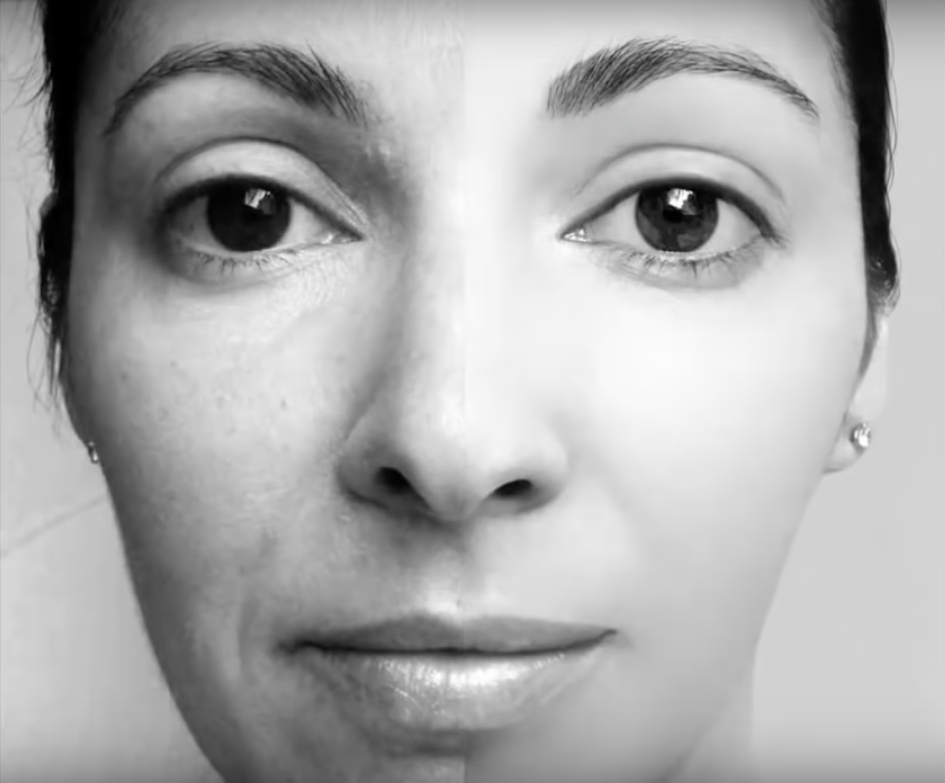
problems your skin will go from this to
0:00:22.199,0:00:28.920
this as you can see in this
0:00:26.609,0:00:31.320
black-and-white photo the left side of
0:00:28.920,0:00:34.350
her face is ruddy and has blemishes but
0:00:31.320,0:00:36.390
after smoothing her skin the right side
0:00:34.350,0:00:39.239
of her face is now blemish-free and
0:00:36.390,0:00:41.850
beautifully smooth using the techniques
0:00:39.239,0:00:44.040
in this tutorial you can quickly remedy
0:00:41.850,0:00:48.450
most people's skin conditions that
0:00:44.040,0:00:51.449
result in beautiful clear skin so let's
0:00:48.450,0:00:53.899
begin using the lasso tool i drew a
0:00:51.449,0:00:56.190
selection of the area around her foreign
0:00:53.899,0:00:58.829
we're going to use the refine edge
0:00:56.190,0:01:00.840
feature so her hair at the top of her
0:00:58.829,0:01:03.960
forehead and her eyebrows will be
0:01:00.840,0:01:06.240
protected we'll click on the refine edge
0:01:03.960,0:01:09.119
button and that will open the refine
0:01:06.240,0:01:11.939
edge window will put the radius to 70
0:01:09.119,0:01:18.990
pixels and feather it to pixels and
0:01:11.939,0:01:21.720
press ok go to filter blur surface blur
0:01:18.990,0:01:24.750
that will open the surface blur window
0:01:21.720,0:01:28.229
the radius is 61 pixels and we'll choose
0:01:24.750,0:01:30.509
69 for the levels and threshold at this
0:01:28.229,0:01:32.270
point her skin is way too smooth so
0:01:30.509,0:01:37.290
we're going to go back to filter and
0:01:32.270,0:01:39.810
click noise add noise that will open the
0:01:37.290,0:01:42.000
add noise window make sure the amount is
0:01:39.810,0:01:46.310
five percent and it's uniform
0:01:42.000,0:01:51.030
distribution with monochromatic checked
0:01:46.310,0:01:53.880
go back to filter press blur and then
0:01:51.030,0:01:56.700
lens blur this will open the lens blur
0:01:53.880,0:02:00.180
dialog box will keep the default
0:01:56.700,0:02:03.119
settings but use the iris shape radius
0:02:00.180,0:02:08.340
at four let's take one more look at the
0:02:03.119,0:02:11.480
before and after this is Marty from Blue
0:02:08.340,0:02:13.540
Lightning TV thanks for watching
0:02:11.480,0:02:13.540
you
Profiles
Profile 1
| Purpose | |
|---|---|
| Content | Portrait |
| Participants | nameless (f) model, Photoshop (m) geek |
| Form | |
| Time | |
| Place |
Profile 2
| Purpose | Tutorial |
|---|---|
| Content | |
| Participants | |
| Form | Tutorial (how) |
| Time | |
| Place |