Photoshop Tutorial: How to make a POP ART portrait from a Photo!
Figuration: Tutorial
Description
Photo:
http://goo.gl/o0Fm7d
Subscribe to Blue Lightning TV!:
http://goo.gl/HEpuJ4
Website:
http://www.bluelightningtv.com/
For a limited time, get up to 20% off Photoshop + Lightroom + more all for $7.99 USD p/month!:
http://goo.gl/QFznn7
Become a Patron to Blue Lightning TV:
https://www.patreon.com/bluelightningtv
Facebook:
https://goo.gl/fHLJsh
Twitter:
https://twitter.com/bluelightningtv
Check out my tutorials on Skillfeed!:
https://www.skillfeed.com/instructor/12
Metadata
| Video ID | 54 | Youtube URL | Photoshop Tutorial: How to make a POP ART portrait from a Photo! |
|---|---|
| Captions Available | Yes |
| Captions Downloadable | Yes |
| Playlists | |
| Duration | 00:05:32 |
| Definition | hd |
| Keywords | |
| License | youtube |
| Embeddable | Yes |
| Views | 560480 |
| Likes | 4885 |
| Dislikes | 74 |
| Favourites | 0 |
| Comments | 275 |
| Created | 2017-05-04 1:00:42 PM |
| Updated | 2017-05-04 1:10:06 PM |
Captions
ASR: en
0:00:07.580,0:00:14.099
hi this is Marty from Blue Lightning TV
0:00:10.820,0:00:16.619
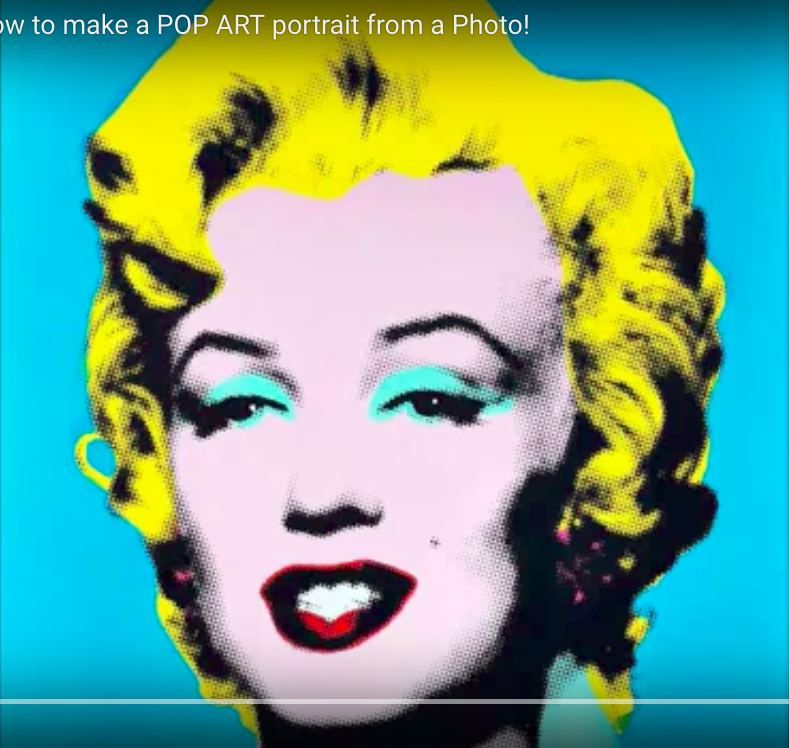
over a year ago I did a tutorial showing
0:00:14.099,0:00:19.619
how to make this pop art portrait of
0:00:16.619,0:00:22.170
Lady gaga based on the iconic silk
0:00:19.619,0:00:25.590
screens of celebrities and other famous
0:00:22.170,0:00:27.510
people by Andy Warhol due to its
0:00:25.590,0:00:29.609
popularity I'll show you how to make
0:00:27.510,0:00:33.000
another one using techniques that are
0:00:29.609,0:00:34.680
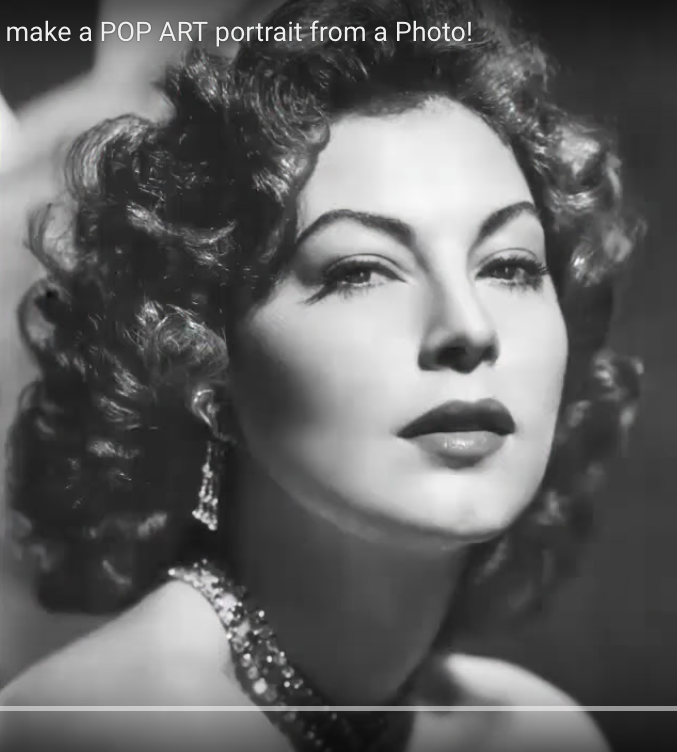
quicker and simpler choose a photo of
0:00:33.000,0:00:38.160
someone you'd like to make into a
0:00:34.680,0:00:41.780
portrait if it's in color desaturate it
0:00:38.160,0:00:45.390
by pressing ctrl shift you on a pc or
0:00:41.780,0:00:47.160
command shift you on a Mac make sure
0:00:45.390,0:00:49.379
it's cropped so it just shows the
0:00:47.160,0:00:51.960
subjects head and the top of the
0:00:49.379,0:00:53.670
shoulders we need to make sure that its
0:00:51.960,0:00:55.969
size and resolution will be the most
0:00:53.670,0:01:00.570
effective for the filters we'll be using
0:00:55.969,0:01:03.180
so go to image and image size click on
0:01:00.570,0:01:05.760
the chain-link to lock its aspect ratio
0:01:03.180,0:01:09.990
this will keep its proportions intact
0:01:05.760,0:01:15.720
type in 500 pixels for the width and 72
0:01:09.990,0:01:18.210
pixels per inch then click OK to fit it
0:01:15.720,0:01:22.350
back onto your screen press ctrl or
0:01:18.210,0:01:25.100
command 0 to make its darkest areas
0:01:22.350,0:01:28.680
black and the lightest areas white
0:01:25.100,0:01:31.619
invoke Auto tone by pressing ctrl or
0:01:28.680,0:01:34.200
command shift l we need to make a
0:01:31.619,0:01:36.450
selection around the subject to separate
0:01:34.200,0:01:38.250
it from its background there are many
0:01:36.450,0:01:41.280
ways to do this and I covered them in
0:01:38.250,0:01:44.880
many of my tutorials for this example
0:01:41.280,0:01:48.210
I'll use the pencil tool make the size
0:01:44.880,0:01:51.210
10 pixels and the hardness a hundred
0:01:48.210,0:01:53.280
percent if your foreground and
0:01:51.210,0:01:56.340
background colors aren't black and white
0:01:53.280,0:01:59.189
respectively press D on your keyboard
0:01:56.340,0:02:02.070
click the quick mask button so we can
0:01:59.189,0:02:04.290
draw a quick mask draw loosely around
0:02:02.070,0:02:08.240
the head and shoulders and make sure
0:02:04.290,0:02:08.240
there are no openings in your quick mask
0:02:08.660,0:02:13.870
open your paint bucket tool and click
0:02:11.390,0:02:17.379
down anywhere inside
0:02:13.870,0:02:20.739
quickmask press q to change the quick
0:02:17.379,0:02:23.500
mask into a selection and press ctrl or
0:02:20.739,0:02:26.980
command + delete to fill it with white
0:02:23.500,0:02:30.930
which is your background color to delete
0:02:26.980,0:02:33.430
the selection press ctrl or command D
0:02:30.930,0:02:38.769
make a copy of your image by pressing
0:02:33.430,0:02:42.129
ctrl or command + J go to filter and
0:02:38.769,0:02:46.180
filter gallery open the sketch folder
0:02:42.129,0:02:50.790
and click halftone pattern make the size
0:02:46.180,0:02:52.989
1 the contrast 40 and a pattern type dot
0:02:50.790,0:02:55.150
depending on the characteristics of your
0:02:52.989,0:02:58.390
photo you may want to adjust the
0:02:55.150,0:03:00.519
contrast amount there should be a good
0:02:58.390,0:03:03.269
balance of shadow and highlight with
0:03:00.519,0:03:08.290
just enough mid tones as halftone dots
0:03:03.269,0:03:13.480
click OK to accept it go to filter
0:03:08.290,0:03:18.250
sharpen and smart sharpen make the
0:03:13.480,0:03:22.000
amount 500% the radius 1 pixel keep the
0:03:18.250,0:03:25.290
reduced noise to 0% and remove Gaussian
0:03:22.000,0:03:27.840
blur then click OK
0:03:25.290,0:03:30.060
we now have a crisp black-and-white
0:03:27.840,0:03:34.690
halftone dot partridge
0:03:30.060,0:03:37.419
change the blend mode to multiply go to
0:03:34.690,0:03:40.540
the new layer icon and ctrl-click it on
0:03:37.419,0:03:42.810
a PC or command click it on a Mac to
0:03:40.540,0:03:45.489
make a new layer below the active layer
0:03:42.810,0:03:47.949
will fill the empty layer with a color
0:03:45.489,0:03:50.859
by clicking on your foreground color to
0:03:47.949,0:03:53.470
open the color picker pick a color you
0:03:50.859,0:03:56.440
like for your background I'll pick a
0:03:53.470,0:03:57.690
dark turquoise then press Enter or
0:03:56.440,0:04:01.480
return
0:03:57.690,0:04:04.000
press alt or option + delete to fill it
0:04:01.480,0:04:07.750
with the color we'll do the skin next
0:04:04.000,0:04:14.470
click on the foreground color box for
0:04:07.750,0:04:16.599
this example I'll type in f7c eb7 open
0:04:14.470,0:04:19.930
your pencil tool by pressing B on your
0:04:16.599,0:04:24.430
keyboard to increase its size press the
0:04:19.930,0:04:26.919
right bracket key now painting areas of
0:04:24.430,0:04:27.690
the skin on your subject don't be
0:04:26.919,0:04:29.400
concerned right
0:04:27.690,0:04:32.040
now with the colors of other areas of
0:04:29.400,0:04:34.770
the face and neck like the eyes lips
0:04:32.040,0:04:37.800
clothing or jewelry we'll paint them in
0:04:34.770,0:04:40.860
over the skin if you want to paint back
0:04:37.800,0:04:43.320
in a color press eye on your keyboard to
0:04:40.860,0:04:46.170
open the eyedropper tool click on the
0:04:43.320,0:04:51.030
color press B again to open your pencil
0:04:46.170,0:04:54.360
tool and paint over those areas to paint
0:04:51.030,0:04:55.800
in white for the eyes and jewelry I'll
0:04:54.360,0:05:00.000
invert the foreground and background
0:04:55.800,0:05:03.510
colors by pressing X on my keyboard now
0:05:00.000,0:05:06.270
I have white as my foreground color to
0:05:03.510,0:05:09.930
decrease the size of your pencil press
0:05:06.270,0:05:15.960
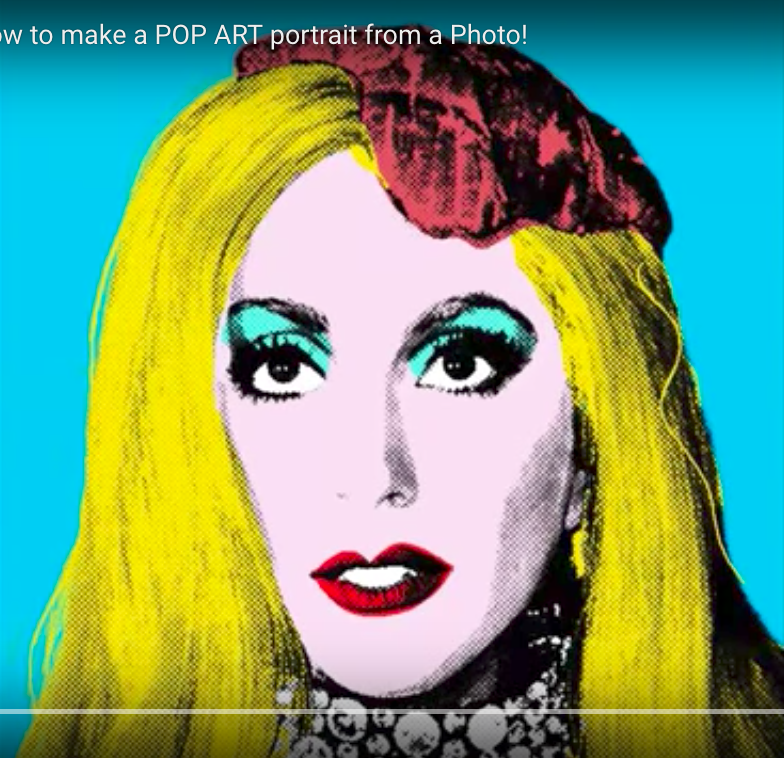
the left bracket key I'll paint over the
0:05:09.930,0:05:18.030
eyes earrings and necklace and then pick
0:05:15.960,0:05:21.810
different colors for the lips and
0:05:18.030,0:05:24.120
eyeshadow have fun transforming photos
0:05:21.810,0:05:26.490
of someone you know into pop art
0:05:24.120,0:05:27.600
portraits this is Marty from Blue
0:05:26.490,0:05:30.620
Lightning TV
0:05:27.600,0:05:30.620
thanks for watching
standard: en
0:00:00.190,0:00:04.520
0:00:04.520,0:00:11.099
Hi, this is Marty from Blue Lightning TV.
0:00:11.099,0:00:15.639
Over a year ago, I did a tutorial showing how to make this pop art
0:00:15.639,0:00:20.470
portrait of Lady Gaga based on the iconic, silkscreens
0:00:20.470,0:00:24.450
of celebrities and other famous people by Andy Warhol.
0:00:24.450,0:00:28.330
Due to its popularity, I'll show you how to make another one
0:00:28.330,0:00:33.690
using techniques that are quicker and simpler.
Choose a photo of someone
0:00:33.690,0:00:36.989
you'd like to make into a portrait. If it's in color,
0:00:36.989,0:00:40.819
desaturate it by pressing Ctrl + Shift + U
0:00:40.819,0:00:43.850
on a PC or Comd + Shift + U
0:00:43.850,0:00:48.569
on a Mac. Make sure it's cropped, so it
just shows the subject's head
0:00:48.569,0:00:52.690
and the top on the shoulders. We need to
make sure that its size and resolution
0:00:52.690,0:00:55.989
will be the most effective for the
filters we'll be using.
0:00:55.989,0:00:59.510
So, go to "Image"...and "Image Size".
0:00:59.510,0:01:03.449
Click on the chainlink to lock its aspect ratio.
0:01:03.449,0:01:07.190
This will keep its proportions intact.
Type in...
0:01:07.190,0:01:11.880
500 pixels for the Width and 72 pixels
per inch.
0:01:11.880,0:01:17.110
Then, click OK. To fit it back onto your
screen,
0:01:17.110,0:01:22.530
press Ctrl or Cmd + 0. To make its darkest areas
0:01:22.530,0:01:26.320
black and lightest areas white, invoke
0:01:26.320,0:01:30.150
Auto-Tone by pressing Ctrl or Cmd + Shift + L.
0:01:30.150,0:01:33.520
We need to make a selection around the subject
0:01:33.520,0:01:37.510
to separate it from its background. There are many ways to do this
0:01:37.510,0:01:41.650
and I covered them in many of my tutorials. For this example,
0:01:41.650,0:01:45.390
I'll use the pencil tool. Make the Size,
0:01:45.390,0:01:48.860
10 pixels and the Hardness, 100%.
0:01:48.860,0:01:52.400
If your foreground and background colors
0:01:52.400,0:01:55.430
aren't black and white, respectively, press "D"
0:01:55.430,0:02:00.420
on your keyboard. Click the Quickmask button, so we can draw a quickmask.
0:02:00.420,0:02:03.530
Draw loosely around the head and shoulders
0:02:03.530,0:02:06.659
and make sure there are no openings in your quickmask.
0:02:06.659,0:02:10.920
Open your Paint Bucket tool...
0:02:10.920,0:02:14.770
and click down anywhere inside the quickmask.
0:02:14.770,0:02:17.880
Press "Q" to change the quickmask
0:02:17.880,0:02:22.380
into a selection and press Ctrl or Cmd + Delete
0:02:22.380,0:02:25.710
to fill it with white, which is your background color.
0:02:25.710,0:02:29.940
To delete the selection, Ctrl or Cmd + D.
0:02:29.940,0:02:34.709
Make a copy of your image by pressing
Ctrl...
0:02:34.709,0:02:38.920
or Cmd + J. Go to "Filter"...
0:02:38.920,0:02:42.870
and "Filter Gallery". Open the "Sketch" folder
0:02:42.870,0:02:46.940
and click "Halftone Pattern". Make the Size, 1...
0:02:46.940,0:02:50.990
the Contrast, 40 and the Pattern Type, Dot.
0:02:50.990,0:02:55.140
Depending on the characteristics of YOUR photo, you may want to adjust the
0:02:55.140,0:02:56.010
Contrast
0:02:56.010,0:03:00.180
amount. There should be a good balance of
shadow and highlight
0:03:00.180,0:03:03.319
with just enough midtones as halftone
dots.
0:03:03.319,0:03:08.490
Click OK to accept it. Go to "Filter"...
0:03:08.490,0:03:12.000
"Sharpen"..and "Smart Sharpen".
0:03:12.000,0:03:15.050
Make the Amount, 500%...
0:03:15.050,0:03:22.050
the Radius, 1 pixel...keep the Reduce Noise to 0%...and remove Gaussian Blur.
0:03:22.550,0:03:28.280
Then, click OK. We now have a crisp,
black-and-white
0:03:28.280,0:03:32.069
halftone-dot, portrait. Change the blend
mode
0:03:32.069,0:03:36.150
to "Multiply". Go to the New Layer icon
0:03:36.150,0:03:40.300
and Ctrl-click it on a PC or Cmd-click it on a Mac
0:03:40.300,0:03:45.170
to make a new layer below the active layer. We'll fill the empty layer with a
0:03:45.170,0:03:45.870
color
0:03:45.870,0:03:49.459
by clicking on your foreground color to open the Color Picker.
0:03:49.459,0:03:53.440
Pick a color you like for your background. I'll pick
0:03:53.440,0:03:58.410
a dark turquoise. Then, press Enter
or Return.
0:03:58.410,0:04:02.640
Press Alt or Opt + Delete to fill it the color.
0:04:02.640,0:04:07.340
We'll do the skin next. Click on the
foreground color box.
0:04:07.340,0:04:11.480
For this example, I'll type in F 7 C
0:04:11.480,0:04:16.120
E B 7.
Open your Pencil tool by pressing
0:04:16.120,0:04:19.530
"B" on your keyboard. To increase its size,
0:04:19.530,0:04:22.550
press the Right bracket key.
0:04:22.550,0:04:26.560
Now paint in areas of the skin on your
subject.
0:04:26.560,0:04:29.960
Don't be concerned right now with the colors of other areas of the face and
0:04:29.960,0:04:30.860
neck
0:04:30.860,0:04:34.040
like the eyes, lips, clothing or jewelry.
0:04:34.040,0:04:38.860
We'll paint them in over the skin. If you want to paint back in a color,
0:04:38.860,0:04:42.780
press "i" on your keyboard to open the Eyedropper tool.
0:04:42.780,0:04:47.070
Click on the color, press "B" again to open your Pencil tool
0:04:47.070,0:04:50.560
and paint over those areas.
0:04:50.560,0:04:54.360
To paint in white for the eyes and jewelry,
0:04:54.360,0:04:57.910
I'll invert the foreground and
background colors by pressing
0:04:57.910,0:05:01.130
"X" on my keyboard. Now, I have white
0:05:01.130,0:05:06.000
as my foreground color. To decrease the size of your pencil,
0:05:06.000,0:05:09.030
press the Left bracket key.
0:05:09.030,0:05:12.220
I'll paint over the eyes,
0:05:12.220,0:05:15.780
earrings and necklace and then,
0:05:15.780,0:05:20.120
pick different colors for the lips and eye shadow.
0:05:20.120,0:05:23.180
Have fun transforming photos of someone you know
0:05:23.180,0:05:28.070
into pop art portraits. This is Marty from Blue Lightning TV.
0:05:28.070,0:05:28.889
Thanks for watching!
Screenshots

Profiles
Profile 1
| Purpose | Tutorial (why) |
|---|---|
| Content | |
| Participants | Photoshop (m) geek, Celebrity (m), Celebrity (f) |
| Form | Tutorial (how) |
| Time | |
| Place |
Profile 2
| Purpose | Tutorial |
|---|---|
| Content | Portrait |
| Participants | nameless (f) model, Photoshop (m) geek |
| Form | Tutorial (how) |
| Time | Real time |
| Place | Desktop |
Profile 4
| Purpose | |
|---|---|
| Content | Portrait |
| Participants | |
| Form | |
| Time | |
| Place |