How to make your photos LOOK BETTER FAST! Photoshop Tutorial
Figuration: Tutorial
Description
If you are looking for ways to step up your editing game and enter the ring with photoshop - this video is for you.
Like, Comment & Subscribe to stay updated with the latest content! VLOGS & Tutorials uploaded frequently!
The Music I use: https://goo.gl/IMZC9A
GEAR:
My MAIN Camera - http://amzn.to/2kdu35o
My FAVOURITE Lens Ever - http://amzn.to/2kQNK4U
The Magic Canon Lens of Life - http://amzn.to/2kXF9Qm
The Mic I use - http://amzn.to/2l23rrZ
My Drone - http://amzn.to/2kdE3M7
GoPro HERO 5 - http://amzn.to/2l1Nhit
Follow Me:
Instagram: https://www.instagram.com/petermckinnon/
Twitter: https://twitter.com/petermckinnon
Facebook: https://www.facebook.com/petermckinnonphoto
Website: http://www.petermckinnon.com
Metadata
| Video ID | 56 | Youtube URL | How to make your photos LOOK BETTER FAST! Photoshop Tutorial |
|---|---|
| Captions Available | Yes |
| Captions Downloadable | Yes |
| Playlists | |
| Duration | 00:17:10 |
| Definition | hd |
| Keywords | |
| License | youtube |
| Embeddable | Yes |
| Views | 647111 |
| Likes | 21910 |
| Dislikes | 414 |
| Favourites | 0 |
| Comments | 1074 |
| Created | 2017-05-04 1:00:42 PM |
| Updated | 2017-05-04 1:10:09 PM |
Captions
ASR: en
0:00:00.000,0:00:03.689
what's up everybody Peter MacKinnon here
0:00:01.770,0:00:12.240
and today we're talking about how to
0:00:03.689,0:00:13.590
make your photos look better fast okay
0:00:12.240,0:00:15.360
so you don't when you get home somewhere
0:00:13.590,0:00:17.039
you've been taking photos maybe vacation
0:00:15.360,0:00:19.350
maybe trip hanging out with friends and
0:00:17.039,0:00:22.680
you load that photo on your computer and
0:00:19.350,0:00:24.840
you're like oh this looks so good throw
0:00:22.680,0:00:27.090
it up on the social Facebook Instagram
0:00:24.840,0:00:28.800
people are double tap and that IG hearts
0:00:27.090,0:00:30.960
are flowing and you're just feeling good
0:00:28.800,0:00:32.820
about yourself ready for sunset and it's
0:00:30.960,0:00:34.770
just so beautiful and then there's
0:00:32.820,0:00:35.850
sometimes you get home and you open that
0:00:34.770,0:00:40.020
photo up on your computer and you're
0:00:35.850,0:00:42.750
like I remember this being way better
0:00:40.020,0:00:45.570
when I was there promise so these are
0:00:42.750,0:00:47.670
some basic editing skills basic editing
0:00:45.570,0:00:49.739
skills that you can do on your
0:00:47.670,0:00:52.920
photographs at home at any time using
0:00:49.739,0:00:55.079
Photoshop I'm using Photoshop CC so go
0:00:52.920,0:00:57.030
ahead head over to Adobe and download
0:00:55.079,0:00:58.739
the trial of that or sign up for their
0:00:57.030,0:01:00.629
subscription base to service which is
0:00:58.739,0:01:02.789
what I do and you pay a monthly fee to
0:01:00.629,0:01:05.309
basically own all of their apps that's
0:01:02.789,0:01:08.040
what I recommend we can take a mundane
0:01:05.309,0:01:10.250
photo that looks like this and turn it
0:01:08.040,0:01:13.380
into something that looks like this in
0:01:10.250,0:01:14.909
pretty much like 10 minutes maybe even
0:01:13.380,0:01:15.930
faster if you do this thing on a daily
0:01:14.909,0:01:17.700
basis like I do
0:01:15.930,0:01:19.380
okay so we've dragged our photo into
0:01:17.700,0:01:22.619
Photoshop and here we are we are hit
0:01:19.380,0:01:25.200
with the Camera Raw plug-in that pops up
0:01:22.619,0:01:26.549
and says hey this is a raw file what do
0:01:25.200,0:01:28.080
you want to do you want to just open the
0:01:26.549,0:01:29.729
image as is do you want to tweak it a
0:01:28.080,0:01:31.979
little bit here with Camera Raw and then
0:01:29.729,0:01:33.060
open it and this is where you might say
0:01:31.979,0:01:34.799
to me Pete well what's the difference
0:01:33.060,0:01:36.420
between editing and doing everything
0:01:34.799,0:01:38.400
you're about to show me in Lightroom
0:01:36.420,0:01:40.979
instead of using Lightroom and Photoshop
0:01:38.400,0:01:43.200
we're using Camera Raw and Photoshop
0:01:40.979,0:01:44.880
yeah you can do everything in Lightroom
0:01:43.200,0:01:47.159
you can do everything in Photoshop it's
0:01:44.880,0:01:49.409
all about workflow what programs you
0:01:47.159,0:01:51.630
like better I like using them both photo
0:01:49.409,0:01:53.970
shops more of like a photo manipulator
0:01:51.630,0:01:56.460
where you can I don't like that guy's
0:01:53.970,0:01:59.520
face I'm going to put his face on his
0:01:56.460,0:02:01.020
face great for that kind of thing
0:01:59.520,0:02:02.729
but I like using them both in
0:02:01.020,0:02:04.380
conjunction with one another and I'm
0:02:02.729,0:02:06.960
going to show you how I do it right here
0:02:04.380,0:02:07.950
doesn't take long don't be nervous or
0:02:06.960,0:02:10.649
like oh this is
0:02:07.950,0:02:12.120
10 it's intense if you don't pay
0:02:10.649,0:02:15.269
attention but no we're going to rip
0:02:12.120,0:02:17.220
through this so Camera Raw I'm just
0:02:15.269,0:02:19.709
going to tweak the exposure bring up the
0:02:17.220,0:02:21.060
contrast a little bit highlight you'll
0:02:19.709,0:02:23.610
see in the mountain there at the top I
0:02:21.060,0:02:24.959
drag them all the way to the right they
0:02:23.610,0:02:26.670
blow out if I bring them all the way
0:02:24.959,0:02:30.420
down it's a little too dark but I'm
0:02:26.670,0:02:33.450
happy kind of just just a little south
0:02:30.420,0:02:34.739
of the center their shadows I'm fine
0:02:33.450,0:02:36.390
with you can see really only affects
0:02:34.739,0:02:38.459
that t-shirt we drag them all the way up
0:02:36.390,0:02:41.370
but I don't want I don't want it to be
0:02:38.459,0:02:44.280
this right it's just a little bit weird
0:02:41.370,0:02:46.260
a little bit awkward if you will I'll
0:02:44.280,0:02:49.260
drag them up to like 25 will be half
0:02:46.260,0:02:51.120
will meet in the middle the white I'm
0:02:49.260,0:02:53.730
happy with the whites the black that's
0:02:51.120,0:02:55.620
good the clarity I always like to tweak
0:02:53.730,0:02:57.329
a little bit because it just defines all
0:02:55.620,0:03:00.060
those edges and really sharpens the
0:02:57.329,0:03:01.620
image nicely straight into Photoshop the
0:03:00.060,0:03:03.750
vibrance we're going to up a little bit
0:03:01.620,0:03:05.730
a little bit more saturation and then
0:03:03.750,0:03:07.200
because of those clarity adjustments we
0:03:05.730,0:03:09.750
just did that sometimes darkens the
0:03:07.200,0:03:12.150
image you might want to go back and just
0:03:09.750,0:03:16.319
bring that exposure up slightly and then
0:03:12.150,0:03:18.329
we're going to hit open image ok here we
0:03:16.319,0:03:21.150
are the first thing I usually do with
0:03:18.329,0:03:24.209
the photo is clean up any dust on
0:03:21.150,0:03:26.190
someone's shirt or if they have bad skin
0:03:24.209,0:03:29.459
I usually go over their skin with a
0:03:26.190,0:03:31.560
brush tool like this Spot Healing Brush
0:03:29.459,0:03:35.100
that kind of thing and if you watched my
0:03:31.560,0:03:37.230
tutorial on how to float things in your
0:03:35.100,0:03:39.690
photos this is the same brush that I'm
0:03:37.230,0:03:41.670
using and I'm just clicking to get rid
0:03:39.690,0:03:43.260
of any dust or specks
0:03:41.670,0:03:45.260
that's just brush over here on the left
0:03:43.260,0:03:49.440
side right below the color picker and
0:03:45.260,0:03:51.720
it's just like look you clicked on so
0:03:49.440,0:03:54.720
you can kind of clean up any spots that
0:03:51.720,0:03:56.010
you want to smooth over with this brush
0:03:54.720,0:03:57.660
now sometimes if you were to click
0:03:56.010,0:03:59.730
something too big like let's say I made
0:03:57.660,0:04:01.590
this brush size huge and click you can
0:03:59.730,0:04:03.810
actually see the outline of the circle
0:04:01.590,0:04:05.040
so you don't want to do that if you want
0:04:03.810,0:04:07.500
to get rid of this little red mark here
0:04:05.040,0:04:09.239
you'd be better off hitting s which
0:04:07.500,0:04:12.090
gives you the clone stamp you hold down
0:04:09.239,0:04:13.830
option select the area you want to clone
0:04:12.090,0:04:16.080
and then you click too
0:04:13.830,0:04:17.730
in that area over and I'm happy with
0:04:16.080,0:04:21.120
pretty much just that right there he's
0:04:17.730,0:04:24.870
got good skin as it is so I am ready to
0:04:21.120,0:04:26.580
go now with Photoshop you never want to
0:04:24.870,0:04:28.800
just edit the bottom layer and just
0:04:26.580,0:04:31.890
start taking on your layers and layers
0:04:28.800,0:04:35.160
an hour goes by you crushed an entire
0:04:31.890,0:04:36.690
pizza and then you realize to yourself
0:04:35.160,0:04:38.370
Oh his eyes are a little bit too dark
0:04:36.690,0:04:39.510
and go back and change that you're like
0:04:38.370,0:04:42.180
whoops sorry
0:04:39.510,0:04:44.850
you flatten that image and bake those
0:04:42.180,0:04:47.460
edits into that into that photo like 38
0:04:44.850,0:04:49.500
minutes ago there's no going back but if
0:04:47.460,0:04:51.600
you do everything on layers you can
0:04:49.500,0:04:53.430
always delete a layer go back delete
0:04:51.600,0:04:55.320
what you did tweak that layers
0:04:53.430,0:04:58.200
adjustments change the colors so you
0:04:55.320,0:05:00.260
always want to work in layers now I
0:04:58.200,0:05:02.880
don't just duplicate the background I
0:05:00.260,0:05:04.500
shift option command n is going to give
0:05:02.880,0:05:06.920
you a new layer and then what I do is
0:05:04.500,0:05:09.360
stamp visible layer on top of that
0:05:06.920,0:05:12.870
sounds crazy already right but hang on
0:05:09.360,0:05:14.760
shift option command e paste that image
0:05:12.870,0:05:17.160
into the new layer we just made instead
0:05:14.760,0:05:18.450
of just duplicating a layer if I've made
0:05:17.160,0:05:20.580
a bunch of edits to a layer that is
0:05:18.450,0:05:22.320
duplicate it to duplicate those edits
0:05:20.580,0:05:24.840
with it I don't want that I just want to
0:05:22.320,0:05:26.190
clean start so I can manipulate that and
0:05:24.840,0:05:27.419
then blend everything together that
0:05:26.190,0:05:29.730
doesn't make sense
0:05:27.419,0:05:31.440
rewind watch it if you still rebound and
0:05:29.730,0:05:35.370
watch it doesn't make sense do a shot
0:05:31.440,0:05:36.690
come back it'll make sense okay
0:05:35.370,0:05:39.270
I'm going to start by sharpening the
0:05:36.690,0:05:41.100
image and by doing that I start by
0:05:39.270,0:05:43.200
blurring the image first sounds
0:05:41.100,0:05:45.800
counterintuitive yes but this is why
0:05:43.200,0:05:49.500
you're going to go over to filter blur
0:05:45.800,0:05:52.530
Gaussian blur I have it preset to 5 so
0:05:49.500,0:05:54.270
set your radius of 5 hit OK change the
0:05:52.530,0:05:58.560
blending mode down here in your layers
0:05:54.270,0:05:59.250
panel to stop light oh look at that it
0:05:58.560,0:06:01.500
looks warm
0:05:59.250,0:06:03.840
it looks more punchy it already looks
0:06:01.500,0:06:06.090
cooler but yeah I know it's blurry
0:06:03.840,0:06:07.620
you're like why would I just want to
0:06:06.090,0:06:09.780
just wreck an image to try and make it
0:06:07.620,0:06:12.270
better sometimes you got to set
0:06:09.780,0:06:13.830
something free to what's the same you
0:06:12.270,0:06:16.169
got to let it you got to let it go to
0:06:13.830,0:06:18.400
make it come back or if you let you love
0:06:16.169,0:06:22.389
it set it free what it doesn't matter
0:06:18.400,0:06:26.260
changing the opacity to 50%
0:06:22.389,0:06:28.449
hit enter okay now if we use that little
0:06:26.260,0:06:30.850
eyeball they're visible and invisible
0:06:28.449,0:06:33.270
you can see how it's warmed his skin up
0:06:30.850,0:06:37.479
it's kind of added just glow this nice
0:06:33.270,0:06:39.970
smooth aspect to it soothing comforting
0:06:37.479,0:06:42.729
if you will and we can see that by just
0:06:39.970,0:06:44.290
clicking the eyeball on and off now is
0:06:42.729,0:06:46.570
where we're going to sharpen it so again
0:06:44.290,0:06:48.610
I'm going to shift option command n for
0:06:46.570,0:06:51.580
a new layer shift option command E to
0:06:48.610,0:06:54.400
stamp that layer on top and I'm going to
0:06:51.580,0:06:56.169
desaturate this because I don't want to
0:06:54.400,0:06:57.639
affect the colors when I'm sharpening it
0:06:56.169,0:06:59.350
I just want to affect the lightness in
0:06:57.639,0:07:02.800
the darkness while I'm sharpening it so
0:06:59.350,0:07:05.650
shift command U is going to take all
0:07:02.800,0:07:07.419
that color right gone change that
0:07:05.650,0:07:09.789
blending mode to overlay you're going to
0:07:07.419,0:07:11.650
go oh my goodness Pete what this looks
0:07:09.789,0:07:14.470
like a scene from the Croke what is this
0:07:11.650,0:07:17.260
nonsense heading on with me here go up
0:07:14.470,0:07:20.139
to filter other we're going to run a
0:07:17.260,0:07:22.990
high pass on it what just happened
0:07:20.139,0:07:25.479
I know magic you'll see that weird crow
0:07:22.990,0:07:27.100
like filter just vanished and now we
0:07:25.479,0:07:29.950
have something that looks a little
0:07:27.100,0:07:31.750
sharper you're going to hit okay now
0:07:29.950,0:07:33.760
let's zoom in to his face here take a
0:07:31.750,0:07:35.020
look at what's happened if we hide that
0:07:33.760,0:07:38.139
it's blurry
0:07:35.020,0:07:41.590
we unhide it it's sharp now if we unhide
0:07:38.139,0:07:44.530
that and unhide this you'll see the
0:07:41.590,0:07:46.270
colors have not only been pumped up a
0:07:44.530,0:07:49.570
little bit in saturation but that skins
0:07:46.270,0:07:51.580
nice and smooth and now it's sharp and
0:07:49.570,0:07:54.820
we zoom out and it's looking pretty good
0:07:51.580,0:07:56.590
gosh darn it if you want to double those
0:07:54.820,0:07:58.780
effects if you want to say you know what
0:07:56.590,0:08:01.330
I could use a little bit more of that
0:07:58.780,0:08:03.700
sharp reapeat or I like the skin to look
0:08:01.330,0:08:06.789
even more dreamy hold down command
0:08:03.700,0:08:08.740
select both those layers drag them down
0:08:06.789,0:08:11.710
to this new layers tab and that's going
0:08:08.740,0:08:14.050
to duplicate the layers with all of the
0:08:11.710,0:08:16.180
effects now that's too strong for me so
0:08:14.050,0:08:18.200
while those two layers are still well
0:08:16.180,0:08:21.170
while they're still selected
0:08:18.200,0:08:24.530
even think of what to say there change
0:08:21.170,0:08:26.450
your opacity to whatever suits your your
0:08:24.530,0:08:29.420
fancy I'm going to go down to like 20 I
0:08:26.450,0:08:31.550
don't want to really over exaggerate
0:08:29.420,0:08:35.180
duplicating those effects but just
0:08:31.550,0:08:38.750
enough that it gives me a little little
0:08:35.180,0:08:41.240
more okay what do we do now Pete well it
0:08:38.750,0:08:42.919
could use some warm it's not winter time
0:08:41.240,0:08:44.840
right now in this photo but it's looking
0:08:42.919,0:08:46.520
a little too cold so we're going to warm
0:08:44.840,0:08:50.090
the photo up and we're going to do that
0:08:46.520,0:08:52.460
by you guessed it shift command shift
0:08:50.090,0:08:55.010
option command and new layer and then
0:08:52.460,0:08:57.770
we're going to shift delete that's going
0:08:55.010,0:09:00.830
to bring up the content aware box and
0:08:57.770,0:09:02.870
you're going to hit color under content
0:09:00.830,0:09:05.600
which then opens up the color picker I
0:09:02.870,0:09:07.130
have orange selected there's the
0:09:05.600,0:09:10.640
hexadecimal code if you want to see that
0:09:07.130,0:09:11.960
F 5 7 9 0 0 you can plug that into the
0:09:10.640,0:09:14.480
same spot and you'll end up with the
0:09:11.960,0:09:15.620
same color orange that I'm using but it
0:09:14.480,0:09:19.030
all depends on the photo you're editing
0:09:15.620,0:09:22.820
so kind of doesn't matter hit OK
0:09:19.030,0:09:26.660
hit OK again and now you have it looks
0:09:22.820,0:09:29.540
beautiful a nice solid pumpkin looking
0:09:26.660,0:09:33.140
photo completely orange change that
0:09:29.540,0:09:35.420
blending mode down here to soft light
0:09:33.140,0:09:37.310
and now it looks a little better it
0:09:35.420,0:09:39.770
still looks like he has jaundice and
0:09:37.310,0:09:42.380
things are going bad we're going to
0:09:39.770,0:09:45.590
change that opacity to like I don't know
0:09:42.380,0:09:48.950
maybe like 15 and say 15 is like a good
0:09:45.590,0:09:50.810
spot maybe maybe 13 I wanted to go 10
0:09:48.950,0:09:53.510
but then 16 so 13 in the middle of
0:09:50.810,0:09:55.280
sounds like I'm happy with that so now
0:09:53.510,0:09:57.200
that looks warmer so let's hide all of
0:09:55.280,0:10:00.230
these and see what we've done see how
0:09:57.200,0:10:04.340
it's looking better already with not bad
0:10:00.230,0:10:05.960
now what if I wanted to make his eyes
0:10:04.340,0:10:07.640
brighter or make the mountains in the
0:10:05.960,0:10:09.800
background darker because they're a
0:10:07.640,0:10:11.180
little too washed out or his eyes and I
0:10:09.800,0:10:13.040
look a little too dark because of all
0:10:11.180,0:10:15.170
the sharpening and the saturation that
0:10:13.040,0:10:16.190
we've added with the Gaussian blur we'll
0:10:15.170,0:10:17.810
just how you're going to do that you're
0:10:16.190,0:10:19.910
going to make a new layer shift option
0:10:17.810,0:10:22.040
command n you're going to stamp that
0:10:19.910,0:10:24.500
visible on there and you're going to
0:10:22.040,0:10:26.330
grab the last suit tool hold command
0:10:24.500,0:10:27.120
down get plus on your keyboard that's
0:10:26.330,0:10:29.009
going to zoom in
0:10:27.120,0:10:31.259
if you hold spacebar this is a little
0:10:29.009,0:10:34.170
hand pop-up and you can use that hand to
0:10:31.259,0:10:35.910
move the image around command + again to
0:10:34.170,0:10:39.329
zoom in and we're just going to select
0:10:35.910,0:10:41.100
the iris I don't want to make the whites
0:10:39.329,0:10:42.629
of his eyes too bright because then
0:10:41.100,0:10:45.480
he'll look like someone from the walking
0:10:42.629,0:10:47.370
dead so once we selected that you'll see
0:10:45.480,0:10:49.410
that little selection of what's called
0:10:47.370,0:10:51.930
marching ants that means this area is
0:10:49.410,0:10:53.999
selected you hold shift you'll see a
0:10:51.930,0:10:59.459
little plus pop-up beside the lasso
0:10:53.999,0:11:01.920
lasso lasso lasso whatever select the
0:10:59.459,0:11:05.189
other eye be very careful not to go too
0:11:01.920,0:11:08.189
much into the skin but it's okay and now
0:11:05.189,0:11:09.829
we've got both eyes selected now you're
0:11:08.189,0:11:12.959
going to come down here and make a new
0:11:09.829,0:11:16.379
adjustment layer with brightness and
0:11:12.959,0:11:18.540
contrast click on that now if we up that
0:11:16.379,0:11:19.709
brightness you'll see just the eyeballs
0:11:18.540,0:11:22.529
are getting brighter now that's
0:11:19.709,0:11:26.040
terrifying that straight up looks like a
0:11:22.529,0:11:27.379
zombie if we zoom out there unless I
0:11:26.040,0:11:30.959
mean if that's what you're going for
0:11:27.379,0:11:32.999
you're done but not not here we're just
0:11:30.959,0:11:35.069
going to up that just a little bit I
0:11:32.999,0:11:36.509
don't want it to be too obvious if you
0:11:35.069,0:11:39.480
brighten someone's eyes up is way too
0:11:36.509,0:11:41.009
much people know and it looks that it's
0:11:39.480,0:11:43.050
like oh that guy had some fun in
0:11:41.009,0:11:45.779
Photoshop we don't want that we want it
0:11:43.050,0:11:47.429
to be subtle the more subtle edits that
0:11:45.779,0:11:48.689
we apply to this just a more pleasing
0:11:47.429,0:11:51.300
it's going to end up in the end
0:11:48.689,0:11:53.819
so I'm just bumping that a little right
0:11:51.300,0:11:55.709
there it's fine 24 for me I am good to
0:11:53.819,0:11:58.499
go with that now we're going to make
0:11:55.709,0:12:00.329
another layer again and what I'm going
0:11:58.499,0:12:01.709
to do with this layer is darken those
0:12:00.329,0:12:03.600
mounds in the background
0:12:01.709,0:12:05.730
same thing shift option command and
0:12:03.600,0:12:07.559
shift option command II I feel like I
0:12:05.730,0:12:09.689
have to keep saying that in case people
0:12:07.559,0:12:10.730
are tuning in or zoning in and out so
0:12:09.689,0:12:13.470
I'm sorry
0:12:10.730,0:12:15.600
and I just apologize past because I'm
0:12:13.470,0:12:19.079
Canadian in half because I am sorry but
0:12:15.600,0:12:20.370
anyway let's get back to this what
0:12:19.079,0:12:22.410
you're going to do is again with that
0:12:20.370,0:12:25.610
last new tool you're just going to draw
0:12:22.410,0:12:29.939
a line along the waterline over his head
0:12:25.610,0:12:32.490
over the trees just like this up that
0:12:29.939,0:12:36.000
border of the photo across the top and
0:12:32.490,0:12:38.189
across the left side back down right
0:12:36.000,0:12:40.350
there happy with that now we've got our
0:12:38.189,0:12:40.770
selection here same thing adjustment
0:12:40.350,0:12:43.380
layer
0:12:40.770,0:12:46.529
curds this time now we're going to use
0:12:43.380,0:12:50.040
this curve and we're going to bring down
0:12:46.529,0:12:52.110
that brightness so we're going to crush
0:12:50.040,0:12:54.000
it here even more - we talked about
0:12:52.110,0:12:55.709
making that s curved when using curves
0:12:54.000,0:12:58.320
but right now I just want to make it
0:12:55.709,0:13:00.149
darker but in doing so it just made it
0:12:58.320,0:13:01.560
really blue and like I said we're trying
0:13:00.149,0:13:02.640
to get rid of it feeling like it's
0:13:01.560,0:13:05.459
winter because it's the middle of summer
0:13:02.640,0:13:08.279
in this photo so we can change from RGB
0:13:05.459,0:13:10.380
to red Channel and then we can push more
0:13:08.279,0:13:13.440
Reds on to end now we don't want to look
0:13:10.380,0:13:16.680
like Mars so we're just going to tweak
0:13:13.440,0:13:18.480
that slightly just a little bit I'm
0:13:16.680,0:13:20.670
happy with that it's a little too purple
0:13:18.480,0:13:21.930
it's good right about there again I'm
0:13:20.670,0:13:23.940
trying to be subtle with this and we're
0:13:21.930,0:13:25.860
going to close that now because it's an
0:13:23.940,0:13:29.010
adjustment layer we can hit B for our
0:13:25.860,0:13:31.649
brush tool close bracket to make that a
0:13:29.010,0:13:34.380
little bit smaller and then we can paint
0:13:31.649,0:13:36.060
away that harsh line right there we're
0:13:34.380,0:13:38.580
just going to paint over that edge and
0:13:36.060,0:13:41.130
get rid of that harsh line because that
0:13:38.580,0:13:43.200
does not look good and then I'm going to
0:13:41.130,0:13:47.430
drop the opacity of this whole thing to
0:13:43.200,0:13:49.140
like 60 now if we hide that layer you'll
0:13:47.430,0:13:51.810
see what's happened it's just basically
0:13:49.140,0:13:54.089
drops the brightness and the contrast in
0:13:51.810,0:13:56.370
the top of the mountains and just kind
0:13:54.089,0:13:58.380
of define them a little more they got
0:13:56.370,0:14:00.570
lost and I wanted to bring them back
0:13:58.380,0:14:03.480
into focus and that's basically
0:14:00.570,0:14:06.000
accomplished by doing that now the last
0:14:03.480,0:14:09.240
thing you can do is shift option command
0:14:06.000,0:14:11.490
n shift option command E and then you
0:14:09.240,0:14:13.380
can desaturate this again and this is
0:14:11.490,0:14:15.510
just if you want a little more contrast
0:14:13.380,0:14:18.060
and mood in this photo which I like to
0:14:15.510,0:14:20.490
do in my shots but will be saturated
0:14:18.060,0:14:21.890
with shift command U and then I'm going
0:14:20.490,0:14:24.209
to change that blending mode to overlay
0:14:21.890,0:14:26.010
like we did right before we added the
0:14:24.209,0:14:28.770
high-pass filter but now I'm just going
0:14:26.010,0:14:31.170
to drop that opacity to like I don't
0:14:28.770,0:14:33.270
know 15 I'm going to preview see what
0:14:31.170,0:14:35.820
that does for me it just adds a little
0:14:33.270,0:14:39.390
more attitude I'm happy with this it
0:14:35.820,0:14:43.140
could just use a slight overall bump in
0:14:39.390,0:14:46.260
brightness so the last thing this is the
0:14:43.140,0:14:48.110
last layer we're going to add here I'm
0:14:46.260,0:14:51.209
going to add an adjustment layer for
0:14:48.110,0:14:53.610
curves and I'm just going to take the
0:14:51.209,0:14:54.630
bottom here and bump those curves up
0:14:53.610,0:14:58.440
just a little
0:14:54.630,0:15:01.320
little bit just ever so slightly not
0:14:58.440,0:15:02.940
making a big deal of it that's it I'm
0:15:01.320,0:15:04.770
going to select that top layer I'm going
0:15:02.940,0:15:06.510
to hold down shift and I'm going to
0:15:04.770,0:15:08.490
click the bottom layer right above the
0:15:06.510,0:15:09.990
background I'm going to hit command G
0:15:08.490,0:15:11.820
it's going to group all of our edits
0:15:09.990,0:15:14.460
together and we can double click on that
0:15:11.820,0:15:16.590
and name it edit and now when we look at
0:15:14.460,0:15:19.500
this photo if we just hide this layer
0:15:16.590,0:15:21.630
that's what we started with after we
0:15:19.500,0:15:24.900
adjusted it in the Camera Raw plug-in at
0:15:21.630,0:15:26.370
the beginning now it looks like this so
0:15:24.900,0:15:28.710
I'm going to flatten this image just for
0:15:26.370,0:15:31.800
example sake and then I'm going to bring
0:15:28.710,0:15:33.390
in this camera edit again so you can see
0:15:31.800,0:15:35.280
it but I'm going to reset we're going to
0:15:33.390,0:15:38.130
go back to default to what it looked
0:15:35.280,0:15:41.160
like I'm going to open that image I'm
0:15:38.130,0:15:43.290
going to copy it close that window and
0:15:41.160,0:15:45.900
I'm going to paste it onto this and that
0:15:43.290,0:15:47.550
is a pretty accurate representation of
0:15:45.900,0:15:50.070
what the photo looked like coming out of
0:15:47.550,0:15:53.820
the camera and what it looks like now
0:15:50.070,0:15:56.010
after we've applied our edits again this
0:15:53.820,0:15:58.020
is all personal preference you might not
0:15:56.010,0:16:00.240
like your photos as contrast being a
0:15:58.020,0:16:03.030
punchy or to pop as much as this and
0:16:00.240,0:16:05.070
that's the beauty of being photographers
0:16:03.030,0:16:06.840
and artists and editing is that you can
0:16:05.070,0:16:09.240
make it look however you want it to look
0:16:06.840,0:16:11.460
and the more that you stay consistent
0:16:09.240,0:16:13.680
with that style the more it becomes your
0:16:11.460,0:16:15.870
style and people start to pick up on
0:16:13.680,0:16:17.730
shots that you take without even knowing
0:16:15.870,0:16:19.830
you took them because they say hey that
0:16:17.730,0:16:22.710
looks a lot like how piece photos look
0:16:19.830,0:16:24.750
very peter McKinnon and it's really cool
0:16:22.710,0:16:27.270
to start seeing your own style develop
0:16:24.750,0:16:28.890
so if this is a cup of tea there's no
0:16:27.270,0:16:30.720
worries with that you can play around
0:16:28.890,0:16:32.700
with all those settings kind of follow
0:16:30.720,0:16:34.470
the same basic steps and come up with
0:16:32.700,0:16:35.700
something yourself that looks pretty
0:16:34.470,0:16:38.550
similar it looks completely different
0:16:35.700,0:16:41.580
everything's okay but we went from this
0:16:38.550,0:16:44.670
to this and I'd say that's a pretty
0:16:41.580,0:16:45.990
nifty little edit and not much time so
0:16:44.670,0:16:48.090
that's it guys thank you so much for
0:16:45.990,0:16:49.470
watching I really appreciate it if you
0:16:48.090,0:16:51.450
liked this video hit that like button
0:16:49.470,0:16:52.860
drop me a comment below let me know what
0:16:51.450,0:16:55.770
you thought I love hearing from you guys
0:16:52.860,0:16:57.990
and interacting and I'll see you in the
0:16:55.770,0:16:59.090
next tutorial or the next vlog whichever
0:16:57.990,0:17:11.559
comes first
0:16:59.090,0:17:11.559
[Music]
Default
1
00:00:00,096 --> 00:00:01,117
- What's up everybody?
2
00:00:01,117 --> 00:00:03,025
Peter McKinnon here, and today,
3
00:00:03,025 --> 00:00:05,750
we're talking about how to
make your photos look better.
4
00:00:05,750 --> 00:00:06,966
Fast.
5
00:00:06,966 --> 00:00:09,633
(intense music)
6
00:00:12,249 --> 00:00:13,636
Okay, so you know when you
get home from somewhere,
7
00:00:13,636 --> 00:00:15,951
you've been taking photos,
maybe vacation, maybe trip,
8
00:00:15,951 --> 00:00:18,554
hanging out with friends,
and you load that photo
9
00:00:18,554 --> 00:00:19,856
onto your computer and you're like,
10
00:00:19,856 --> 00:00:20,752
(gasps)
11
00:00:20,752 --> 00:00:22,539
this looks so good!
12
00:00:22,539 --> 00:00:25,177
Throw it up on the socials,
Facebook, Instagram,
13
00:00:25,177 --> 00:00:27,777
people are double tapping
that IG, hearts are flowing,
14
00:00:27,777 --> 00:00:29,610
and you're just feeling
good about yourself,
15
00:00:29,610 --> 00:00:32,539
right as the sun sets and
it's just so beautiful.
16
00:00:32,539 --> 00:00:34,285
And then there's sometimes you get home,
17
00:00:34,285 --> 00:00:35,706
and you open that photo
up on your computer
18
00:00:35,706 --> 00:00:38,596
and you're like,
(record skips)
19
00:00:38,596 --> 00:00:42,378
I remember this being way better
when I was there, promise.
20
00:00:42,378 --> 00:00:44,494
So these are some basic editing skills,
21
00:00:44,494 --> 00:00:47,265
basic editing skills, that you can do
22
00:00:47,265 --> 00:00:50,640
on your photographs at home
at any time using Photoshop.
23
00:00:50,640 --> 00:00:54,543
I'm using Photoshop CC, so
go ahead, head over to Adobe
24
00:00:54,543 --> 00:00:56,128
and download the trial of that,
25
00:00:56,128 --> 00:00:58,524
or sign up for their
subscription based service
26
00:00:58,524 --> 00:01:00,518
which is what I do, and
you pay a monthly fee
27
00:01:00,518 --> 00:01:02,797
to basically own all of their apps,
28
00:01:02,797 --> 00:01:03,813
that's what I recommend.
29
00:01:03,813 --> 00:01:07,760
We can take a mundane
photo that looks like this,
30
00:01:07,760 --> 00:01:10,927
and turn it into something
that looks like this,
31
00:01:10,927 --> 00:01:13,204
in pretty much like 10 minutes maybe?
32
00:01:13,204 --> 00:01:16,091
Even faster if you do this thing
on a daily basis like I do.
33
00:01:16,091 --> 00:01:18,248
Okay, so we've dragged
our photo into Photoshop
34
00:01:18,248 --> 00:01:21,686
and here we are, we are hit
with the Camera Raw plugin
35
00:01:21,686 --> 00:01:25,062
that pops up and says,
hey this is a raw file,
36
00:01:25,062 --> 00:01:25,895
what do you wanna do?
37
00:01:25,895 --> 00:01:27,338
Do you wanna just open the image as is?
38
00:01:27,338 --> 00:01:28,605
Do you wanna tweak it a little bit here
39
00:01:28,605 --> 00:01:31,246
with Camera Raw and then open it?
40
00:01:31,246 --> 00:01:32,543
And this is where you
might say to me, Pete,
41
00:01:32,543 --> 00:01:34,224
well what's the difference between editing
42
00:01:34,224 --> 00:01:36,745
and doing everything you're
about to show me in Lightroom
43
00:01:36,745 --> 00:01:39,226
instead of using Lightroom and Photoshop,
44
00:01:39,226 --> 00:01:41,626
or using Camera Raw and Photoshop?
45
00:01:41,626 --> 00:01:43,373
Yeah, you can do everything in Lightroom.
46
00:01:43,373 --> 00:01:44,796
You can do everything in Photoshop.
47
00:01:44,796 --> 00:01:48,090
It's all about workflow, what
programs you like better,
48
00:01:48,090 --> 00:01:49,268
I like using them both.
49
00:01:49,268 --> 00:01:51,786
Photoshop's more of like
a photo manipulator,
50
00:01:51,786 --> 00:01:54,834
where you can, I don't
like that guy's face!
51
00:01:54,834 --> 00:01:57,597
I'm gonna put his face on his face.
52
00:01:57,597 --> 00:01:59,952
Great for that kind of thing.
53
00:01:59,952 --> 00:02:02,397
But I like using them both in
conjunction with one another,
54
00:02:02,397 --> 00:02:04,674
and I'm gonna show you
how I do it right here.
55
00:02:04,674 --> 00:02:07,529
Doesn't take long, so don't
be nervous or like, oh,
56
00:02:07,529 --> 00:02:11,313
this is intense, it's intense
if you don't pay attention.
57
00:02:11,313 --> 00:02:14,968
But no, we're gonna rip
through this, so Camera Raw,
58
00:02:14,968 --> 00:02:17,818
I'm just gonna tweak the
exposure, bring up the contrast
59
00:02:17,818 --> 00:02:20,377
a little bit, highlights,
you'll see in the mountain
60
00:02:20,377 --> 00:02:23,543
there at the top if I drag
them all the way to the right,
61
00:02:23,543 --> 00:02:25,780
they blow out, if I bring
them all the way down,
62
00:02:25,780 --> 00:02:29,084
it's a little too dark, but
I'm happy kind of just, just,
63
00:02:29,084 --> 00:02:32,135
just a little south of the center there.
64
00:02:32,135 --> 00:02:34,490
Shadows, I'm fine with,
you can see it really only
65
00:02:34,490 --> 00:02:37,056
affects that T-shirt if we
drag 'em all the way up,
66
00:02:37,056 --> 00:02:39,537
but I don't want it to be this bright.
67
00:02:39,537 --> 00:02:41,769
It's just a little bit weird,
68
00:02:41,769 --> 00:02:43,963
little bit awkward if you will.
69
00:02:43,963 --> 00:02:48,675
I'll drag 'em up to like 25,
we'll meet in the middle.
70
00:02:48,675 --> 00:02:50,177
The whites, I'm happy with the whites,
71
00:02:50,177 --> 00:02:53,752
the blacks, that's good, the
clarity I always like to tweak
72
00:02:53,752 --> 00:02:56,238
a little bit because it
just defines all those edges
73
00:02:56,238 --> 00:02:58,312
and really sharpens the image nicely
74
00:02:58,312 --> 00:03:00,060
straight into Photoshop.
75
00:03:00,060 --> 00:03:01,930
The vibrance we're gonna up a little bit,
76
00:03:01,930 --> 00:03:03,477
little bit more saturation.
77
00:03:03,477 --> 00:03:06,078
And then, because of those
clarity adjustments we just did,
78
00:03:06,078 --> 00:03:07,585
that sometimes darkens the image,
79
00:03:07,585 --> 00:03:11,340
so you might wanna go back
and just bring that exposure
80
00:03:11,340 --> 00:03:15,113
up slightly, and then
we're gonna hit Open Image.
81
00:03:15,113 --> 00:03:19,301
Okay, here we are, the first
thing I usually do with a photo
82
00:03:19,301 --> 00:03:22,547
is clean up any dust on someone's shirt
83
00:03:22,547 --> 00:03:26,003
or if they have bad skin I
usually go over their skin
84
00:03:26,003 --> 00:03:29,791
with a brush tool like
this spot healing brush,
85
00:03:29,791 --> 00:03:30,889
that kinda thing.
86
00:03:30,889 --> 00:03:34,883
And if you watched my tutorial
on how to float things
87
00:03:34,883 --> 00:03:38,129
in your photos, this is the
same brush that I'm using,
88
00:03:38,129 --> 00:03:41,016
and I'm just clicking
to get rid of any dust
89
00:03:41,016 --> 00:03:43,500
or specks, that's this brush
over here on the left side
90
00:03:43,500 --> 00:03:45,699
right below the color picker.
91
00:03:45,699 --> 00:03:49,399
And it just like, look,
you click, it's gone,
92
00:03:49,399 --> 00:03:51,595
so you can kinda clean up any spots
93
00:03:51,595 --> 00:03:54,886
that you want to smooth
over with this brush.
94
00:03:54,886 --> 00:03:57,008
Now sometimes if you were
to click something too big,
95
00:03:57,008 --> 00:03:59,610
like let's say I made this
brush size huge and clicked,
96
00:03:59,610 --> 00:04:01,965
you can actually see the
outline of the circle.
97
00:04:01,965 --> 00:04:03,509
So you don't wanna do that.
98
00:04:03,509 --> 00:04:05,632
If you wanted to get rid of
this little red mark here,
99
00:04:05,632 --> 00:04:07,459
you'd be better off hitting S,
100
00:04:07,459 --> 00:04:08,841
which gives you the clone stamp,
101
00:04:08,841 --> 00:04:12,381
you hold down Option, select
the area you wanna clone,
102
00:04:12,381 --> 00:04:15,554
and then you click to
clone that area over.
103
00:04:15,554 --> 00:04:17,669
And I'm happy with pretty
much just that right there.
104
00:04:17,669 --> 00:04:21,836
He's got good skin as it
is, so, I am ready to go.
105
00:04:23,165 --> 00:04:25,568
Now with Photoshop, you
never wanna just edit
106
00:04:25,568 --> 00:04:28,547
the bottom layer and just
start caking on your layers
107
00:04:28,547 --> 00:04:32,714
and layers, an hour goes by,
you crushed an entire pizza.
108
00:04:33,907 --> 00:04:35,453
And then you realize to yourself, oh,
109
00:04:35,453 --> 00:04:36,834
his eyes are a little bit too dark,
110
00:04:36,834 --> 00:04:38,173
I'm gonna go back and change that.
111
00:04:38,173 --> 00:04:40,863
And you're like, woops, sorry,
you flattened that image
112
00:04:40,863 --> 00:04:45,825
and baked those edits into
that photo like 38 minutes ago.
113
00:04:45,825 --> 00:04:47,329
There's no going back.
114
00:04:47,329 --> 00:04:49,443
But if you do everything on layers,
115
00:04:49,443 --> 00:04:52,693
you can always delete a layer,
go back, delete what you did,
116
00:04:52,693 --> 00:04:55,168
tweak that layer's
adjustments, change the colors,
117
00:04:55,168 --> 00:04:57,808
so you always wanna work in layers.
118
00:04:57,808 --> 00:05:00,254
Now, I don't just
duplicate the background,
119
00:05:00,254 --> 00:05:02,569
I Shift + Option + Command + N
120
00:05:02,569 --> 00:05:03,746
is gonna give you a new layer.
121
00:05:03,746 --> 00:05:07,558
And then what I do is stamp
visible layer on top of that.
122
00:05:07,558 --> 00:05:08,941
This sounds crazy already, right?
123
00:05:08,941 --> 00:05:12,030
But hang on, Shift + Option + Command + E
124
00:05:12,030 --> 00:05:14,423
pastes that image into
the new layer we just made
125
00:05:14,423 --> 00:05:16,820
instead of just duplicating a layer.
126
00:05:16,820 --> 00:05:18,242
If I've made a bunch of edits to a layer
127
00:05:18,242 --> 00:05:20,637
then I duplicate it, it's
gonna duplicate those edits
128
00:05:20,637 --> 00:05:23,730
with it, I don't want that,
I just want a clean start
129
00:05:23,730 --> 00:05:26,497
so I can manipulate that and
then blend everything together.
130
00:05:26,497 --> 00:05:28,772
If that doesn't make
sense, rewind, watch it,
131
00:05:28,772 --> 00:05:30,948
if you still rewound and watch
and it doesn't make sense,
132
00:05:30,948 --> 00:05:34,198
do a shot, come back, it'll make sense.
133
00:05:35,062 --> 00:05:37,619
Okay, I'm gonna start
by sharpening the image,
134
00:05:37,619 --> 00:05:40,829
and by doing that, I start
by blurring the image first.
135
00:05:40,829 --> 00:05:43,795
Sounds counterintuitive,
yes, but this is why.
136
00:05:43,795 --> 00:05:47,946
You're gonna go over to
Filter, Blur, Gaussian Blur,
137
00:05:47,946 --> 00:05:50,870
I have it preset to five,
so set your radius to five,
138
00:05:50,870 --> 00:05:53,881
hit OK, change the blending mode down here
139
00:05:53,881 --> 00:05:56,872
in your layers panel to Soft Light.
140
00:05:56,872 --> 00:05:57,705
Woo!
141
00:05:57,705 --> 00:06:00,952
Look at that, it looks
warm, it looks more punchy,
142
00:06:00,952 --> 00:06:04,129
it already looks cooler,
but, I know, it's blurry.
143
00:06:04,129 --> 00:06:07,060
You're like, why would
I just wreck an image
144
00:06:07,060 --> 00:06:08,576
to try and make it better?
145
00:06:08,576 --> 00:06:11,429
Sometimes you gotta set something free to,
146
00:06:11,429 --> 00:06:12,284
what's the saying?
147
00:06:12,284 --> 00:06:15,255
You gotta let it go to make it come back?
148
00:06:15,255 --> 00:06:17,335
Or if you love it set it free?
149
00:06:17,335 --> 00:06:19,102
You know what, doesn't matter,
150
00:06:19,102 --> 00:06:23,102
change the opacity to
50%, hit Enter, okay?
151
00:06:24,719 --> 00:06:26,998
Now, if we use that little eyeball there,
152
00:06:26,998 --> 00:06:29,595
visible and invisible, you can see
153
00:06:29,595 --> 00:06:32,646
how it's warmed his skin up,
it's kind of added this glow,
154
00:06:32,646 --> 00:06:35,229
this nice, smooth aspect to it.
155
00:06:36,228 --> 00:06:39,076
Soothing, comforting, if you will.
156
00:06:39,076 --> 00:06:42,247
And we can see that by just
clicking the eyeball on and off.
157
00:06:42,247 --> 00:06:44,078
Now is where we're going to sharpen it.
158
00:06:44,078 --> 00:06:46,433
So again, I'm gonna Shift
+ Option + Command + N
159
00:06:46,433 --> 00:06:48,546
for a new layer, Shift
+ Option + Command + E
160
00:06:48,546 --> 00:06:51,227
to stamp that layer on top.
161
00:06:51,227 --> 00:06:52,935
And I'm gonna desaturate this,
162
00:06:52,935 --> 00:06:55,411
because I don't want to affect the colors
163
00:06:55,411 --> 00:06:56,915
when I'm sharpening it,
I just want to affect
164
00:06:56,915 --> 00:06:59,240
the lightness and the darkness
while I'm sharpening it.
165
00:06:59,240 --> 00:07:03,407
So Shift + Command + U is
gonna take all that color away,
166
00:07:04,279 --> 00:07:07,203
gone, change that
blending mode to Overlay,
167
00:07:07,203 --> 00:07:09,533
you're gonna go, oh my
goodness, Pete, what?
168
00:07:09,533 --> 00:07:11,363
This looks like a scene from The Crow.
169
00:07:11,363 --> 00:07:13,284
What is this nonsense?
170
00:07:13,284 --> 00:07:16,839
Hang on with me here,
go up to Filter, Other,
171
00:07:16,839 --> 00:07:20,373
we're gonna run a High Pass
on it, what just happened?
172
00:07:20,373 --> 00:07:23,837
I know, it's magic, you'll see
that weird crow-like filter
173
00:07:23,837 --> 00:07:27,008
just vanished, and now we
have something that looks
174
00:07:27,008 --> 00:07:29,910
a little sharper, you're gonna hit OK.
175
00:07:29,910 --> 00:07:31,620
Now let's zoom in to his face here
176
00:07:31,620 --> 00:07:33,216
and take a look at what's happened.
177
00:07:33,216 --> 00:07:37,573
If we hide that, it's blurry,
we unhide it, it's sharp.
178
00:07:37,573 --> 00:07:40,253
Now if we unhide that, and unhide this,
179
00:07:40,253 --> 00:07:43,744
you'll see the colors have not only
180
00:07:43,744 --> 00:07:45,610
been pumped up a little bit in saturation,
181
00:07:45,610 --> 00:07:49,512
but that skin's nice and
smooth, and now it's sharp.
182
00:07:49,512 --> 00:07:53,536
And we zoom out, and it's
looking pretty good gosh darn it.
183
00:07:53,536 --> 00:07:55,688
If you want to double those effects,
184
00:07:55,688 --> 00:07:57,681
if you want to say, you know what?
185
00:07:57,681 --> 00:07:59,712
I could use a little bit more
of that sharpening, Pete.
186
00:07:59,712 --> 00:08:03,090
Or, I'd like the skin to
look even more dreamy,
187
00:08:03,090 --> 00:08:06,059
hold down Command,
select both those layers,
188
00:08:06,059 --> 00:08:08,412
drag them down to this New Layers tab,
189
00:08:08,412 --> 00:08:11,055
and that's gonna duplicate the layers
190
00:08:11,055 --> 00:08:12,761
with all of the effects.
191
00:08:12,761 --> 00:08:13,945
Now that's too strong for me,
192
00:08:13,945 --> 00:08:16,449
so while those two layers are still,
193
00:08:16,449 --> 00:08:17,853
while they're still selected,
194
00:08:17,853 --> 00:08:20,944
I couldn't even think
of what to say there,
195
00:08:20,944 --> 00:08:25,185
change your opacity to
whatever suits your fancy.
196
00:08:25,185 --> 00:08:26,565
I'm gonna go down to like 20,
197
00:08:26,565 --> 00:08:29,652
I don't want to really over exaggerate
198
00:08:29,652 --> 00:08:30,790
duplicating those effects,
199
00:08:30,790 --> 00:08:34,957
but just enough that it gives
me a little, little more.
200
00:08:35,862 --> 00:08:37,773
Okay, what do we do now Pete?
201
00:08:37,773 --> 00:08:40,051
Well, it could use some warmth,
202
00:08:40,051 --> 00:08:42,327
it's not winter time
right now in this photo,
203
00:08:42,327 --> 00:08:44,035
but it's looking a little too cold.
204
00:08:44,035 --> 00:08:45,991
So we're gonna warm the photo up,
205
00:08:45,991 --> 00:08:48,880
and we're gonna do that
by, you guessed it,
206
00:08:48,880 --> 00:08:52,249
Shift + Option + Command + N, new layer,
207
00:08:52,249 --> 00:08:54,777
and then we are going to Shift + Delete,
208
00:08:54,777 --> 00:08:58,156
that's gonna bring up
the Content Aware box.
209
00:08:58,156 --> 00:09:01,003
And you're gonna hit Color under Contents,
210
00:09:01,003 --> 00:09:03,237
which then opens up the Color Picker.
211
00:09:03,237 --> 00:09:06,403
I have orange selected,
there's the hexadecimal code
212
00:09:06,403 --> 00:09:09,657
if you want to see that, F57900,
213
00:09:09,657 --> 00:09:11,281
you can plug that into the same spot
214
00:09:11,281 --> 00:09:13,479
and you'll end up with the same
color orange that I'm using.
215
00:09:13,479 --> 00:09:15,837
But, it all depends on
the photo you're editing,
216
00:09:15,837 --> 00:09:18,195
so kinda doesn't matter.
217
00:09:18,195 --> 00:09:22,362
Hit OK, hit OK again, and now
you have it, looks beautiful.
218
00:09:24,382 --> 00:09:29,139
A nice, solid, pumpkin looking
photo, completely orange.
219
00:09:29,139 --> 00:09:33,306
Change that blending mode
down here to Soft Light.
220
00:09:34,180 --> 00:09:35,439
And now it looks a little better,
221
00:09:35,439 --> 00:09:37,234
it still looks like he has jaundice,
222
00:09:37,234 --> 00:09:39,483
and things are going bad,
223
00:09:39,483 --> 00:09:42,530
but we're gonna change that
opacity to like, I don't know,
224
00:09:42,530 --> 00:09:46,105
maybe like 15, I'd say
15 is like a good spot.
225
00:09:46,105 --> 00:09:49,723
Maybe 13, I wanted to go 10, but then 15,
226
00:09:49,723 --> 00:09:53,422
so 13 in the middle sounds
like, I'm happy with that.
227
00:09:53,422 --> 00:09:54,316
So now that looks warmer,
228
00:09:54,316 --> 00:09:56,913
so let's hide all of these
and see what we've done,
229
00:09:56,913 --> 00:09:58,217
see how it's looking better already?
230
00:09:58,217 --> 00:09:59,967
Let's, boop, not bad.
231
00:10:01,156 --> 00:10:05,022
Now, what if I wanted to
make his eyes brighter,
232
00:10:05,022 --> 00:10:07,218
or make the mountains in
the background darker?
233
00:10:07,218 --> 00:10:08,849
Because they're a little too washed out,
234
00:10:08,849 --> 00:10:10,677
or his eyes now look a little too dark
235
00:10:10,677 --> 00:10:12,871
because of all the
sharpening and the saturation
236
00:10:12,871 --> 00:10:15,103
that we've added with the gaussian blur.
237
00:10:15,103 --> 00:10:16,222
Well this is how you're gonna do that.
238
00:10:16,222 --> 00:10:17,405
You're gonna make a new layer,
239
00:10:17,405 --> 00:10:18,872
Shift + Option + Command + N,
240
00:10:18,872 --> 00:10:21,791
you're gonna stamp that visible on there,
241
00:10:21,791 --> 00:10:24,921
and you're gonna grab the
lasso tool, hold Command down,
242
00:10:24,921 --> 00:10:27,521
hit plus on your keyboard,
that's gonna zoom in.
243
00:10:27,521 --> 00:10:30,243
If you hold spacebar, you'll
see this little hand pop up,
244
00:10:30,243 --> 00:10:33,133
and you can use that hand
to move the image around.
245
00:10:33,133 --> 00:10:35,164
Command + Plus again to zoom in,
246
00:10:35,164 --> 00:10:38,244
and we're just gonna select the iris,
247
00:10:38,244 --> 00:10:40,886
I don't wanna make the
whites of his eyes too bright
248
00:10:40,886 --> 00:10:43,524
because then he'll look like
someone from The Walking Dead.
249
00:10:43,524 --> 00:10:45,243
So once we've selected that,
250
00:10:45,243 --> 00:10:46,746
you'll see that little selection
251
00:10:46,746 --> 00:10:48,213
of what's called marching ants,
252
00:10:48,213 --> 00:10:50,248
that means this area is selected.
253
00:10:50,248 --> 00:10:53,224
You hold Shift, you'll
see a little plus pop up
254
00:10:53,224 --> 00:10:56,922
beside the lasso, lasso, lasso, lasso?
255
00:10:56,922 --> 00:10:57,755
Whatever.
256
00:10:58,834 --> 00:11:02,696
Select the other eye, be very
careful not to go too much
257
00:11:02,696 --> 00:11:05,101
into the skin, but it's okay,
258
00:11:05,101 --> 00:11:08,022
and now we've got both eyes selected.
259
00:11:08,022 --> 00:11:09,161
Now you're gonna come down here
260
00:11:09,161 --> 00:11:12,127
and make a new adjustment layer
261
00:11:12,127 --> 00:11:14,322
with brightness and contrast.
262
00:11:14,322 --> 00:11:16,924
Click on that, now if
we up that brightness
263
00:11:16,924 --> 00:11:19,363
you'll see just the eyeballs
are getting brighter.
264
00:11:19,363 --> 00:11:23,631
Now that's terrifying, that
straight up looks like a zombie,
265
00:11:23,631 --> 00:11:26,437
if we zoom out there, unless,
266
00:11:26,437 --> 00:11:28,974
if that's what you're
going for, you're done.
267
00:11:28,974 --> 00:11:33,777
But not here, we're just gonna
up that just a little bit,
268
00:11:33,777 --> 00:11:34,994
I don't want it to be too obvious.
269
00:11:34,994 --> 00:11:37,961
If you brighten someone's
eyes up way too much,
270
00:11:37,961 --> 00:11:39,879
people know and it
looks bad and it's like,
271
00:11:39,879 --> 00:11:42,076
oh that guy had some fun in Photoshop.
272
00:11:42,076 --> 00:11:43,743
We don't want that, we
want it to be subtle.
273
00:11:43,743 --> 00:11:46,866
The more subtle edits
that we apply to this,
274
00:11:46,866 --> 00:11:48,658
just the more pleasing it's
gonna end up in the end.
275
00:11:48,658 --> 00:11:52,033
So I'm just bumping that a
little, right there is fine,
276
00:11:52,033 --> 00:11:55,159
24 for me, I am good to go with that.
277
00:11:55,159 --> 00:11:57,763
Now we're gonna make another layer again,
278
00:11:57,763 --> 00:11:59,635
and what I'm gonna do with this layer
279
00:11:59,635 --> 00:12:01,997
is darken those mounds in the background.
280
00:12:01,997 --> 00:12:03,781
Same thing, Shift + Option + Command + N,
281
00:12:03,781 --> 00:12:05,445
Shift + Option + Command + E,
282
00:12:05,445 --> 00:12:06,828
I feel like I have to keep saying that
283
00:12:06,828 --> 00:12:09,549
in case people are tuning
in or zoning in and out,
284
00:12:09,549 --> 00:12:12,925
so I'm sorry, and I just apologized,
285
00:12:12,925 --> 00:12:15,526
half because I'm Canadian,
and half because I am sorry.
286
00:12:15,526 --> 00:12:18,989
But anyway, let's get back to this.
287
00:12:18,989 --> 00:12:21,724
What you're gonna do, is
again, with that lasso tool,
288
00:12:21,724 --> 00:12:24,736
you're just gonna draw a
line along the water line,
289
00:12:24,736 --> 00:12:28,569
over his head, over the
trees, just like this,
290
00:12:29,612 --> 00:12:33,065
up that border of the
photo, across the top,
291
00:12:33,065 --> 00:12:36,765
and across the left side,
back down, right there.
292
00:12:36,765 --> 00:12:39,165
Happy with that, now we've
got our selection here.
293
00:12:39,165 --> 00:12:42,783
Same thing, adjustment
layer, Curves this time.
294
00:12:42,783 --> 00:12:45,018
Now we're gonna use this curve,
295
00:12:45,018 --> 00:12:49,489
and we're going to bring
down that brightness.
296
00:12:49,489 --> 00:12:51,722
And we're gonna crush
it here even more too.
297
00:12:51,722 --> 00:12:54,084
We've talked about making that
S curve when using curves,
298
00:12:54,084 --> 00:12:56,646
but right now, I just
wanna make it darker.
299
00:12:56,646 --> 00:12:59,285
But in doing so, it just
made it really blue.
300
00:12:59,285 --> 00:13:01,117
And like I said, we're
trying to get rid of it
301
00:13:01,117 --> 00:13:02,012
feeling like it's winter,
302
00:13:02,012 --> 00:13:04,135
'cause it's the middle
of summer in this photo,
303
00:13:04,135 --> 00:13:07,220
so we can change from RGB to red channel,
304
00:13:07,220 --> 00:13:09,700
and then we can push more reds onto that.
305
00:13:09,700 --> 00:13:12,078
Now we don't want it to look like Mars.
306
00:13:12,078 --> 00:13:16,918
So we're just gonna tweak that
slightly, just a little bit.
307
00:13:16,918 --> 00:13:19,193
I'm happy with that,
it's a little too purple,
308
00:13:19,193 --> 00:13:20,411
it's good right about there.
309
00:13:20,411 --> 00:13:21,756
Again, I'm trying to be subtle with this,
310
00:13:21,756 --> 00:13:23,265
and then we're gonna close that.
311
00:13:23,265 --> 00:13:24,687
Now because it's an adjustment layer,
312
00:13:24,687 --> 00:13:27,694
we can hit B for our brush tool,
313
00:13:27,694 --> 00:13:30,075
closed bracket to make
that a little bit smaller,
314
00:13:30,075 --> 00:13:34,338
and then we can paint away
that harsh line right there.
315
00:13:34,338 --> 00:13:36,575
So we're just gonna paint over that edge,
316
00:13:36,575 --> 00:13:38,078
and get rid of that harsh line
317
00:13:38,078 --> 00:13:40,637
because that does not look good.
318
00:13:40,637 --> 00:13:42,177
And then I'm gonna drop the opacity
319
00:13:42,177 --> 00:13:45,299
of this whole thing to like, 60.
320
00:13:45,299 --> 00:13:48,351
Now if we hide that layer,
you'll see what's happened,
321
00:13:48,351 --> 00:13:51,722
it just basically dropped the
brightness and the contrast
322
00:13:51,722 --> 00:13:54,809
in the top of the mountains,
and just kind of defined them
323
00:13:54,809 --> 00:13:57,340
a little more, they got lost,
324
00:13:57,340 --> 00:13:59,330
and I wanted to bring
them back into focus,
325
00:13:59,330 --> 00:14:03,030
and that's basically
accomplished by doing that.
326
00:14:03,030 --> 00:14:05,098
Now the last thing you can do
327
00:14:05,098 --> 00:14:07,287
is Shift + Option + Command + N,
328
00:14:07,287 --> 00:14:08,994
Shift + Option + Command + E,
329
00:14:08,994 --> 00:14:11,314
and then you can desaturate this again,
330
00:14:11,314 --> 00:14:13,512
and this is just if you
want a little more contrast
331
00:14:13,512 --> 00:14:16,357
and mood in this photo, which
I like to do in my shots.
332
00:14:16,357 --> 00:14:20,113
But, we'll desaturate it
with Shift + Command + U,
333
00:14:20,113 --> 00:14:22,793
and then I'm gonna change
that blending mode to Overlay,
334
00:14:22,793 --> 00:14:25,514
like we did right before we
added the high pass filter,
335
00:14:25,514 --> 00:14:27,548
but now I'm just gonna drop that opacity
336
00:14:27,548 --> 00:14:30,876
to like, I don't know,
15, I'm gonna preview,
337
00:14:30,876 --> 00:14:32,295
see what that does for me.
338
00:14:32,295 --> 00:14:35,865
It just adds a little more
attitude, I'm happy with this.
339
00:14:35,865 --> 00:14:40,032
It could just use a slight
overall bump in brightness.
340
00:14:41,064 --> 00:14:44,153
So the last thing, this is the last layer
341
00:14:44,153 --> 00:14:48,255
we're gonna add here, I'm
gonna add an adjustment layer
342
00:14:48,255 --> 00:14:52,374
for Curves, and I'm just
gonna take the bottom here,
343
00:14:52,374 --> 00:14:55,466
and bump those curves
up just a little bit.
344
00:14:55,466 --> 00:14:57,299
Just ever so slightly,
345
00:14:58,389 --> 00:15:01,431
not making a big deal of it, that's it.
346
00:15:01,431 --> 00:15:02,854
I'm gonna select that top layer,
347
00:15:02,854 --> 00:15:04,437
I'm gonna hold down Shift,
348
00:15:04,437 --> 00:15:05,901
and I'm gonna click the bottom layer
349
00:15:05,901 --> 00:15:07,098
right above the background,
350
00:15:07,098 --> 00:15:08,726
and then I'm gonna hit Command + G,
351
00:15:08,726 --> 00:15:10,999
that's gonna group all
of our edits together,
352
00:15:10,999 --> 00:15:13,356
and we can double click
on that and name it edits.
353
00:15:13,356 --> 00:15:15,511
And now when we look at this photo,
354
00:15:15,511 --> 00:15:18,973
if we just hide this layer,
that's what we started with
355
00:15:18,973 --> 00:15:21,613
after we adjusted it in
the Camera Raw plugin
356
00:15:21,613 --> 00:15:23,291
at the beginning,
357
00:15:23,291 --> 00:15:24,832
now it looks like this.
358
00:15:24,832 --> 00:15:28,121
So I'm gonna flatten this
image just for example's sake,
359
00:15:28,121 --> 00:15:31,330
and then I'm gonna bring
in this camera edit again
360
00:15:31,330 --> 00:15:33,202
so you can see it, but I'm gonna reset,
361
00:15:33,202 --> 00:15:34,988
we're gonna go back to defaults,
362
00:15:34,988 --> 00:15:38,159
to what it looked like, and
I'm gonna open that image.
363
00:15:38,159 --> 00:15:41,212
I'm going to copy it, close that window,
364
00:15:41,212 --> 00:15:43,003
and I'm gonna paste it onto this.
365
00:15:43,003 --> 00:15:45,847
And that is a pretty
accurate representation
366
00:15:45,847 --> 00:15:49,058
of what the photo looked like
coming out of the camera,
367
00:15:49,058 --> 00:15:53,240
and what it looks like now
after we've applied our edits.
368
00:15:53,240 --> 00:15:55,516
Again, this is all personal preference.
369
00:15:55,516 --> 00:15:57,914
You might not like your
photos as contrasty
370
00:15:57,914 --> 00:16:00,880
and as punchy, or to pop as much as this,
371
00:16:00,880 --> 00:16:03,155
and that's the beauty
of being photographers
372
00:16:03,155 --> 00:16:05,640
and artists and editing is
that you can make it look
373
00:16:05,640 --> 00:16:07,554
however you want it to look.
374
00:16:07,554 --> 00:16:10,400
And the more that you stay
consistent with that style,
375
00:16:10,400 --> 00:16:12,227
the more it becomes your style,
376
00:16:12,227 --> 00:16:15,192
and people start to pick
up on shots that you take
377
00:16:15,192 --> 00:16:16,371
without even knowing you took them
378
00:16:16,371 --> 00:16:18,284
because they say, hey, that looks a lot
379
00:16:18,284 --> 00:16:20,356
like how Pete's photos look.
380
00:16:20,356 --> 00:16:22,143
That's very Peter McKinnon.
381
00:16:22,143 --> 00:16:24,826
And it's really cool to start
seeing your own style develop,
382
00:16:24,826 --> 00:16:26,982
so, if this isn't your cup of tea,
383
00:16:26,982 --> 00:16:28,442
there's no worries with that,
384
00:16:28,442 --> 00:16:30,309
you can play around
with all those settings,
385
00:16:30,309 --> 00:16:32,264
kind of follow the same basic steps,
386
00:16:32,264 --> 00:16:33,526
and come up with something yourself
387
00:16:33,526 --> 00:16:36,180
that looks pretty similar or
looks completely different.
388
00:16:36,180 --> 00:16:37,805
Everything's okay.
389
00:16:37,805 --> 00:16:41,460
But we went from this,
to this, and I'd say
390
00:16:41,460 --> 00:16:44,587
that's a pretty nifty little
edit in not much time.
391
00:16:44,587 --> 00:16:46,820
So that's it guys, thank
you so much for watching,
392
00:16:46,820 --> 00:16:47,920
I really appreciate it.
393
00:16:47,920 --> 00:16:50,195
If you like this video,
hit that like button,
394
00:16:50,195 --> 00:16:51,940
drop me a comment below, let
me know what you thought.
395
00:16:51,940 --> 00:16:55,115
I love hearing from you
guys and interacting.
396
00:16:55,115 --> 00:16:57,721
And I'll see you in the next
tutorial, or the next vlog,
397
00:16:57,721 --> 00:16:58,855
whichever comes first.
398
00:16:58,855 --> 00:17:01,438
(upbeat music)
standard: es
0:00:00.096,0:00:01.117
¿Qué hay todos?
0:00:01.117,0:00:03.025
Aquí Peter McKinnon y hoy,
0:00:03.025,0:00:05.750
estamos hablando de cómo hacer que tus fotos se vean mejor.
0:00:05.750,0:00:06.966
Rápido.
0:00:06.966,0:00:09.633
(música intensa)
0:00:12.249,0:00:13.636
Okey, entonces, ya saben cuando llegan a casa de algún lado,
0:00:13.636,0:00:15.951
han estado tomando fotos, capaz unas vacaciones, capaz un paseo
0:00:15.951,0:00:18.554
pasando con tus amigos y subes esa foto
0:00:18.554,0:00:19.856
a tu computadora y estás como que,
0:00:19.856,0:00:20.752
(suspiro)
0:00:20.752,0:00:22.539
¡esto se ve tan bien!
0:00:22.539,0:00:25.177
Lo lanzas a las redes, Facebook, Instagram,
0:00:25.177,0:00:27.777
la gente está dándole doble tap a tu IG, los corazones fluyen
0:00:27.777,0:00:29.610
y justo te estas sintiendo bien de ti mismo
0:00:29.610,0:00:32.539
mientras que el sol empieza a bajar y todo es simplemente hermoso.
0:00:32.539,0:00:34.285
Y de ahí hay ocasiones que llegas a casa
0:00:34.285,0:00:35.706
y abres esa foto en tu computadora
0:00:35.706,0:00:38.596
y estás como que (se raya el disco)
0:00:38.596,0:00:42.378
Yo recuerdo que esto estaba mucho mejor cuando estaba ahí, lo prometo.
0:00:42.378,0:00:44.494
Así que estas son algunas habilidades de edición básicas,
0:00:44.494,0:00:47.265
HABILIDADES DE EDICIÓN BÁSICAS, que puedes hacer
0:00:47.265,0:00:50.640
a tus fotos en casa en cualquier momento usando Photoshop.
0:00:50.640,0:00:54.543
Estoy usando Photoshop CC, así que vayan no más a Adobe
0:00:54.543,0:00:56.128
y descárguense esa prueba,
0:00:56.128,0:00:58.524
o apúntense para su servicio basado en suscripción
0:00:58.524,0:01:00.518
que es lo que yo hago, y pagas una mensualidad
0:01:00.518,0:01:02.797
para básicamente tener todas sus aplicaciones,
0:01:02.797,0:01:03.813
eso es lo que yo recomiendo.
0:01:03.813,0:01:07.760
Podemos tomar una foto mundana que se ve así
0:01:07.760,0:01:10.927
y transformarla en algo que se ve así,
0:01:10.927,0:01:13.204
en como 10 minutos, tal vez?
0:01:13.204,0:01:16.091
Incluso más rápido si haces esto a diario como yo.
0:01:16.091,0:01:18.248
Okey, hemos pasado nuestra foto a Photoshop
0:01:18.248,0:01:21.686
y aquí estamos, nos sale el plugin de Cámara RAW
0:01:21.686,0:01:25.062
que salta y dice, esto es un archivo RAW,
0:01:25.062,0:01:25.895
¿qué quieres hacer?
0:01:25.895,0:01:27.338
¿Quieres solo abrir la imagen tal cual?
0:01:27.338,0:01:28.605
¿Quieres adecuarla un poquito aquí
0:01:28.605,0:01:31.246
con Cámara RAW y de ahí abrirla?
0:01:31.246,0:01:32.543
Y aquí es cuando podrías decirme, Pete,
0:01:32.543,0:01:34.224
¿cuál es la diferencia entre editar
0:01:34.224,0:01:36.745
y hacer en Lightroom todo lo que estás por enseñarme
0:01:36.745,0:01:39.226
en vez de usar Lightroom y Photoshop,
0:01:39.226,0:01:41.626
¿o usar Cámara RAW y Photoshop?
0:01:41.626,0:01:43.373
Sí, pueden hacer todo en Lightroom.
0:01:43.373,0:01:44.796
Pueden hacer todo en Photoshop.
0:01:44.796,0:01:48.090
Todo se trata del flujo de trabajo, qué programas te gustan más.
0:01:48.090,0:01:49.268
A mi me gusta usar ambos.
0:01:49.268,0:01:51.786
Photoshop es más como un manipulador de foto
0:01:51.786,0:01:54.834
donde pueden: No me gusta la cara de ese tipo!
0:01:54.834,0:01:57.597
Voy a poner su cara en su cara.
0:01:57.597,0:01:59.952
Genial para ese tipo de cosas
0:01:59.952,0:02:02.397
Pero me gusta usar ambos en conjunto
0:02:02.397,0:02:04.674
y voy a enseñarte cómo lo hago justo aquí.
0:02:04.674,0:02:07.529
No toma mucho tiempo así que no te pongas nervioso, o como que
0:02:07.529,0:02:11.313
esto es intenso. Es intenso si no pones atención.
0:02:11.313,0:02:14.968
Pero no, vamos a volar sobre esto. Así que Cámara RAW.
0:02:14.968,0:02:17.818
Solo voy a retocar la exposición, subir el contraste
0:02:17.818,0:02:20.377
un poco, reflejos, verán la montaña
0:02:20.377,0:02:23.543
ahí en la cima si jalo totalmente a la derecha,
0:02:23.543,0:02:25.780
se queman, si lo traigo totalmente para abajo,
0:02:25.780,0:02:29.084
es un poco oscuro, pero estoy feliz como que justo, justo,
0:02:29.084,0:02:32.135
justo, un poquito al sur del centro.
0:02:32.135,0:02:34.490
Sombras, estoy bien, en verdad pueden ver que solo
0:02:34.490,0:02:37.056
afecta a la camiseta si lo subimos hasta arriba,
0:02:37.056,0:02:39.537
pero no quiero que sea tan brillante.
0:02:39.537,0:02:41.769
Se ve un poco raro,
0:02:41.769,0:02:43.963
un poquito incómodo si os complace.
0:02:43.963,0:02:48.675
Los subiré hasta unos 25, nos topamos en el medio.
0:02:48.675,0:02:50.177
Los blancos, estoy contento con los blancos,
0:02:50.177,0:02:53.752
los negros están bien, siempre me gusta retocar la claridad
0:02:53.752,0:02:56.238
un poco por que simplemente les da definición a eso bordes
0:02:56.238,0:02:58.312
y realmente da buen detalle a la imagen
0:02:58.312,0:03:00.060
directamente en Photoshop.
0:03:00.060,0:03:01.930
Subiremos un poco la intensidad,
0:03:01.930,0:03:03.477
un poco más de saturación.
0:03:03.477,0:03:06.078
Y de ahí, debido a esos ajustes de claridad que hicimos,
0:03:06.078,0:03:07.585
que a veces oscurece a la imagen,
0:03:07.585,0:03:11.340
así que quieren regresar y solo subir esa exposición
0:03:11.340,0:03:15.113
un poco y de ahí vamos a darle a Abrir Imagen.
0:03:15.113,0:03:19.301
Okey, aquí estamos, lo primero que usualmente hago con una foto
0:03:19.301,0:03:22.547
es limpiar cualquier polvo en la camisa de alguien
0:03:22.547,0:03:26.003
o si tienen mala piel normalmente le doy una pasada
0:03:26.003,0:03:29.791
con una herramienta como esta de sanado,
0:03:29.791,0:03:30.889
ese tipo de cosas.
0:03:30.889,0:03:34.883
Y si viste mi tutorial de cómo hacer flotar a las cosas
0:03:34.883,0:03:38.129
en tus fotos, esta es la misma herramienta que estoy usando,
0:03:38.129,0:03:41.016
y solo estoy haciendo clic para eliminar cualquier polvo
0:03:41.016,0:03:43.500
o mota, es esta herramienta aquí a la izquierda
0:03:43.500,0:03:45.699
justo debajo del selector de color.
0:03:45.699,0:03:49.399
Y simplemente, mira, haces clic y se fue,
0:03:49.399,0:03:51.595
así que limpias cualquier mancha
0:03:51.595,0:03:54.886
que quieras ajustar con esta herramienta.
0:03:54.886,0:03:57.008
Ahora, si haces un clic muy grande,
0:03:57.008,0:03:59.610
digamos que hago que mi tamaño de brocha sea enorme y hago clic,
0:03:59.610,0:04:01.965
claramente puedes ver el delineado del círculo.
0:04:01.965,0:04:03.509
Así que no quieres hacer eso.
0:04:03.509,0:04:05.632
Si quisieras deshacerte de este pequeña marca roja de aquí,
0:04:05.632,0:04:07.459
estarías mejor dándole a la S,
0:04:07.459,0:04:08.841
que te da la estampa de clonado,
0:04:08.841,0:04:12.381
mantén oprimido Opción, selecciona el área que quiere clonar
0:04:12.381,0:04:15.554
y de ahí hace clic para clonar esa área.
0:04:15.554,0:04:17.669
Y estoy feliz con eso basicamente.
0:04:17.669,0:04:21.836
Tiene buena piel así que estoy listo para avanzar.
0:04:23.165,0:04:25.568
Ahora, con Photoshop, nunca quiere solo editar
0:04:25.568,0:04:28.547
la capa de abajo y emplastar capa
0:04:28.547,0:04:32.714
y capa sobre capa, pasa una hora, devoraste una pizza entera
0:04:33.907,0:04:35.453
y ahí te das cuenta, oh
0:04:35.453,0:04:36.834
sus ojos están un poco oscuros,
0:04:36.834,0:04:38.173
voy a regresar y cambiar eso.
0:04:38.173,0:04:40.863
Y estás como que Oops, muy tarde, aplanaste la imagen
0:04:40.863,0:04:45.825
y emplastaste esas ediciones a la foto hace 38 minutos.
0:04:45.825,0:04:47.329
No hay vuelta atrás.
0:04:47.329,0:04:49.443
Pero si haces todo en capas,
0:04:49.443,0:04:52.693
siempre puede borrar la capa, regresar, eliminar lo que hiciste,
0:04:52.693,0:04:55.168
retocar esa capa de ajustes, cambiar los colores,
0:04:55.168,0:04:57.808
así que quieres siempre trabajar en capas.
0:04:57.808,0:05:00.254
Ahora, yo no solo duplico el fondo,
0:05:00.254,0:05:02.569
yo Shift + Opción + Commando + N
0:05:02.569,0:05:03.746
esto va a darte una nueva capa.
0:05:03.746,0:05:07.558
Y luego lo que hago es estampar capa visible encima de eso.
0:05:07.558,0:05:08.941
Esto suena loco, verdad?
0:05:08.941,0:05:12.030
Pero espera, Shift + Opcón + Commando +E
0:05:12.030,0:05:14.423
pega esa imagen a la nueva capa que acabamos de hacer
0:05:14.423,0:05:16.820
en vez de simplemente duplicar la capa.
0:05:16.820,0:05:18.242
Si he hecho un montón de ediciones a una capa
0:05:18.242,0:05:20.637
y luego la duplico, también van a duplicarse esas
0:05:20.637,0:05:23.730
ediciones, no quiero eso. Solo quiero un comienzo limpio
0:05:23.730,0:05:26.497
para poder manipular eso y luego mezclar todo junto.
0:05:26.497,0:05:28.772
Si eso no hace sentido, retrocede, velo.
0:05:28.772,0:05:30.948
Si tu retrocediste y viste y aún así no hace sentido,
0:05:30.948,0:05:34.198
hazte un shot, regresa, hará sentido.
0:05:35.062,0:05:37.619
Okey, voy a empezar dándole nitidez a la imagen,
0:05:37.619,0:05:40.829
Y empiezo primero haciendo borrosa a la imagen
0:05:40.829,0:05:43.795
suena contraproducente, sí, pero es por esto.
0:05:43.795,0:05:47.946
Vas a ir a Filtro, Desenfoque, Desenfoque Guassiano
0:05:47.946,0:05:50.870
Lo tengo puesto en 5, así que pon tu radio en 5
0:05:50.870,0:05:53.881
dale OK, cambia el modo de fusión aquí abajo
0:05:53.881,0:05:56.872
en tu panel de capas a Luz Suave.
0:05:56.872,0:05:57.705
Woo!
0:05:57.705,0:06:00.952
Mira eso, se ve cálido, se ve con más fuerza,
0:06:00.952,0:06:04.129
desde ya se ve más cool, pero, lo sé, está borroso.
0:06:04.129,0:06:07.060
Estás sentado ahí diciendo, por qué arruinaría una imagen
0:06:07.060,0:06:08.576
para intentar hacerla mejor?
0:06:08.576,0:06:11.429
A veces tienes que dejar libre para,
0:06:11.429,0:06:12.284
cómo es este dicho?
0:06:12.284,0:06:15.255
¿Tienes que soltar algo para que regrese?
0:06:15.255,0:06:17.335
¿O si lo amas déjalo libre?
0:06:17.335,0:06:19.102
¿Sabes qué? No importa.
0:06:19.102,0:06:23.102
Cambia la opacidad a 50%, dale Enter, okey.
0:06:24.719,0:06:26.998
Ahora, si usamos ese pequeño ojo,
0:06:26.998,0:06:29.595
visible e invisible, ahora pueden ver
0:06:29.595,0:06:32.646
cómo ha calentado su piel, como que le agregó un brillo,
0:06:32.646,0:06:35.229
este lindo, suave aspecto.
0:06:36.228,0:06:39.076
Calmante, reconfortante, si te parece.
0:06:39.076,0:06:42.247
Y podemos ver eso solo prendiendo y apagando el ojo.
0:06:42.247,0:06:44.078
Ahora es cuando vamos a darle nitidez
0:06:44.078,0:06:46.433
Así que de nuevo voy a Shift + Opción + Commando + N
0:06:46.433,0:06:48.546
para una nueva capa, Shift + Commando + E
0:06:48.546,0:06:51.227
para estampar esa capa a la cima.
0:06:51.227,0:06:52.935
Y voy a desaturar esto,
0:06:52.935,0:06:55.411
por que no quiero afectar a los colores
0:06:55.411,0:06:56.915
cuando le de nitidez, solo quiero afectar
0:06:56.915,0:06:59.240
la luminosidad y oscuridad mientras le estoy dando nitidez.
0:06:59.240,0:07:03.407
Así que Shift + Commando + U va a quitar todo el color,
0:07:04.279,0:07:07.203
adiós, cambia el modo de fusión a Superponer,
0:07:07.203,0:07:09.533
vas a ponerte, Oh por Dios, Pete, qué?
0:07:09.533,0:07:11.363
Esto se ve como una escena de El Cuervo.
0:07:11.363,0:07:13.284
¿Qué son estas tonterías?
0:07:13.284,0:07:16.839
Quédate conmigo, sube a Filtro, Otros,
0:07:16.839,0:07:20.373
vamos a darle un Paso Alto, ¿qué acaba de pasar?
0:07:20.373,0:07:23.837
Lo sé, es magia, verán es que ese filtro raro tipo cuervo
0:07:23.837,0:07:27.008
solo desapareció y ahora tenemos algo que se ve
0:07:27.008,0:07:29.910
un poco más nítido, le vas a dar OK.
0:07:29.910,0:07:31.620
Hagamos zoom a su cara
0:07:31.620,0:07:33.216
y mira lo que pasó.
0:07:33.216,0:07:37.573
Si escondemos eso, está borroso, lo hacemos visible, está nítido.
0:07:37.573,0:07:40.253
Ahora, si hacemos visible eso y esto,
0:07:40.253,0:07:43.744
verás que no solo los colores han sido
0:07:43.744,0:07:45.610
mejorados un poco en saturación,
0:07:45.610,0:07:49.512
pero esa piel está linda y suave y ahora está nítida.
0:07:49.512,0:07:53.536
Y hacemos zoom afuera y maldita sea, se está viendo muy bien!
0:07:53.536,0:07:55.688
Si quieres duplicar esos efectos,
0:07:55.688,0:07:57.681
si quieres decir, sabes qué?
0:07:57.681,0:07:59.712
Me vendría bien un poco más de esa nitidez, Pete.
0:07:59.712,0:08:03.090
O me gustaría que la piel se vea un poco más soñadora,
0:08:03.090,0:08:06.059
oprime Commando, selecciona ambas de esas capas,
0:08:06.059,0:08:08.412
llévalas a abajo a esta pestaña de Capa Nueva
0:08:08.412,0:08:11.055
y eso va a duplicar a esas capas
0:08:11.055,0:08:12.761
con todos los efectos.
0:08:12.761,0:08:13.945
Ahora, eso está muy fuerte para mi,
0:08:13.945,0:08:16.449
así que mientras esas dos capas todavía están,
0:08:16.449,0:08:17.853
mientras todavía están seleccionadas,
0:08:17.853,0:08:20.944
0:08:20.944,0:08:25.185
cambia la opacidad a tu gusto.
0:08:25.185,0:08:26.565
Yo voy a bajar hasta unos 20,
0:08:26.565,0:08:29.652
quiero evitar sobre exagerar
0:08:29.652,0:08:30.790
duplicando esos efectos,
0:08:30.790,0:08:34.957
pero justo lo suficiente como para que me de un poquito más.
0:08:35.862,0:08:37.773
Okey ¿ahora qué hacemos Pete?
0:08:37.773,0:08:40.051
Pues, le vendría bien un poco de calidez,
0:08:40.051,0:08:42.327
no es invierno en esta foto
0:08:42.327,0:08:44.035
pero se ve un poco fría.
0:08:44.035,0:08:45.991
Así que vamos a abrigar esta foto,
0:08:45.991,0:08:48.880
y vamos a hacer eso... lo adivinaste,
0:08:48.880,0:08:52.249
Shift + Opción + Commando + N, nueva capa
0:08:52.249,0:08:54.777
y de ahí vamos a Shift + Eliminar,
0:08:54.777,0:08:58.156
eso va a hacer que salga la caja de contenidos.
0:08:58.156,0:09:01.003
Y vas a darle a Color en Contenidos,
0:09:01.003,0:09:03.237
lo cual hará que se habrá el selector de colores.
0:09:03.237,0:09:06.403
Tengo seleccionado naranja, ahí está el código hexadecimal
0:09:06.403,0:09:09.657
si quieren ver eso, F57900,
0:09:09.657,0:09:11.281
pueden escribir eso en ese mismo puesto
0:09:11.281,0:09:13.479
y les dará el mismo naranja que estoy usando.
0:09:13.479,0:09:15.837
Pero todo depende de la foto que estés editando,
0:09:15.837,0:09:18.195
así que no importa.
0:09:18.195,0:09:22.362
Dale OK, OK de nuevo y ahí lo tienes, se ve hermoso.
0:09:24.382,0:09:29.139
Una linda, sólida, foto con apariencia de calabaza, totalmente naranja.
0:09:29.139,0:09:33.306
Cambia ese modo de fusión a Luz Suave.
0:09:34.180,0:09:35.439
Y ahora se ve un poco mejor,
0:09:35.439,0:09:37.234
todavía parece que tiene ictericia
0:09:37.234,0:09:39.483
y que las cosas van mal,
0:09:39.483,0:09:42.530
pero vamos a cambiar la opacidad a unos,
0:09:42.530,0:09:46.105
tal vez 15, diría que 15 es un buen puesto.
0:09:46.105,0:09:49.723
Quizás 13, quería 10 pero luego 15,
0:09:49.723,0:09:53.422
así que 13 en la mitad, me gusta.
0:09:53.422,0:09:54.316
Ahora sí se ve más cálido.
0:09:54.316,0:09:56.913
Así que escondamos todos estos y veamos qué hemos hecho.
0:09:56.913,0:09:58.217
¿Ven que desde ya se está viendo mejor?
0:09:58.217,0:09:59.967
Hagos, oops, mi error.
0:10:01.156,0:10:05.022
Ahora ¿qué si es que quisiera aclarar sus ojos,
0:10:05.022,0:10:07.218
o oscurecer a las montañas del fondo?
0:10:07.218,0:10:08.849
Por que están un poco pálidas,
0:10:08.849,0:10:10.677
o sus ojos se ven un poco oscuros
0:10:10.677,0:10:12.871
por toda la nitidez y saturación
0:10:12.871,0:10:15.103
qué hemos agregado con el enfoque gaussiano.
0:10:15.103,0:10:16.222
Pues así es como vas a hacer eso.
0:10:16.222,0:10:17.405
Vas hacer una nueva capa,
0:10:17.405,0:10:18.872
Shift + Opción + Commando + N,
0:10:18.872,0:10:21.791
van a poner esa imagen ahí
0:10:21.791,0:10:24.921
y vas a coger la herramienta de lazo, sostener Comando,
0:10:24.921,0:10:27.521
darle + en tu teclado, eso va a ampliar.
0:10:27.521,0:10:30.243
Si presionas la barra espaciadora, verás esta pequeña mano
0:10:30.243,0:10:33.133
y puedes usar esa mano para mover la imagen.
0:10:33.133,0:10:35.164
Comando + "+" de nuevo para ampliar
0:10:35.164,0:10:38.244
y vamos a seleccionar solo el iris,
0:10:38.244,0:10:40.886
no quiero hacer muy brillante la parte blanca de los ojos
0:10:40.886,0:10:43.524
por que sino parecerá alguien de The Walking Dead.
0:10:43.524,0:10:45.243
Una vez que hemos seleccionado eso,
0:10:45.243,0:10:46.746
verán esa pequeña selección
0:10:46.746,0:10:48.213
de lo hormigas marchantes,
0:10:48.213,0:10:50.248
eso significa que esta área está seleccionada.
0:10:50.248,0:10:53.224
Sostienes Shift, verás un pequeño + salir
0:10:53.224,0:10:56.922
al lado del lazo.
0:10:56.922,0:10:57.755
0:10:58.834,0:11:02.696
Selecciona el otro ojo cuidando de no meterte mucho
0:11:02.696,0:11:05.101
en la piel, pero está bien,
0:11:05.101,0:11:08.022
ahora tenemos ambos ojos seleccionados.
0:11:08.022,0:11:09.161
Vas a venir a acá abajo
0:11:09.161,0:11:12.127
y hacer una nueva capa de ajustes
0:11:12.127,0:11:14.322
con brillo y contraste
0:11:14.322,0:11:16.924
Clic en eso, si ahora subimos el brillo
0:11:16.924,0:11:19.363
verán que solo los ojos se hacen más brillantes.
0:11:19.363,0:11:23.631
Eso es terrorífico, eso parece un zombie,
0:11:23.631,0:11:26.437
hacemos zoom out. A no ser que,
0:11:26.437,0:11:28.974
si esa es su intención, están listos.
0:11:28.974,0:11:33.777
Pero no aquí. Vamos a subir eso un poco,
0:11:33.777,0:11:34.994
no quiero que sea demasiado obvio.
0:11:34.994,0:11:37.961
Si abrillantas los ojos demasiado,
0:11:37.961,0:11:39.879
la gente lo sabe y se ve mal.
0:11:39.879,0:11:42.076
0:11:42.076,0:11:43.743
No queremos eso, queremos que sea sutil.
0:11:43.743,0:11:46.866
Mientras más ediciones sutiles le hagamos,
0:11:46.866,0:11:48.658
se va a terminar viendo mejor al final.
0:11:48.658,0:11:52.033
Así que vamos a subir eso un poco, justo ahí está bien,
0:11:52.033,0:11:55.159
24 para mi, estoy bien con eso.
0:11:55.159,0:11:57.763
Ahora vamos a hacer otra capa de nuevo,
0:11:57.763,0:11:59.635
y lo que voy a hacer con esta capa
0:11:59.635,0:12:01.997
es oscurecer esos montes en el fondo.
0:12:01.997,0:12:03.781
Misma cosa, Shift + Opción + Comando + N
0:12:03.781,0:12:05.445
Shift + Opción + Commando + E,
0:12:05.445,0:12:06.828
siento que debo seguir diciendo eso
0:12:06.828,0:12:09.549
en caso de que la gente se despiste,
0:12:09.549,0:12:12.925
así que me disculpo y acabo de disculparme
0:12:12.925,0:12:15.526
parcialmente por que soy canadiense y parcialmente por que me siento mal.
0:12:15.526,0:12:18.989
Pero sigamos.
0:12:18.989,0:12:21.724
Lo que vas a hacer es, de nuevo, con la herramienta de lazo,
0:12:21.724,0:12:24.736
vas dibujar una línea a lo largo de la orilla,
0:12:24.736,0:12:28.569
sobre su cabeza, los árboles, justo así,
0:12:29.612,0:12:33.065
subimos por el borde de la foto, para arriba
0:12:33.065,0:12:36.765
y cruzamos al lado izquierdo, bajamos, justo ahí.
0:12:36.765,0:12:39.165
Feliz con eso, ya tenemos nuestra selección.
0:12:39.165,0:12:42.783
Misma cosa, capa de ajustes, ahora Curvas.
0:12:42.783,0:12:45.018
Vamos a usar esta curva,
0:12:45.018,0:12:49.489
vamos a bajar esa luminosidad.
0:12:49.489,0:12:51.722
Y vamos a presionarlo aquí más.
0:12:51.722,0:12:54.084
Hemos hablado de hacer esa curva en S al usar Curvas,
0:12:54.084,0:12:56.646
pero ahorita solo quiero oscurecerle.
0:12:56.646,0:12:59.285
Pero al hacerlo, acaba de hacerse muy azul.
0:12:59.285,0:13:01.117
Y como dije, estamos tratando de deshacernos de que
0:13:01.117,0:13:02.012
se sienta como invierno,
0:13:02.012,0:13:04.135
por que es en la mitad del verano en esta foto
0:13:04.135,0:13:07.220
así que podemos cambiar de RGB al canal rojo
0:13:07.220,0:13:09.700
y subimos los rojos ahí.
0:13:09.700,0:13:12.078
No queremos que se vea como Marte.
0:13:12.078,0:13:16.918
Así que vamos a ajustar eso un poco, solo un poco.
0:13:16.918,0:13:19.193
Estoy feliz con eso, está un poco morado,
0:13:19.193,0:13:20.411
está bien por ahí.
0:13:20.411,0:13:21.756
De nuevo, estoy tratando de ser sutil.
0:13:21.756,0:13:23.265
Vamos a cerrar eso.
0:13:23.265,0:13:24.687
Como es una capa de ajuste,
0:13:24.687,0:13:27.694
podemos presionar B para la herramienta de brocha
0:13:27.694,0:13:30.075
la hacemos un poco más pequeña
0:13:30.075,0:13:34.338
y luego podemos pintar y borrar esa línea.
0:13:34.338,0:13:36.575
Vamos a pintar solo sobre el borde
0:13:36.575,0:13:38.078
y eliminar esa línea fuerte
0:13:38.078,0:13:40.637
por que no se ve bien.
0:13:40.637,0:13:42.177
De ahí voy a bajar la opacidad
0:13:42.177,0:13:45.299
de todo esto a unos 60.
0:13:45.299,0:13:48.351
Si escondemos esa capa, verán lo que pasó,
0:13:48.351,0:13:51.722
básicamente bajó el brillo y contraste
0:13:51.722,0:13:54.809
en la cima de las montañas y como que están más nítidas
0:13:54.809,0:13:57.340
Se habían peridod
0:13:57.340,0:13:59.330
y quería traerlas un poco más en enfoque
0:13:59.330,0:14:03.030
y eso se consigue básicamente haciendo eso.
0:14:03.030,0:14:05.098
La última cosa que puedes hacer
0:14:05.098,0:14:07.287
es Shift + Opción + Comando + N,
0:14:07.287,0:14:08.994
Shift + Opción + Comando + E,
0:14:08.994,0:14:11.314
y puedes desaturar esto de nuevo
0:14:11.314,0:14:13.512
y esto es solo si quieres un poco más de contraste
0:14:13.512,0:14:16.357
y sentimiento en esta foto, lo cual me gusta hacer en mis tomas.
0:14:16.357,0:14:20.113
Lo desaturamos con Shift + Comando + U,
0:14:20.113,0:14:22.793
voy a cambiar el modo de fusión a Superponer
0:14:22.793,0:14:25.514
como hicimos antes de poner el filtro de pase alto,
0:14:25.514,0:14:27.548
pero ahora voy a bajar la opacidad
0:14:27.548,0:14:30.876
a unos, no sé, 15.
0:14:30.876,0:14:32.295
¿Ven lo que eso hace?
0:14:32.295,0:14:35.865
Le da un poco más de actitud, estoy contento con esto.
0:14:35.865,0:14:40.032
Podría venirle bien un pequeño ajuste en el brillo.
0:14:41.064,0:14:44.153
Así que lo último, esta es la última capa
0:14:44.153,0:14:48.255
que vamos a agregar, voy a agregar una capa de ajuste
0:14:48.255,0:14:52.374
para Curvas, y solo voy a tomar la parte de abajo
0:14:52.374,0:14:55.466
y subir esas curvas solo un poco.
0:14:55.466,0:14:57.299
Un poquitito,
0:14:58.389,0:15:01.431
ninguna gran cosa, ahí está.
0:15:01.431,0:15:02.854
Voy a seleccionar esa capa de arriba,
0:15:02.854,0:15:04.437
voy a presionar Shift
0:15:04.437,0:15:05.901
selecciono la capa de más abajo
0:15:05.901,0:15:07.098
justo encima del fondo
0:15:07.098,0:15:08.726
y voy a darle a Comando + G,
0:15:08.726,0:15:10.999
eso va a agrupar todas nuestras ediciones,
0:15:10.999,0:15:13.356
podemos hacer doble clic en eso y llamarlo Ediciones.
0:15:13.356,0:15:15.511
Y ahora podemos ver esta foto,
0:15:15.511,0:15:18.973
si ocultamos esta capa, con eso empezamos
0:15:18.973,0:15:21.613
después de ajustarla con el plugin de Cámara RAW
0:15:21.613,0:15:23.291
al comienzo,
0:15:23.291,0:15:24.832
ahora se ve así.
0:15:24.832,0:15:28.121
Solo por dar el ejemplo voy a aplanar esta imagen
0:15:28.121,0:15:31.330
y voy a traer esta de nuevo
0:15:31.330,0:15:33.202
para que la vean, pero voy a resetear,
0:15:33.202,0:15:34.988
regresaremos a los predeterminados,
0:15:34.988,0:15:38.159
a como se veía y abriré la imagen.
0:15:38.159,0:15:41.212
La copiaré, cerrar esa ventana,
0:15:41.212,0:15:43.003
voy a pegarla sobre esto.
0:15:43.003,0:15:45.847
Y esa es una representación muy exacta
0:15:45.847,0:15:49.058
de cómo la foto se veía al salir de la cámara
0:15:49.058,0:15:53.240
y cómo se ve ahora que hemos aplicado nuestras ediciones.
0:15:53.240,0:15:55.516
Una vez más, esto es todo preferencia personal.
0:15:55.516,0:15:57.914
Tal vez no te guste tus fotos con tanto contraste
0:15:57.914,0:16:00.880
y tan saturada, o que resalte tanto como esto,
0:16:00.880,0:16:03.155
y esa es la belleza de ser fotógrafos
0:16:03.155,0:16:05.640
y artistas y editar. Puede hacer que se vea
0:16:05.640,0:16:07.554
como tu quieres que se vea.
0:16:07.554,0:16:10.400
Y mientras más constante te quedes en ese esilo,
0:16:10.400,0:16:12.227
más se convierte en tu estilo
0:16:12.227,0:16:15.192
y la gente va a empezar a escoger tus tomas
0:16:15.192,0:16:16.371
sin si quiera saber que tu las tomaste
0:16:16.371,0:16:18.284
por que ellos dicen, eso se ve bastante
0:16:18.284,0:16:20.356
como las fotos de Pete.
0:16:20.356,0:16:22.143
Eso es muy Peter McKinnon.
0:16:22.143,0:16:24.826
Y es muy chévere empezar a ver tu propio estilo desarrollándose
0:16:24.826,0:16:26.982
así que, si esto no es de tu gusto,
0:16:26.982,0:16:28.442
no hay problema con eso,
0:16:28.442,0:16:30.309
puedes jugar con todos esos ajustes,
0:16:30.309,0:16:32.264
medio que seguir los pasos básicos,
0:16:32.264,0:16:33.526
y salir con algo tuyo
0:16:33.526,0:16:36.180
que se ve muy similar o completamente diferente.
0:16:36.180,0:16:37.805
Todo está bien
0:16:37.805,0:16:41.460
Pero fuimos de esto a esto y diría que
0:16:41.460,0:16:44.587
es una edición bastante buena en poco tiempo.
0:16:44.587,0:16:46.820
así que eso es todo chicos, muchas gracias por ver,
0:16:46.820,0:16:47.920
lo aprecio mucho.
0:16:47.920,0:16:50.195
Si te gusta este video, dale un Me Gusta,
0:16:50.195,0:16:51.940
deja un comentario abajo, déjame saber qué pensaste.
0:16:51.940,0:16:55.115
Me encanta saber de ustedes e interactuar.
0:16:55.115,0:16:57.721
Y los veré en el siguiente tutorial o siguiente vlog
0:16:57.721,0:16:58.855
el que venga primero.
0:16:58.855,0:17:01.438
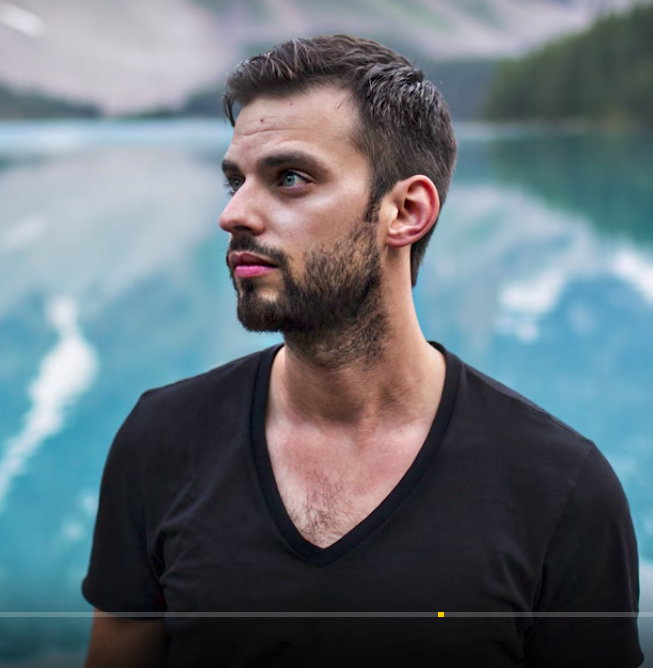

Profiles
Profile 1
| Purpose | Tutorial (why) |
|---|---|
| Content | |
| Participants | nameless (m) model, Photoshop (m) geek |
| Form | Tutorial (how) |
| Time | |
| Place |
Profile 2
| Purpose | Tutorial |
|---|---|
| Content | Portrait, Scene |
| Participants | Photoshop (m) geek |
| Form | Tutorial (how), Mid shot |
| Time | Real time |
| Place | Desktop, Home |
Profile 4
| Purpose | |
|---|---|
| Content | Portrait |
| Participants | |
| Form | |
| Time | |
| Place |