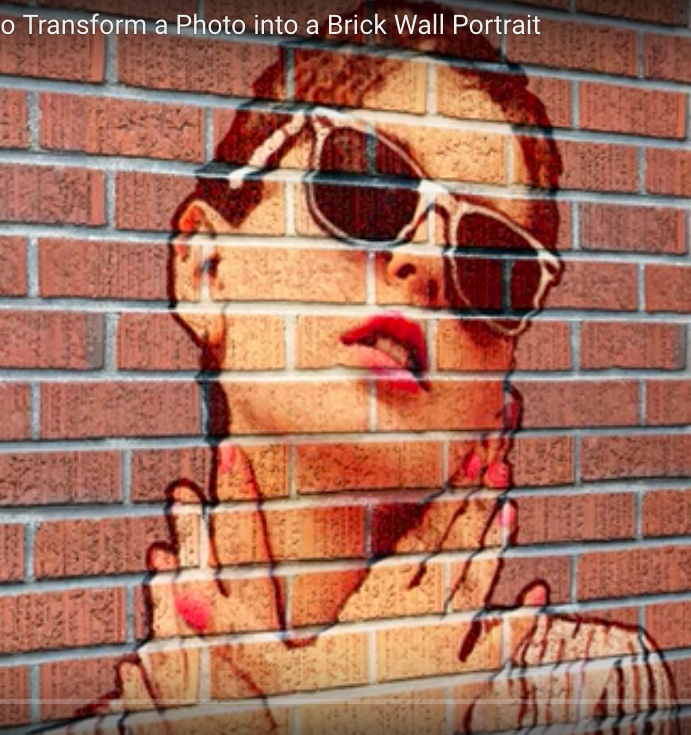
Photoshop Tutorial: How to Transform a Photo into a Brick Wall Portrait
Figuration: Tutorial
Description
Brick wall file:
http://goo.gl/OSgjwJ
Royalty Free Music provided by http://www.beatsuite.com
High quality, copyright-free music for YouTube.
Music track: “Cubanita”. ID #: 6705
Photo provided by www.Shutterstock.com
Photo ID#: 195777914
Subscribe to Blue Lightning TV!:
http://goo.gl/HEpuJ4
Website:
http://www.bluelightningtv.com/
Get up to 20% off Photoshop + Lightroom! Only $7.99 p/month:
http://goo.gl/QFznn7
Become a Patron to Blue Lighting TV:
https://www.patreon.com/bluelightningtv
Facebook:
https://goo.gl/fHLJsh
Twitter:
https://twitter.com/bluelightningtv
Metadata
| Video ID | 57 | Youtube URL | Photoshop Tutorial: How to Transform a Photo into a Brick Wall Portrait |
|---|---|
| Captions Available | Yes |
| Captions Downloadable | Yes |
| Playlists | |
| Duration | 00:08:56 |
| Definition | hd |
| Keywords | |
| License | youtube |
| Embeddable | Yes |
| Views | 532026 |
| Likes | 3894 |
| Dislikes | 50 |
| Favourites | 0 |
| Comments | 251 |
| Created | 2017-05-04 1:00:42 PM |
| Updated | 2017-05-04 1:10:10 PM |
Captions
ASR: en
0:00:09.230,0:00:14.730
hi this is Marty from Blue Lightning TV
0:00:12.719,0:00:16.710
I'm going to show you how to paint a
0:00:14.730,0:00:22.230
portrait onto a brick wall
0:00:16.710,0:00:24.869
from a photo I downloaded this brick
0:00:22.230,0:00:27.240
wall texture from graphics comm which
0:00:24.869,0:00:29.670
allows you to download unlimited images
0:00:27.240,0:00:31.920
icons backgrounds and much more for
0:00:29.670,0:00:33.719
seven days I included a link in the
0:00:31.920,0:00:35.940
description that will give you a huge
0:00:33.719,0:00:38.280
discount on a yearly membership you
0:00:35.940,0:00:40.079
should check it out we want our portrait
0:00:38.280,0:00:42.360
to wrap around the contours of the brick
0:00:40.079,0:00:45.149
wall so we'll make the brick wall into a
0:00:42.360,0:00:47.070
displacement map the first step is to
0:00:45.149,0:00:49.500
duplicate the brick wall as a separate
0:00:47.070,0:00:51.270
document by clicking the icon at the
0:00:49.500,0:00:55.109
upper right corner of the layers panel
0:00:51.270,0:00:59.969
and clicking duplicate layer
0:00:55.109,0:01:02.789
click new and type in displacement then
0:00:59.969,0:01:05.220
click OK
0:01:02.789,0:01:08.240
since displacement maps work best when
0:01:05.220,0:01:13.140
they're slightly blurred go to filter
0:01:08.240,0:01:17.430
blur and Gaussian blur
0:01:13.140,0:01:20.880
I'll blurt 3 pixels and click OK
0:01:17.430,0:01:24.210
remove all its color by pressing ctrl or
0:01:20.880,0:01:26.220
command shift u it's important that your
0:01:24.210,0:01:28.560
image should have enough contrast since
0:01:26.220,0:01:31.530
displacement maps are based on its tonal
0:01:28.560,0:01:34.020
values to adjust its contrast open your
0:01:31.530,0:01:34.650
levels window by pressing ctrl or
0:01:34.020,0:01:36.700
command
0:01:34.650,0:01:39.759
L
0:01:36.700,0:01:42.340
drag the input white slider near where
0:01:39.759,0:01:46.330
the histogram starts and do the same
0:01:42.340,0:01:48.380
with the input black slider then click
0:01:46.330,0:01:50.940
OK
0:01:48.380,0:01:55.290
we'll save it
0:01:50.940,0:01:59.450
to file and save as save it to your
0:01:55.290,0:02:01.610
desktop as a Photoshop PSD file and
0:01:59.450,0:02:04.260
click Save
0:02:01.610,0:02:07.830
let's close the displacement document
0:02:04.260,0:02:10.170
since we already saved it to our desktop
0:02:07.830,0:02:12.480
open a photo of someone you'd like to
0:02:10.170,0:02:15.360
make into a portrait I downloaded this
0:02:12.480,0:02:17.100
one from shutterstock.com we need to
0:02:15.360,0:02:18.480
make a selection around the person in
0:02:17.100,0:02:20.430
order to cut it out from the background
0:02:18.480,0:02:22.410
there are many ways to make selections
0:02:20.430,0:02:25.140
and the method should depend on the
0:02:22.410,0:02:27.440
characteristics of your photo in this
0:02:25.140,0:02:30.480
case I'll use the quick selection tool
0:02:27.440,0:02:32.250
its size should depend on the resolution
0:02:30.480,0:02:34.500
of your photo and the size of your
0:02:32.250,0:02:37.500
subject if you're using this tool as
0:02:34.500,0:02:40.250
well drag your cursor over the subject
0:02:37.500,0:02:40.250
to select it
0:02:43.380,0:02:48.960
to remove areas of the selection press
0:02:46.350,0:02:52.140
and hold alt or option as you drag over
0:02:48.960,0:02:54.990
those areas to make sure you've selected
0:02:52.140,0:02:57.600
all of it press Q to see the selection
0:02:54.990,0:03:00.890
as a quick mask then press Q again to
0:02:57.600,0:03:03.830
revert it back into a selection
0:03:00.890,0:03:07.010
press control or command J to cut and
0:03:03.830,0:03:08.960
copy your subject to its own layer to
0:03:07.010,0:03:11.600
place your subject onto the brick wall
0:03:08.960,0:03:14.120
press V to open your move tool and drag
0:03:11.600,0:03:16.760
your subject onto the tab of the wall
0:03:14.120,0:03:20.150
without releasing your mouse or pen drag
0:03:16.760,0:03:22.760
it down onto the wall and release to
0:03:20.150,0:03:26.540
resize it open your transform tool by
0:03:22.760,0:03:29.030
pressing ctrl or command T to see the
0:03:26.540,0:03:33.550
transforms entire bounding box press
0:03:29.030,0:03:35.540
ctrl or command 0 go to a corner and
0:03:33.550,0:03:39.470
when you see a diagonal double-arrow
0:03:35.540,0:03:42.560
press and hold alt or option + shift as
0:03:39.470,0:03:43.400
you drag it in then press Enter or
0:03:42.560,0:03:45.590
return
0:03:43.400,0:03:50.330
to fit your document back onto your
0:03:45.590,0:03:52.220
canvas press ctrl or command 0 before we
0:03:50.330,0:03:54.500
add effects to your subject let's
0:03:52.220,0:03:57.950
protect it by converting it into a smart
0:03:54.500,0:04:01.550
object click the icon at the upper right
0:03:57.950,0:04:05.660
of the layers panel and click convert to
0:04:01.550,0:04:08.239
smart object smart objects also allow us
0:04:05.660,0:04:10.640
to modify or even change the effects at
0:04:08.239,0:04:13.250
any point double click on an empty area
0:04:10.640,0:04:17.290
of the layer to open its layer style
0:04:13.250,0:04:20.590
window click stroke
0:04:17.290,0:04:24.870
change the size to 2 pixels and the
0:04:20.590,0:04:27.120
position is outside then click OK
0:04:24.870,0:04:29.340
if you notice black spots anywhere
0:04:27.120,0:04:31.980
around your subject I'll show you how to
0:04:29.340,0:04:35.760
get rid of them in a minute first go to
0:04:31.980,0:04:39.120
filter and filter gallery open the
0:04:35.760,0:04:42.330
artistic folder and click fresco
0:04:39.120,0:04:46.620
I'll make the brush size 1 the brush
0:04:42.330,0:04:48.419
detail 10 and the texture 1 however feel
0:04:46.620,0:04:51.120
free to experiment with these settings
0:04:48.419,0:04:53.430
alternately you can also try poster
0:04:51.120,0:04:56.540
edges which is another effective filter
0:04:53.430,0:04:56.540
to use for the portrait
0:04:56.999,0:05:03.500
to get rid of any unwanted spots
0:05:00.590,0:05:07.220
click the layer mask icon which makes a
0:05:03.500,0:05:09.410
layer mask next to the active layer open
0:05:07.220,0:05:11.500
your eraser tool
0:05:09.410,0:05:14.360
to make the eraser larger or smaller
0:05:11.500,0:05:16.310
press the right or left bracket key on
0:05:14.360,0:05:20.480
your keyboard
0:05:16.310,0:05:23.260
then brush over the spots convert the
0:05:20.480,0:05:27.669
layer into a smart object again and
0:05:23.260,0:05:27.669
change the blend mode to overlay
0:05:29.590,0:05:35.330
reduce its opacity to 80% you can choose
0:05:34.090,0:05:38.629
to leave the perspect
0:05:35.330,0:05:39.710
your image as it is or angle it if you
0:05:38.629,0:05:41.689
want to angle it
0:05:39.710,0:05:43.789
we need to resize and reposition the
0:05:41.689,0:05:46.370
portrait to make it ultimately fit
0:05:43.789,0:05:50.090
correctly onto the angled brick wall to
0:05:46.370,0:05:52.280
do this open your transform tool go to
0:05:50.090,0:05:55.310
the top right corner of the transform
0:05:52.280,0:05:58.580
and press and hold shift as you drag it
0:05:55.310,0:06:00.979
in approximately this much then go
0:05:58.580,0:06:03.919
inside the transform and press and hold
0:06:00.979,0:06:06.860
shift again as you slide the portrait to
0:06:03.919,0:06:09.500
the left then press Enter or return
0:06:06.860,0:06:11.120
we're ready to displace the portrait so
0:06:09.500,0:06:15.289
it'll wrap around the contours of the
0:06:11.120,0:06:17.730
brick wall go to filter distort and
0:06:15.289,0:06:19.710
displace
0:06:17.730,0:06:23.400
make the horizontal and vertical scales
0:06:19.710,0:06:27.500
five stretch to fit and repeat edge
0:06:23.400,0:06:27.500
pixels then click OK
0:06:28.140,0:06:31.520
click desktop
0:06:31.590,0:06:39.569
the displacement PSD file and open
0:06:37.080,0:06:42.300
your portrait has now conformed to the
0:06:39.569,0:06:45.120
contours of your brick wall we're going
0:06:42.300,0:06:47.729
to make the portrait pop more by
0:06:45.120,0:06:50.220
pressing ctrl or command J to copy the
0:06:47.729,0:06:54.020
portrait layer and changing the blend
0:06:50.220,0:06:54.020
mode the soft light
0:06:54.530,0:07:00.650
next we'll angle our entire image make a
0:06:58.220,0:07:04.130
composite snapshot by pressing ctrl
0:07:00.650,0:07:07.630
shift alt e' on Windows or command shift
0:07:04.130,0:07:07.630
option E on a Mac
0:07:09.290,0:07:14.060
zoom out of your document by pressing
0:07:11.270,0:07:17.380
ctrl or command and the minus key on
0:07:14.060,0:07:17.380
your keyboard twice
0:07:17.700,0:07:24.420
go to edit transform
0:07:22.230,0:07:27.420
and perspective
0:07:24.420,0:07:30.720
go to the bottom left corner and drag it
0:07:27.420,0:07:33.930
down if you want your image to angle the
0:07:30.720,0:07:36.780
other way undo the last step and drag
0:07:33.930,0:07:38.719
down the right corner then press Enter
0:07:36.780,0:07:42.279
or return
0:07:38.719,0:07:44.739
fit it back onto your canvas
0:07:42.279,0:07:46.749
to give the image more depth will make
0:07:44.739,0:07:50.379
the wall darker as it recedes in the
0:07:46.749,0:07:52.790
distance click the new layer icon to
0:07:50.379,0:07:56.330
make a new layer
0:07:52.790,0:07:59.810
open your gradient tool and make sure
0:07:56.330,0:08:02.420
the linear gradient icon is active click
0:07:59.810,0:08:06.610
the gradient bar to open the gradient
0:08:02.420,0:08:10.190
editor click the black/white preset
0:08:06.610,0:08:12.060
click the lower left stop and the color
0:08:10.190,0:08:15.750
box
0:08:12.060,0:08:19.710
in the hexadecimal field type in 83
0:08:15.750,0:08:23.870
times to pick up 50% gray
0:08:19.710,0:08:23.870
then click OK on both windows
0:08:26.780,0:08:31.040
go to the side of your document where
0:08:28.940,0:08:33.880
the wall recedes and press and hold
0:08:31.040,0:08:37.840
shift as you drag a line to the middle
0:08:33.880,0:08:37.840
then release your cursor
0:08:38.320,0:08:46.529
change the blend mode to linear burn and
0:08:41.940,0:08:46.529
reduce its opacity to 40%
0:08:48.050,0:08:54.140
this is Marty from Blue Lightning TV
0:08:51.180,0:08:54.140
thanks for watching
standard: en
0:00:10.020,0:00:12.680
Hi. This is Marty from Blue Lightning TV.
0:00:13.100,0:00:15.380
I'm going to show you how to paint a portrait
0:00:15.389,0:00:18.329
onto a brick wall from a photo.
0:00:21.120,0:00:24.620
I downloaded this brick wall texture from GraphicStock.com.
0:00:24.820,0:00:29.500
which allows you to download unlimited
images, icons, backgrounds and much more.
0:00:29.500,0:00:32.630
for seven days. I included a link in the description
0:00:32.630,0:00:35.690
that'll give you a huge discount on a yearly membership.
0:00:35.690,0:00:36.810
You should check it out.
0:00:37.200,0:00:40.700
We want our portrait to wrap around the contours of the brick wall,
0:00:40.700,0:00:43.520
so we'll make the brick wall into a displacement map.
0:00:44.020,0:00:47.660
The first step is to duplicate the brick wall as a separate document
0:00:48.060,0:00:51.600
by clicking the icon at the upper right
corner of the Layers panel
0:00:51.600,0:00:53.840
and clicking "Duplicate Layer".
0:00:55.520,0:00:59.079
Click "New" and type in "Displacement".
0:00:59.800,0:01:01.040
Then click OK.
0:01:03.160,0:01:06.420
Since displacement maps work best when they're slightly blurred,
0:01:07.150,0:01:11.550
go to Filter, Blur and Gaussian Blur.
0:01:13.650,0:01:16.210
I'll blur it 3 pixels and click OK.
0:01:18.030,0:01:22.450
Remove all its color by pressing Ctrl or Cmd + Shift + U.
0:01:23.120,0:01:25.780
It's important that your image should have enough contrast,
0:01:26.060,0:01:29.360
since displacement maps are based on its tonal values.
0:01:29.370,0:01:32.729
To adjust its contrast, open your Levels window
0:01:32.729,0:01:35.149
by pressing Ctrl or Cmd + L.
0:01:37.220,0:01:41.080
Drag the Input white slider near where the histogram starts
0:01:41.620,0:01:43.820
and do the same with the input black slider.
0:01:45.619,0:01:46.919
Then, click OK.
0:01:48.920,0:01:53.500
We'll save it by going to File and "Save As".
0:01:54.549,0:01:59.409
Save it to your desktop as a Photoshop PSD file
0:01:59.840,0:02:01.220
and click "Save".
0:02:02.390,0:02:06.490
Let's close the displacement document,
since we already saved it to our desktop.
0:02:08.340,0:02:11.440
Open a photo of someone that you would like to make into a portrait.
0:02:11.440,0:02:14.730
I downloaded this one from Shutterstock.com.
0:02:14.730,0:02:18.810
We need to make a selection around the
person in order to cut it out from the background.
0:02:19.260,0:02:22.360
There are many ways to make selections
and the method should depend on the
0:02:22.370,0:02:24.350
characteristics of your photo.
0:02:24.800,0:02:27.620
In this case, I'll use the Quick Selection Tool.
0:02:28.220,0:02:32.840
Its size should depend on the resolution of your photo and the size of your subject.
0:02:33.240,0:02:34.900
If you're using this tool as well,
0:02:35.620,0:02:38.220
Drag your cursor over the subject to select it.
0:02:43.910,0:02:45.910
To remove areas of the selection,
0:02:46.140,0:02:49.900
press and hold Alt or Option, as you drag over those areas.
0:02:51.120,0:02:53.080
To make sure you've selected all of it,
0:02:53.380,0:02:56.080
press "Q" to see the selection as a quick mask.
0:02:56.300,0:02:59.580
Then, press "Q" again to revert it back into a selection.
0:03:01.390,0:03:05.950
Press Ctrl or Cmd +J to cut and
copy your subject to its own layer.
0:03:06.840,0:03:09.220
To place your subject onto the brick wall,
0:03:09.380,0:03:14.260
press "v" to open your Move Tool and drag your subject onto the tab of the wall.
0:03:14.720,0:03:16.800
Without releasing your computer mouse or pen,
0:03:16.800,0:03:19.380
drag it down onto the wall and release.
0:03:19.960,0:03:25.100
To resize it, open your Transform Tool by pressing Ctrl or Cmd +T.
0:03:26.080,0:03:31.180
To see the Transform's entire bounding box, press Ctrl or Cmd +0.
0:03:32.330,0:03:36.290
Go to a corner and when you see a diagonal, double-arrow,
0:03:36.700,0:03:39.460
press and hold Alt or Option +Shift
0:03:39.740,0:03:43.400
as you drag in, then press Enter or Return.
0:03:44.020,0:03:48.700
To fit your document back onto your canvas, press Ctlr or Cmd +0.
0:03:49.780,0:03:55.240
Before we add effects to your subject,
let's protect it by converting it into a Smart Object.
0:03:56.530,0:03:59.210
Click the icon at the upper right of the Layers panel
0:04:00.120,0:04:02.440
and click "Convert to Smart Object".
0:04:03.409,0:04:09.069
Smart Objects also allow us to modify or even change the effects at any point.
0:04:09.640,0:04:11.740
Double-click on an empty area of the layer
0:04:12.440,0:04:14.000
to open its Layer Style window.
0:04:14.910,0:04:15.910
Click "Stroke".
0:04:17.770,0:04:22.090
Change the size to 2 pixels and the Position is "Outside".
0:04:22.440,0:04:23.620
Then, click OK.
0:04:25.370,0:04:28.600
If you notice black spots anywhere around your subject,
0:04:28.600,0:04:30.760
I'll show you how to get rid of them in a minute.
0:04:31.140,0:04:34.200
First, go to Filter and Filter Gallery.
0:04:35.310,0:04:36.890
Open the Artistic folder
0:04:37.480,0:04:39.100
and click "Fresco".
0:04:39.780,0:04:41.320
I'll make the brush size: 1,
0:04:41.919,0:04:43.559
the brush detail: 10
0:04:44.180,0:04:48.440
and the Texture: 1, however, feel free to
experiment with the settings.
0:04:48.730,0:04:51.730
Alternately, you can also try "Poster Edges",
0:04:51.730,0:04:54.670
which is another effective filter to use for the portrait.
0:04:57.590,0:04:59.690
To get rid of any unwanted spots,
0:05:01.060,0:05:05.620
click the layer mask icon, which makes a layer mask next to the active layer.
0:05:06.910,0:05:08.430
Open your Eraser Tool.
0:05:09.760,0:05:12.000
To make the eraser larger or smaller,
0:05:12.300,0:05:15.300
press the right or left bracket key on your keyboard.
0:05:16.790,0:05:18.490
Then, brush over the spots.
0:05:19.780,0:05:22.560
Convert the layer into a smart object again
0:05:23.789,0:05:26.229
and change the Blend Mode to "Overlay".
0:05:29.950,0:05:31.960
Reduce its opacity to 80%.
0:05:33.480,0:05:36.560
You can choose to leave the perspective of your image as it is
0:05:36.900,0:05:39.720
or angle it. If you want. to angle it,
0:05:39.720,0:05:44.200
we need to resize and reposition the
portrait to make it ultimately fit correctly
0:05:44.340,0:05:49.020
onto the angle brick wall. To do this,
open your Transform Tool,
0:05:49.870,0:05:54.370
go to the top right corner of the
Transform and press and hold "Shift"
0:05:54.740,0:05:57.480
as you drag it in approximately this much.
0:05:57.900,0:06:02.100
Then, go inside the Transform and press
and hold Shift again
0:06:02.320,0:06:04.420
as you slide the portrait to the left.
0:06:04.980,0:06:06.820
Then, press Enter or Return.
0:06:07.500,0:06:11.880
We're ready to displace the portrait, so
it'll wrap around the contours of the brick wall.
0:06:12.770,0:06:16.630
Go to Filter, Distort and Displace.
0:06:18.070,0:06:24.370
Make the horizontal and vertical scales:
5, "Stretch to Fit" and "Repeat Edge Pixels".
0:06:24.600,0:06:25.660
Then, click OK.
0:06:28.720,0:06:30.080
Click "Desktop",
0:06:32.060,0:06:34.040
the "Displacement" PSD file
0:06:34.960,0:06:35.680
and Open.
0:06:37.520,0:06:41.120
Your portrait has now conformed to the
contours your brick wall.
0:06:41.919,0:06:43.999
We're going to make the portrait pop more
0:06:44.980,0:06:48.720
by pressing Ctrl or Cmd + J to copy the portrait layer
0:06:49.340,0:06:52.160
and changing the blend mode to "Soft Light".
0:06:55.030,0:06:57.550
Next, we'll angle our entire image.
0:06:58.040,0:07:03.040
Make a composite snapshot by pressing Ctrl +Shift + Alt +E on Windows
0:07:03.320,0:07:06.000
or Cmd + Shift + Option + E on a Mac.
0:07:09.650,0:07:11.010
Zoom out of your document
0:07:11.180,0:07:15.720
by pressing Ctrl or Cmd and the minus key on your keyboard, twice.
0:07:18.199,0:07:19.099
Go to "Edit",
0:07:20.120,0:07:21.080
"Transform"
0:07:22.280,0:07:23.140
and "Perspective".
0:07:24.910,0:07:27.890
Go to the bottom, left corner and drag it down.
0:07:29.040,0:07:31.460
If you want your image to angle the other way,
0:07:31.680,0:07:35.200
undo the last step and drag down the right corner.
0:07:35.660,0:07:37.600
Then, press Enter or Return.
0:07:39.300,0:07:41.000
Fit it back onto your canvas.
0:07:42.800,0:07:47.460
To give the image more depth, we'll make the wall darker as it recedes in the distance.
0:07:48.740,0:07:51.520
Click the New Layer icon to make a new layer.
0:07:53.290,0:07:54.750
Open you Gradient Tool
0:07:55.970,0:07:58.890
and make sure the Linear gradient icon is active.
0:07:59.539,0:08:03.299
Click the gradient bar to open a Gradient Editor.
0:08:04.100,0:08:06.340
Click the "black white" pre-set.
0:08:07.360,0:08:10.900
Click the lower, left stop and the color box.
0:08:12.660,0:08:14.060
In the hexadecimal field,
0:08:14.380,0:08:18.400
type in 80, three times to pick up 50% gray.
0:08:20.200,0:08:22.540
Then, click OK on both windows.
0:08:27.230,0:08:29.970
Go to the side of your document where the wall recedes
0:08:30.360,0:08:34.080
and press and hold Shift as you drag a line to the middle.
0:08:34.680,0:08:36.300
Then, release your cursor.
0:08:38.820,0:08:41.100
Change the Blend Mode to Linear Burn
0:08:42.479,0:08:45.239
and reduce its opacity to 40%.
0:08:48.860,0:08:51.060
This is Marty from Blue Lightning TV.
0:08:51.480,0:08:52.340
Thanks for watching!
standard: pt
0:00:10.020,0:00:12.680
Oi. Este é o Marty da TV Blue Lightning.
0:00:13.100,0:00:15.380
Eu vou mostrar-lhe como pintar um retrato,
0:00:15.389,0:00:18.329
em um muro de tijolos, de uma foto
0:00:21.120,0:00:24.620
Eu baixei esta textura de muro de tijolos de GraphicStock.com
0:00:24.820,0:00:29.500
que permite que você baixe imagens, ícones, planos de fundo ilimitados e muito mais
0:00:29.500,0:00:32.630
por sete dias. Eu incluí um link na descrição do vídeo
0:00:32.630,0:00:35.690
que lhe dará um enorme desconto numa assinatura anual.
0:00:35.690,0:00:36.810
Você deveria verificar isso.
0:00:37.200,0:00:40.700
Queremos que nosso retrato envolva os contorno do muro de tijolos,
0:00:40.700,0:00:43.520
então, faremos um mapa de deslocamento do muro de tijolos.
0:00:44.020,0:00:47.660
O primeiro passo é duplicar o muro de tijolos como um documento separado
0:00:48.060,0:00:51.600
clicando no ícone no canto superior direito do Painel de Camadas
0:00:51.600,0:00:53.840
e clicar em "Duplicar Camada".
0:00:55.520,0:00:59.079
Clique em "Novo" e digite "Displacement".
0:00:59.800,0:01:01.040
Em seguida clique OK.
0:01:03.160,0:01:06.420
Como os mapas de deslocamento funcionam melhor quando estão ligeiramente desfocados,
0:01:07.150,0:01:11.550
Vá para Filtro, Desfoque e Desfoque Gaussiano.
0:01:13.650,0:01:16.210
Eu vou desfocar 3 pixels e clicar OK.
0:01:18.030,0:01:22.450
Remova todas as cores pressionando Ctrl ou Cmd + Shift + U.
0:01:23.120,0:01:25.780
É importante que sua imagem tenha contraste o bastante,
0:01:26.060,0:01:29.360
uma vez que os mapas de deslocamento são baseados nestes valores de tonalidade.
0:01:29.370,0:01:32.729
Para ajustar o contraste, abra a janela Níveis
0:01:32.729,0:01:35.149
pressionando Ctrl ou Cmd + L.
0:01:37.220,0:01:41.080
Arraste o seletor deslizante de entrada branco para perto de onde começa o histograma
0:01:41.620,0:01:43.820
e faça a mesma coisa com o seletor deslizante de entrada preto.
0:01:45.619,0:01:46.919
Em seguida clique OK.
0:01:48.920,0:01:53.500
Vamos salvar indo para Arquivo e "Salvar Como".
0:01:54.549,0:01:59.409
Salve para sua área de trabalho como um arquivo PSD do Photoshop
0:01:59.840,0:02:01.220
e clique "Salvar".
0:02:02.390,0:02:06.490
Vamos fechar o documento "Displacement", já que ele já está salvo na área de trabalho.
0:02:08.340,0:02:11.440
Abra a foto de alguém que você gostaria de usar para fazer o retrato.
0:02:11.440,0:02:14.730
Eu baixei esta de Shutterstock.com.
0:02:14.730,0:02:18.810
Precisamos fazer uma seleção ao redor da pessoa para que possamos recortá-la do fundo.
0:02:19.260,0:02:22.360
Existem muitas maneiras de fazer seleções e o método dependerá das
0:02:22.370,0:02:24.350
características de sua foto.
0:02:24.800,0:02:27.620
Neste caso, usarei a ferramenta Seleção Rápida.
0:02:28.220,0:02:32.840
O tamanho dependerá da resolução de sua foto e do tamanho da pessoa na foto.
0:02:33.240,0:02:34.900
Se você usar esta ferramenta também
0:02:35.620,0:02:38.220
arraste o cursor do mouse sobre a pessoa para selecioná-la.
0:02:43.910,0:02:45.910
Para remover áreas da seleção,
0:02:46.140,0:02:49.900
Pressione e segure Alt ou Option, enquanto você arrasta sobre estas áreas.
0:02:51.120,0:02:53.080
Para certificar-se que foi tudo selecionado,
0:02:53.380,0:02:56.080
pressione "Q" para ver a seleção como uma máscara rápida.
0:02:56.300,0:02:59.580
Em seguida pressione "Q" outra vez para reverter à seleção.
0:03:01.390,0:03:05.950
Pressione Ctrl ou Cmd + J para recortar e copiar a pessoa da foto em sua própria camada.
0:03:06.840,0:03:09.220
Para pôr a foto no muro,
0:03:09.380,0:03:14.260
pressione "V" para abrir a ferramenta Mover e arraste sua foto para a aba do muro.
0:03:14.720,0:03:16.800
Sem soltar o mouse ou caneta,
0:03:16.800,0:03:19.380
arraste para baixo sobre o muro e solte.
0:03:19.960,0:03:25.100
Para redimensionar, abra a ferramenta Transformação pressionando Ctrl ou Cmd + T.
0:03:26.080,0:03:31.180
Para visualizar todo o conteúdo da caixa, pressione Ctrl ou Cmd + 0.
0:03:32.330,0:03:36.290
Vá em um canto e quando estiver vendo uma seta dupla diagonal,
0:03:36.700,0:03:39.460
pressione e segure Alt ou Option + Shift
0:03:39.740,0:03:43.400
enquanto arrasta, em seguida pressione Enter ou Return.
0:03:44.020,0:03:48.700
Para ajustar o documento de volta ao tamanho da tela de pintura, pressione Ctrl ou Cmd + 0.
0:03:49.780,0:03:55.240
Antes de adicionarmos efeitos em nossa foto, vamos protege-la convertendo-a em um Objeto Inteligente.
0:03:56.530,0:03:59.210
Clique no ícone no canto superior direito do Painel de Camadas
0:04:00.120,0:04:02.440
e clique em "Converter em objeto inteligente".
0:04:03.409,0:04:09.069
Objetos inteligentes também permite-nos modificar ou ainda trocar os efeitos em qualquer ponto.
0:04:09.640,0:04:11.740
Duplo clique sobre uma área vazia da camada
0:04:12.440,0:04:14.000
para abrir a janela Estilo de Camada.
0:04:14.910,0:04:15.910
Clique em "Traçado".
0:04:17.770,0:04:22.090
Troque o tamanho para 2 pixels e a posição é "Externo".
0:04:22.440,0:04:23.620
Em seguida clique OK.
0:04:25.370,0:04:28.600
Se você perceber pontos pretos em qualquer lugar em torno da sua foto,
0:04:28.600,0:04:30.760
Eu vou te mostrar como se livrar deles em um minuto.
0:04:31.140,0:04:34.200
Primeiro, vá para Filtro e Galeria de Filtros.
0:04:35.310,0:04:36.890
Abra a pasta Artístico
0:04:37.480,0:04:39.100
e clique em "Afresco".
0:04:39.780,0:04:41.320
Eu farei o tamanho do pincel: 1,
0:04:41.919,0:04:43.559
o Detalhe do Pincel: 10
0:04:44.180,0:04:48.440
e a Textura: 1, entretanto, sinta-se livre para experimentar outras configurações.
0:04:48.730,0:04:51.730
Alternativamente, você pode tentar também "Arestas Posterizadas",
0:04:51.730,0:04:54.670
Que é outro filtro eficaz para usar para o retrato.
0:04:57.590,0:04:59.690
Para se livrar de quaisquer manchas indesejadas,
0:05:01.060,0:05:05.620
clique no ícone da máscara de camada, o que cria uma máscara de camada próxima à camada ativa.
0:05:06.910,0:05:08.430
Abra a ferramenta Borracha.
0:05:09.760,0:05:12.000
Para tornar a borracha maior ou menor,
0:05:12.300,0:05:15.300
pressione a tecla colchete direito ou esquerdo no seu teclado.
0:05:16.790,0:05:18.490
Em seguida pincele sobre estes pontos.
0:05:19.780,0:05:22.560
Converta a camada para um Objeto Inteligente outra vez
0:05:23.789,0:05:26.229
e altere o Modo de Mesclagem para "Sobrepor".
0:05:29.950,0:05:31.960
Reduza a opacidade para 80%.
0:05:33.480,0:05:36.560
Você pode escolher deixar a perspectiva de sua imagem como está
0:05:36.900,0:05:39.720
ou em ângulo. Se você quiser, para inclinar
0:05:39.720,0:05:44.200
precisaremos redimensionar e reposicionar o retrato e finalmente ajustar corretamente
0:05:44.340,0:05:49.020
no mesmo ângulo do muro. Para fazer isso abra a ferramenta Transformação,
0:05:49.870,0:05:54.370
vá para o canto superior direito da Transformação e pressione e segure "Shift"
0:05:54.740,0:05:57.480
enquanto você arrasta aproximadamente esta distância.
0:05:57.900,0:06:02.100
Então, vá para dentro da Transformação e pressione e segure Shift outra vez
0:06:02.320,0:06:04.420
enquanto você desliza o retrato para a esquerda.
0:06:04.980,0:06:06.820
Então, pressione Enter ou Return.
0:06:07.500,0:06:11.880
Estamos prontos para deslocar o retrato, até que ele se ajuste nos contornos dos tijolos do muro.
0:06:12.770,0:06:16.630
Vá para Filtro, Distorção e Mesclagem.
0:06:18.070,0:06:24.370
Torne as Escalas horizontal e vertical: 5, "Ajustar-se ao Tamanho" e "Repetir Pixels da Aresta".
0:06:24.600,0:06:25.660
Em seguida clique OK.
0:06:28.720,0:06:30.080
Clique "Área de Trabalho",
0:06:32.060,0:06:34.040
o arquivo PSD "Displacement"
0:06:34.960,0:06:35.680
e Abrir.
0:06:37.520,0:06:41.120
Seu retrato agora está ajustado aos contornos do muro de tijolos.
0:06:41.919,0:06:43.999
Agora vamos fazer o retrato mais uma vez
0:06:44.980,0:06:48.720
pressionando Ctrl ou Cmd + J para copiar a camada retrato
0:06:49.340,0:06:52.160
e alterar o Modo de Mesclagem para "Luz Indireta".
0:06:55.030,0:06:57.550
Em seguida vamos inclinar a imagem inteira.
0:06:58.040,0:07:03.040
Crie um instantâneo pressionando Ctrl + Shift + Alt + E no Windows
0:07:03.320,0:07:06.000
ou Cmd + Shift + Option + E no Mac.
0:07:09.650,0:07:11.010
Reduza o zoom do documento
0:07:11.180,0:07:15.720
pressionando Ctrl ou Cmd e a tecla menos em seu teclado duas vezes.
0:07:18.199,0:07:19.099
Vá para "Editar",
0:07:20.120,0:07:21.080
"Transformação"
0:07:22.280,0:07:23.140
e "Perspectiva".
0:07:24.910,0:07:27.890
Vá para o canto inferior esquerdo e arraste para baixo.
0:07:29.040,0:07:31.460
Se você quiser inclinar sua imagem de outra jeito,
0:07:31.680,0:07:35.200
desfaça o último passo e arraste para baixo o canto inferior direito.
0:07:35.660,0:07:37.600
Em seguida pressione Enter ou Return.
0:07:39.300,0:07:41.000
Ajuste sua tela de pintura
0:07:42.800,0:07:47.460
Para dar mais profundidade à imagem, faremos o muro mais escuro conforme ele se afasta da visão na distância.
0:07:48.740,0:07:51.520
Clique no ícone Nova Camada e crie uma nova camada.
0:07:53.290,0:07:54.750
Abra a ferramenta Degradê
0:07:55.970,0:07:58.890
e certifique-se de que o ícone de Gradiente Linear esteja ativado.
0:07:59.539,0:08:03.299
Clique na barra gradiente para abrir o Editor de Gradiente.
0:08:04.100,0:08:06.340
Clique no predefinido "Preto, Branco".
0:08:07.360,0:08:10.900
Clique na parte inferior, na esquerda e na caixa de cores.
0:08:12.660,0:08:14.060
No campo hexadecimal
0:08:14.380,0:08:18.400
digite 80 três vezes, para obter 50% cinza.
0:08:20.200,0:08:22.540
Em seguida clique OK nas duas janelas.
0:08:27.230,0:08:29.970
Vá para o lado do seu documento onde o muro está mais afastado da visão
0:08:30.360,0:08:34.080
e pressione e segure Shift enquanto arrasta uma linha para o meio.
0:08:34.680,0:08:36.300
Então solte o cursor.
0:08:38.820,0:08:41.100
Altere o Modo de Mesclagem para Superexposição Linear
0:08:42.479,0:08:45.239
e reduza a opacidade para 40%.
0:08:48.860,0:08:51.060
Este é o Marty da TV Blue Lightning.
0:08:51.480,0:08:52.340
Obrigado por assistir!

Profiles
Profile 1
| Purpose | Tutorial (why) |
|---|---|
| Content | |
| Participants | nameless (f) model, Photoshop (m) geek, Audience |
| Form | Tutorial (how) |
| Time | |
| Place |
Profile 2
| Purpose | Tutorial |
|---|---|
| Content | Portrait, Scene |
| Participants | nameless (f) model, Photoshop (m) geek |
| Form | Tutorial (how) |
| Time | Real time |
| Place | Desktop |