Photoshop Tutorial: How to Transform PHOTOS into Gorgeous, Pencil DRAWINGS
Figuration: Tutorial
Description
Subscribe to Blue Lightning TV!:
http://goo.gl/HEpuJ4
Website:
http://www.bluelightningtv.com/
For a limited time, get 20% OFF Photoshop CC + Lightroom CC + more all together for only $7.99/month:
http://goo.gl/QFznn7
Become a Patron to Blue Lightning TV:
https://www.patreon.com/bluelightningtv
Facebook:
https://goo.gl/fHLJsh
Twitter:
https://twitter.com/bluelightningtv
Metadata
| Video ID | 6 | Youtube URL | Photoshop Tutorial: How to Transform PHOTOS into Gorgeous, Pencil DRAWINGS |
|---|---|
| Captions Available | Yes |
| Captions Downloadable | Yes |
| Playlists | |
| Duration | 00:03:01 |
| Definition | hd |
| Keywords | |
| License | youtube |
| Embeddable | Yes |
| Views | 3356528 |
| Likes | 19295 |
| Dislikes | 370 |
| Favourites | 0 |
| Comments | 952 |
| Created | 2017-05-04 1:00:41 PM |
| Updated | 2017-05-04 1:09:24 PM |
Captions
ASR: en
0:00:07.580,0:00:13.830
hi this is Marty from Blue Lightning TV
0:00:10.830,0:00:16.650
a year ago I did a tutorial on how to
0:00:13.830,0:00:19.800
make a pencil drawing from a photo using
0:00:16.650,0:00:22.080
an earlier version of Photoshop now I'm
0:00:19.800,0:00:25.170
going to show you a faster and easier
0:00:22.080,0:00:27.810
way to do it this document is
0:00:25.170,0:00:30.779
approximately six and a half by nine and
0:00:27.810,0:00:32.360
a half inches with a resolution of 150
0:00:30.779,0:00:36.149
pixels per inch
0:00:32.360,0:00:39.960
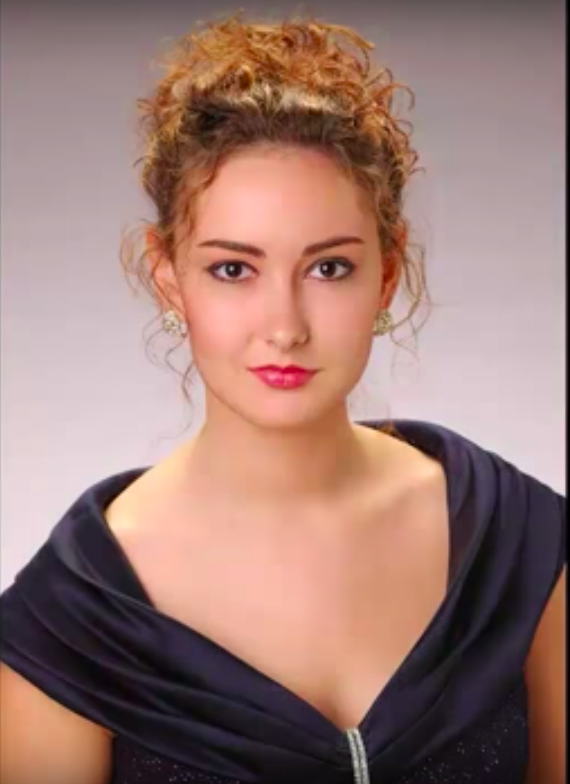
open a photo and make a copy of it by
0:00:36.149,0:00:44.040
pressing ctrl J on a PC or command J on
0:00:39.960,0:00:48.960
a Mac click on the adjustment layer
0:00:44.040,0:00:55.620
button and choose hue/saturation reduce
0:00:48.960,0:00:57.989
the saturation to -100 click on the
0:00:55.620,0:01:03.469
thumbnail of layer 1 to make it active
0:00:57.989,0:01:03.469
and change the blend mode to color dodge
0:01:04.400,0:01:12.840
invert it by pressing ctrl or command I
0:01:08.900,0:01:17.520
at this point your image should look
0:01:12.840,0:01:21.540
white go to filter blur and Gaussian
0:01:17.520,0:01:24.210
blur slide the radius to an amount that
0:01:21.540,0:01:26.130
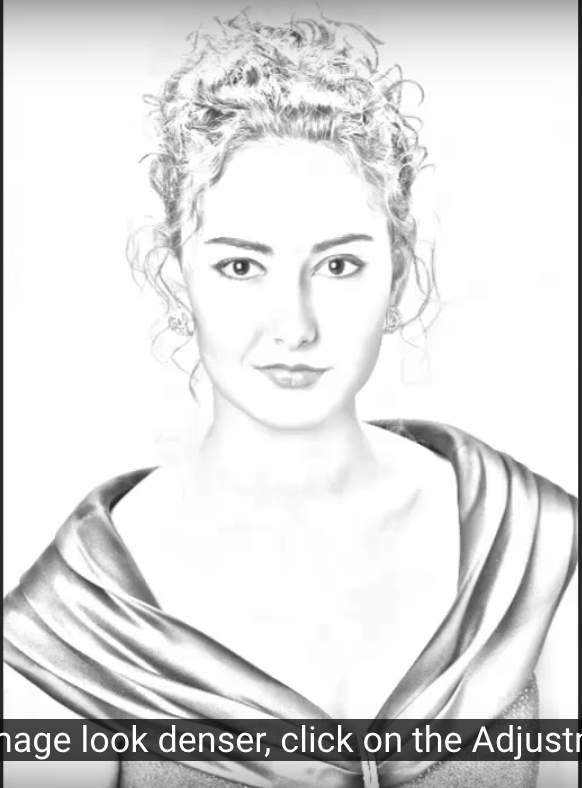
looks good to you your image should have
0:01:24.210,0:01:28.619
the look and feel more of a pencil
0:01:26.130,0:01:30.869
drawing than a photograph to make the
0:01:28.619,0:01:33.150
overall look denser click on the
0:01:30.869,0:01:38.340
adjustment layer button again and this
0:01:33.150,0:01:40.740
time choose levels slide the input darks
0:01:38.340,0:01:43.950
to the right until the face has just the
0:01:40.740,0:01:46.350
right amount of density if other areas
0:01:43.950,0:01:51.240
are too dense like the dress in this
0:01:46.350,0:01:55.170
example open your brush tool make the
0:01:51.240,0:02:00.479
brush size relatively large the hardness
0:01:55.170,0:02:03.600
0% and the opacity 40% make sure the
0:02:00.479,0:02:06.409
foreground color is black and then brush
0:02:03.600,0:02:10.080
over areas you'd like to make less dense
0:02:06.409,0:02:13.480
to clean up some areas make a composite
0:02:10.080,0:02:16.989
snapshot by pressing ctrl shift or
0:02:13.480,0:02:21.730
II on a PC or command shift option E on
0:02:16.989,0:02:24.220
a Mac invert the foreground and
0:02:21.730,0:02:27.340
background colors by clicking on the
0:02:24.220,0:02:30.780
curved double-arrow icon or by pressing
0:02:27.340,0:02:34.480
X on your keyboard make the brush size
0:02:30.780,0:02:38.110
small to medium and the opacity a
0:02:34.480,0:02:47.140
hundred percent now simply brush over
0:02:38.110,0:02:49.450
the areas you want to clean up using
0:02:47.140,0:02:52.120
these quick simple techniques you can
0:02:49.450,0:02:54.940
transform any photo into a beautiful
0:02:52.120,0:02:56.019
pencil drawing this is Marty from Blue
0:02:54.940,0:02:59.069
Lightning TV
0:02:56.019,0:02:59.069
thanks for watching
standard: en
0:00:00.120,0:00:05.330
0:00:05.330,0:00:11.059
Hi. This is Marty from Blue Lightning TV.
0:00:11.059,0:00:16.120
A year ago I did a tutorial on how to make a
pencil drawing from a photo
0:00:16.120,0:00:19.790
using an earlier version of Photoshop. Now,
0:00:19.790,0:00:23.440
I'm going to show you a faster
and easier way to do it.
0:00:23.440,0:00:27.180
This document is approximately 6 1/2
0:00:27.180,0:00:32.269
by 9 1/2 inches with a
Resolution of 150 pixels per inch.
0:00:32.269,0:00:35.809
Open a photo and make a copy of it
0:00:35.809,0:00:39.929
by pressing Ctrl + J on a PC or Cmd + J
0:00:39.929,0:00:44.839
on a Mac.
Click on the Adjustment layer button
0:00:44.839,0:00:50.260
and choose Hue / Saturation.
Reduce the Saturation
0:00:50.260,0:00:56.219
to -100. Click on the thumbnail
0:00:56.219,0:01:00.600
of Layer 1 to make it active
and change the Blend Mode
0:01:00.600,0:01:05.870
to Color Dodge. Invert it
0:01:05.870,0:01:12.870
by pressing Ctrl or Cmd + I.
At this point, your image should look white.
0:01:13.590,0:01:16.900
Go to Filter, Blur
0:01:16.900,0:01:22.590
and Gaussian Blur. Slide the Radius to an
amount that looks good to you.
0:01:22.590,0:01:27.530
Your image should have the look and feel
more of a pencil drawing than a photograph.
0:01:27.530,0:01:32.590
To make the overall image look denser, click on the Adjustment Layer button again
0:01:32.590,0:01:39.080
and this time choose Levels.
Slide the Input darks to the right
0:01:39.080,0:01:42.240
until the face is just the right amount
of density.
0:01:42.240,0:01:46.060
If other areas are too dense like the dress
0:01:46.060,0:01:52.190
in this example, open your Brush Tool,
make the Brush Size
0:01:52.190,0:01:55.400
relatively large, the Hardness
0:01:55.400,0:01:58.900
0% and the Opacity, 40%.
0:01:58.900,0:02:02.290
Make sure the foreground color is black
0:02:02.290,0:02:06.530
and then brush over areas you'd like to
make less dense.
0:02:06.530,0:02:11.120
To clean up some areas,
make a "composite snapshot"
0:02:11.120,0:02:14.709
by pressing Ctrl + Shift + Alt + E on a PC
0:02:14.709,0:02:17.709
or Cmd + Shift + Option + E on a Mac.
0:02:17.709,0:02:20.760
Invert
0:02:20.760,0:02:24.999
the foreground and background colors by
clicking on the curved, double-arrow
0:02:24.999,0:02:28.310
icon or pry pressing "x".
0:02:28.310,0:02:31.409
on your keyboard. Make the Brush Size
0:02:31.409,0:02:34.510
small to medium and the Opacity,
0:02:34.510,0:02:40.049
100%. Now, simply brush over
the areas you want to clean up.
0:02:40.049,0:02:47.049
Using these quick, simple techniques,
0:02:48.989,0:02:53.280
you can transform any photo into a
beautiful pencil drawing.
0:02:53.280,0:02:57.310
This is Marty from Blue Lightning TV.
Thanks for watching!
standard: es
0:00:00.120,0:00:05.330
Hola, soy Marty de la televisión Rayo Azul
0:00:05.330,0:00:11.059
Hola, soy Marty de la televisión Rayo Azul
0:00:11.059,0:00:16.120
Hace un año hice un tutorial sobre cómo dar apariencia de dibujo a lápiz, a una foto.
0:00:16.120,0:00:19.790
utilizando una versión mas antigua de Photoshop. Ahora,
0:00:19.790,0:00:23.440
voy a mostrarte una manera rápida
y más fácil de hacerlo.
0:00:23.440,0:00:27.180
Este documento es de aproximadamente 6 1/2
0:00:27.180,0:00:32.269
por 9 1/2 pulgadas con una
Resolución de 150 píxeles por pulgada.
0:00:32.269,0:00:35.809
Abrir una foto y hacer una copia de ella
0:00:35.809,0:00:39.929
pulsando Ctrl + J en un PC o Cmd + J
0:00:39.929,0:00:44.839
en un Mac.
Haga clic en el botón de capa de ajuste
0:00:44.839,0:00:50.260
y seleccione Tono / Saturación.
Reducir la saturación
0:00:50.260,0:00:56.219
a -100. Haga clic en la miniatura
0:00:56.219,0:01:00.600
de la capa 1 para activarla, desplegar el menú modo de fusión de capa y cambiar el modo de fusión
0:01:00.600,0:01:05.870
a Sobreexponer Color. Invertir
0:01:05.870,0:01:12.870
pulsando Ctrl +I, o Cmd + I.
En este punto, su imagen debe verse en blanco.
0:01:13.590,0:01:16.900
Ir a Filtro, Desenfocar
0:01:16.900,0:01:22.590
y desenfoque gaussiano. Deslice el radio a una
cantidad que le parezca bien a usted.
0:01:22.590,0:01:27.530
Su imagen debe tener más apariencia
de un dibujo de lápiz que de una fotografía.
0:01:27.530,0:01:32.590
Para hacer más denso el aspecto general de la imagen, haga clic de nuevo, en el botón capa de ajuste
0:01:32.590,0:01:39.080
y esta vez elija Niveles.
Deslice el nivel hacia la derecha, para oscurecer la imagen
0:01:39.080,0:01:42.240
hasta que la cara tenga la cantidad justa
de densidad.
0:01:42.240,0:01:46.060
Si otras áreas tambien están demasiado densas, como el vestido
0:01:46.060,0:01:52.190
en este ejemplo, abra la herramienta pincel, y
hacer que el tamaño del pincel
0:01:52.190,0:01:55.400
sea relativamente grande, 400 px, la dureza
0:01:55.400,0:01:58.900
0% y la opacidad, el 40%.
0:01:58.900,0:02:02.290
Asegúrese de que el color de primer plano es negro
0:02:02.290,0:02:06.530
y entonces aplique el pincel sobre las áreas que le gustaría hacer menos densa.
0:02:06.530,0:02:11.120
Para limpiar algunas zonas,
hacer "duplicar capas visibles"
0:02:11.120,0:02:14.709
pulsando Ctrl + Shift + Alt + E en un PC
0:02:14.709,0:02:17.709
o Cmd + Shift + Opción + E en un Mac.
Nos aparece la capa 2.
0:02:17.709,0:02:20.760
Invertir el color frontal por el color de fondo
0:02:20.760,0:02:24.999
haciendo clic en la doble flecha curva
0:02:24.999,0:02:28.310
del icono, o pulsando "x"
0:02:28.310,0:02:31.409
en su teclado.
Cambiar el tamaño del pincel
0:02:31.409,0:02:34.510
a pequeño o mediano tamaño, y la opacidad al 100%,
0:02:34.510,0:02:40.049
Ahora, simplemente pase el pincel sobre las áreas que desea limpiar.
0:02:40.049,0:02:47.049
Con el uso de estas técnicas rápidas y sencillas,
0:02:48.989,0:02:53.280
usted puede transformar cualquier foto en un hermoso dibujo a lápiz.
0:02:53.280,0:02:57.310
Soy Marty del Rayo Azul TV.
¡Gracias por mirar!
standard: hu
0:00:00.120,0:00:05.330
0:00:05.330,0:00:11.059
Szia! Itt Marty a Blue Lightning TV-től.
0:00:11.059,0:00:16.120
Egy éve készítettem egy bemutatót, hogyan készíthető ceruza rajz képről
0:00:16.120,0:00:19.790
egy régebbi Photoshop verziót használva.
0:00:19.790,0:00:23.440
Most meg fogom mutatni ennek egy egyszerűbb és gyorsabb módját.
0:00:23.440,0:00:27.180
Ez a dokumentum megközelítőleg 6,5 inch-szer
0:00:27.180,0:00:32.269
9,5 inch, a felbontása 150 pixel/inch.
0:00:32.269,0:00:35.809
Nyiss meg egy képet és készíts róla másolatot
0:00:35.809,0:00:39.929
a Ctrl+J lenyomásával PC-n, vagy
0:00:39.929,0:00:44.839
Cmd+J-vel Mac-en. Kattints az 'Adjustment layer' gombra
0:00:44.839,0:00:50.260
és válaszd a 'Hue/Saturation'-t. Csökkentsd a 'Saturation'-t
0:00:50.260,0:00:56.219
-100-ra. Kattints az 1-es rétegre
0:00:56.219,0:01:00.600
hogy aktívvá váljon és változtasd meg a 'Blend Mode'-ot
0:01:00.600,0:01:05.870
'Color Dodge'-ra.
0:01:05.870,0:01:12.870
Invertáld át a Ctrl+I vagy Cmd+I lenyomásával. Most a képednek fehérnek kellene kinéznie.
0:01:13.590,0:01:16.900
Menj a 'Filter', 'Blur',
0:01:16.900,0:01:22.590
és 'Gaussian Blur'-re. Változtasd meg a mértékét annyira, ami neked jól néz ki.
0:01:22.590,0:01:27.530
A képednek inkább ceruza rajznak, mint fényképnek kellene kinéznie.
0:01:27.530,0:01:32.590
Hogy az egész kép tömörebb legyen, kattints újra az 'Adjusment Layer' gombra
0:01:32.590,0:01:39.080
és most válaszd a 'Levels'-et. Csúsztasd a 'Intput darks'-ot jobbra
0:01:39.080,0:01:42.240
amíg az arc megfelelő mértékben tömör nem lesz.
0:01:42.240,0:01:46.060
Ha más területek túl tömörek, mint a ruha
0:01:46.060,0:01:52.190
ennél a példánál, nyisd meg a 'Brush Tool'-t, az ecset méretét állítsd
0:01:52.190,0:01:55.400
viszonylag nagyra, az erősségét
0:01:55.400,0:01:58.900
0%-ra és az átlátszóságát 40%-ra.
0:01:58.900,0:02:02.290
Bizonyosodj meg róla, hogy az előtér színe fekete
0:02:02.290,0:02:06.530
és fess rá azokra a területekre, amiket szeretnél kevésbé sűrűvé tenni.
0:02:06.530,0:02:11.120
Hogy megtisztíts néhány területet, készíts "összetett pillanatképet"
0:02:11.120,0:02:14.709
a Ctrl+Shift+Alt+E lenyomásával PC-n,
0:02:14.709,0:02:17.709
vagy Cmd+Shift+Option+E lenyomásával Mac-en.
0:02:17.709,0:02:20.760
Invertáld
0:02:20.760,0:02:24.999
az előteret és a hátteret a hajlított, két irányú nyíl
0:02:24.999,0:02:28.310
ikonnal, vagy az X gomb lenyomásával
0:02:28.310,0:02:31.409
a billentyűzeteden. Állítsd az ecset méretét
0:02:31.409,0:02:34.510
kicsiről nagyra és az átlátszóságot
0:02:34.510,0:02:40.049
100%-ra. Most egyszerűen fess rá azokra a területekre, amiket meg szeretnél tisztítani.
0:02:40.049,0:02:47.049
Ezeket a gyors, egyszerű technikákat alkalmazva
0:02:48.989,0:02:53.280
át tudsz alakítani bármilyen képet egy gyönyörű ceruza rajzzá.
0:02:53.280,0:02:57.310
Marty voltam a Blue Lightning TV-től. Köszönöm, hogy megnézted a videómat!
Profiles
Profile 1
| Purpose | Tutorial (why) |
|---|---|
| Content | |
| Participants | nameless (f) model, Photoshop (m) geek |
| Form | Tutorial (how) |
| Time | |
| Place |
Profile 2
| Purpose | Tutorial |
|---|---|
| Content | Portrait |
| Participants | nameless (f) model, Photoshop (m) geek |
| Form | Tutorial (how) |
| Time | Real time |
| Place | Desktop |
Profile 4
| Purpose | |
|---|---|
| Content | |
| Participants | nameless (f) model, Photoshop (m) geek |
| Form | |
| Time | Short |
| Place | Desktop |
Profile 5
| Purpose | |
|---|---|
| Content | Portrait |
| Participants | nameless (f) model, Photoshop (m) geek |
| Form | |
| Time | |
| Place |