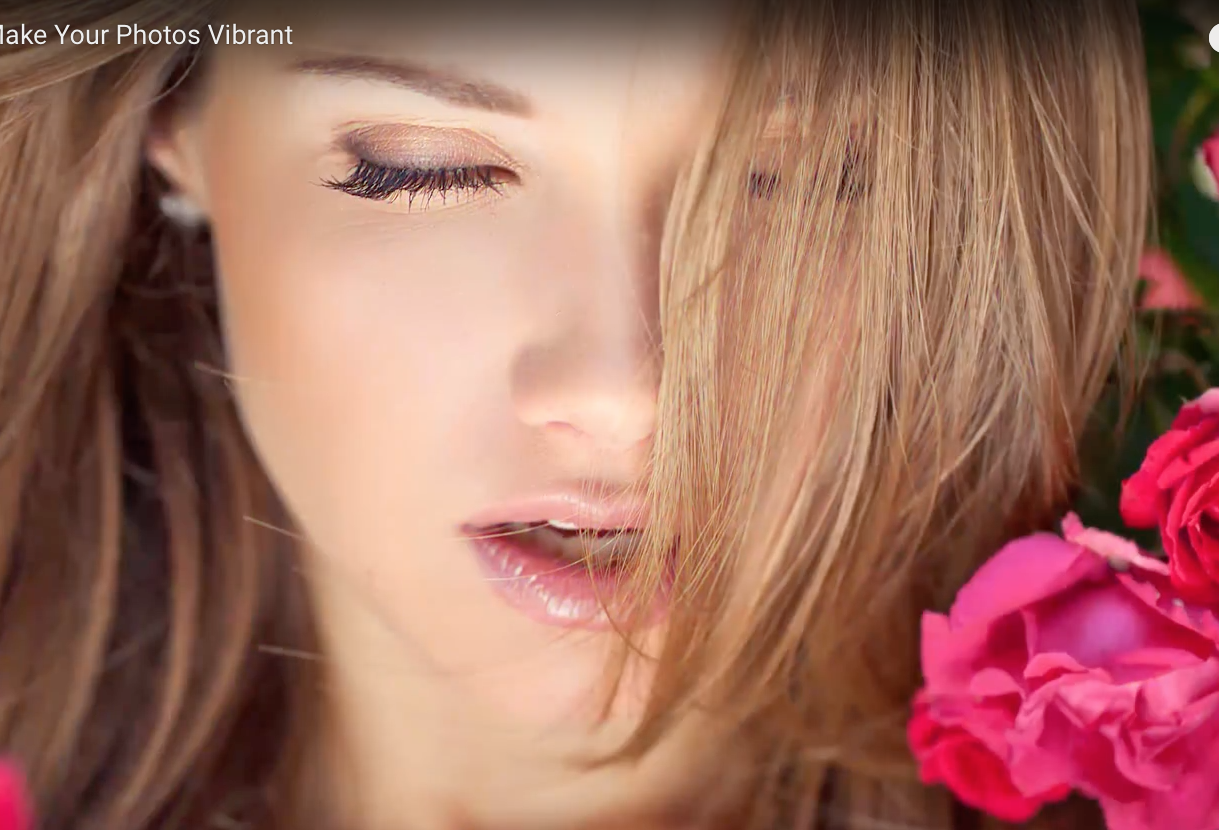
Vibrancy Masking Photoshop Tutorial - How to Make Your Photos Vibrant
Figuration: Tutorial
Description
The Quick Method:
The quick way to do vibrancy masking is to simply increase the saturation and lower the vibrance. This will increase the vibrancy of your photo while keeping the neutral areas neutral. This technique is good if you only have Lightroom or if you don’t have a lot of time and you think it’s good enough. But if you want something that will give you more intense colors and flexibility, then learn how to do it with the Channel Mixer.
Channel Mixer Vibrancy:
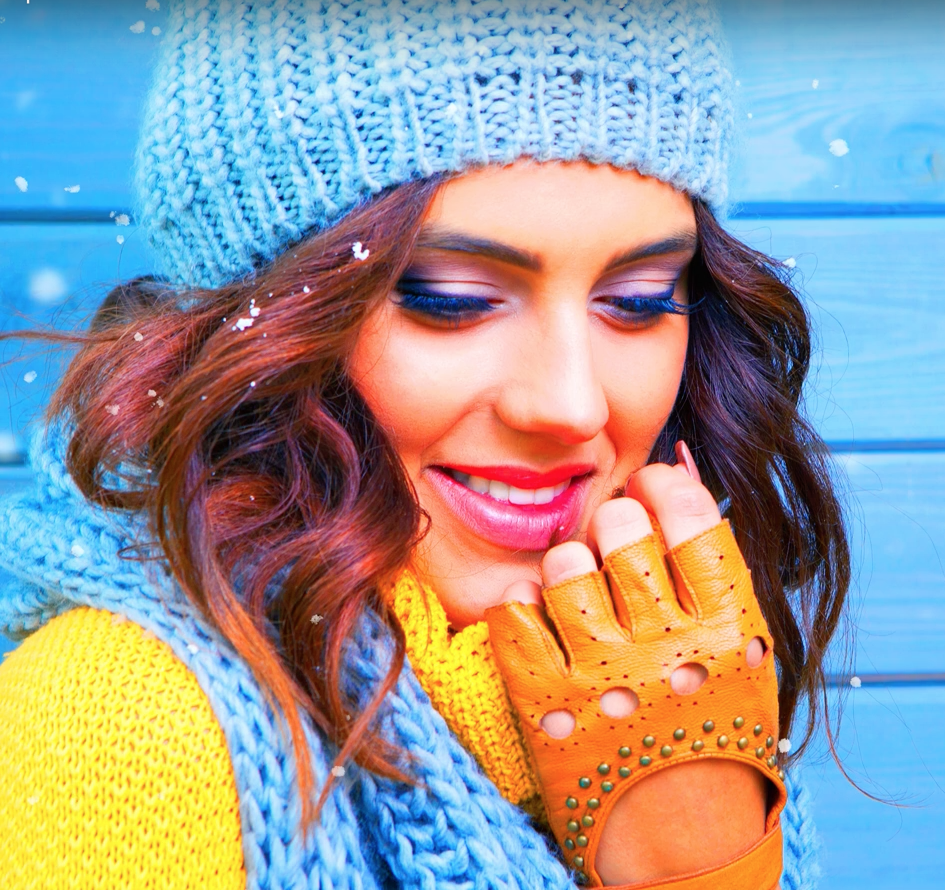
There are several adjustments in Photoshop which an increase the vibrancy of your photo. You can use the Vibrance or Saturation adjustments. There’s also one more way and that is with the Channel Mixer. It gives you really nice intense colors that work great for landscape photos. It’s sort of a mix between the old saturation adjustment and the new vibrance adjustment in that it alters both the saturation and lightness like the vibrance adjustment, but it treats all colors equally like the old saturation adjustment. The vibrance adjustment applies different intensities depending on the hue and lightness. But when we’re doing something like vibrancy masking, we want something that’s straightforward and treats all colors equally. And the Channel Mixer does this job perfectly.
Vibrancy Masking:
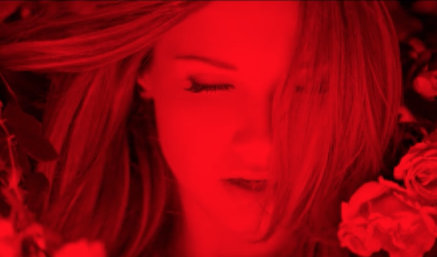
Vibrancy masking lets you hide/show a layer according to your photo's vibrancy. You can choose to make your layer appear in the vibrant or non-vibrant areas. By setting the blending mode of your Channel Mixer layer to "Difference", you can easily get a map of the vibrant areas in your photo. You can then use the Apply Image tool to place this into your Channel Mixer layer mask. With some tweaks like auto-levels, you can get an incredibly useful vibrancy mask.
Links:
? Written Tutorial: https://dennystips.com/vibrancy-masking/
? Photoshop & Lightroom Products: https://sparklestock.com
? Photoshop Books: http://amzn.to/2fDsVtZ
Subscribe:
? https://youtube.com/dennystips?sub_confirmation=1
Follow Me:
? Website: https://dennystips.com/
? Instagram: https://instagram.com/dennystips/
? Facebook: http://facebook.com/dennystips
?Twitter: https://twitter.com/dennystips
? Snapchat: dennystips
?? Did you like/dislike this video? Please let me know in the comments below.
Metadata
| Video ID | 624 | Youtube URL | Vibrancy Masking Photoshop Tutorial - How to Make Your Photos Vibrant |
|---|---|
| Captions Available | No |
| Captions Downloadable | Yes |
| Playlists | |
| Duration | 00:07:21 |
| Definition | hd |
| Keywords | |
| License | youtube |
| Embeddable | Yes |
| Views | 4520 |
| Likes | 222 |
| Dislikes | 0 |
| Favourites | 0 |
| Comments | 31 |
| Created | 2017-05-04 1:00:48 PM |
| Updated | 2017-05-04 1:15:52 PM |
Captions
ASR: en
0:00:03.290,0:00:07.890
hello and welcome to this episode of
0:00:05.609,0:00:09.240
Danny's dead today you'll learn a new
0:00:07.890,0:00:11.759
way to boost the colors of your
0:00:09.240,0:00:13.230
landscape photos the technique is 40
0:00:11.759,0:00:15.780
times when the five months or saturation
0:00:13.230,0:00:17.340
adjustments are good enough you learn
0:00:15.780,0:00:19.289
how to increase the saturation with the
0:00:17.340,0:00:20.760
channel mixer and then use vibrancy
0:00:19.289,0:00:23.150
masking to control whether you want to
0:00:20.760,0:00:25.800
the sexy fireman or non private area
0:00:23.150,0:00:27.390
this technique works amazingly well for
0:00:25.800,0:00:29.070
landscapes and it's great when you want
0:00:27.390,0:00:36.780
to get the most intense and vibrant
0:00:29.070,0:00:38.910
colors they can from your photo before
0:00:36.780,0:00:40.410
we start the quick way to define missing
0:00:38.910,0:00:43.469
asking is distinctly increase the
0:00:40.410,0:00:45.059
saturation and then lower d vibrant this
0:00:43.469,0:00:47.600
will increase the vibrancy of your photo
0:00:45.059,0:00:49.860
while keeping the mutual area neutral
0:00:47.600,0:00:51.360
this technique is good if you only have
0:00:49.860,0:00:53.579
lightroom or if you don't have a lot of
0:00:51.360,0:00:54.690
time and you think it's good enough well
0:00:53.579,0:00:57.270
if you want something i will give you
0:00:54.690,0:00:58.829
more intense colors and flexibility and
0:00:57.270,0:01:00.480
keep watching this tutorial and you'll
0:00:58.829,0:01:03.149
learn how to do it in photoshop with the
0:01:00.480,0:01:04.589
channel mixer there are several
0:01:03.149,0:01:06.570
adjustments and photoshop which can
0:01:04.589,0:01:08.220
increase the vibrancy of your photo you
0:01:06.570,0:01:11.220
can use these five mins or saturation
0:01:08.220,0:01:13.350
adjustment there's also one way and that
0:01:11.220,0:01:15.210
is with the channel mixer it gives you
0:01:13.350,0:01:17.939
really nice intense colors that work
0:01:15.210,0:01:19.619
great for landscape photos it's sort of
0:01:17.939,0:01:21.780
a mix between the old saturation
0:01:19.619,0:01:23.850
judgment and a new fibrin adjustment and
0:01:21.780,0:01:25.409
that it alters both the saturation and
0:01:23.850,0:01:27.600
lightness like the fireman's adjustments
0:01:25.409,0:01:30.630
but it treats all colors equally like
0:01:27.600,0:01:32.220
the old saturation adjustment the fibrin
0:01:30.630,0:01:34.770
adjustment applies different intensity
0:01:32.220,0:01:36.210
depending on the cue and lightness but
0:01:34.770,0:01:37.680
when we're doing something like primacy
0:01:36.210,0:01:39.570
masking we want something that's
0:01:37.680,0:01:42.240
straightforward and treats all colors
0:01:39.570,0:01:45.869
equally andy channel mixer does the job
0:01:42.240,0:01:47.189
perfectly here's how to do it start by
0:01:45.869,0:01:48.840
going to the adjustments panel and
0:01:47.189,0:01:51.149
adding a channel mixer adjustment layer
0:01:48.840,0:01:53.970
if you don't see this panel you can open
0:01:51.149,0:01:55.890
it by going to window adjustments
0:01:53.970,0:01:57.570
you cannot make their elective mix and
0:01:55.890,0:01:59.820
parts of one channel on to another
0:01:57.570,0:02:01.860
channel in case you don't know what
0:01:59.820,0:02:04.410
channels are color photos are made from
0:02:01.860,0:02:06.390
three channels a red green and blue
0:02:04.410,0:02:09.780
channel that one combined forms the
0:02:06.390,0:02:11.400
color photo so for example if we select
0:02:09.780,0:02:14.880
the red channel from the drop-down menu
0:02:11.400,0:02:16.500
and suck you read 20 and blue to 100 the
0:02:14.880,0:02:19.050
red channel will look exactly the same
0:02:16.500,0:02:20.670
as a blue channel and this is because we
0:02:19.050,0:02:23.760
told Photoshop can make you read channel
0:02:20.670,0:02:26.400
0% read your present green and a hungry
0:02:23.760,0:02:28.380
% blue you can play around with the
0:02:26.400,0:02:30.300
percentages but whatever number you use
0:02:28.380,0:02:33.630
you generally want to have them all add
0:02:30.300,0:02:35.760
up to one hundred percent so that's what
0:02:33.630,0:02:37.410
the channel mixer is doing but how do we
0:02:35.760,0:02:40.080
use it to make your photo more fitted
0:02:37.410,0:02:43.020
here's how to do it start with the red
0:02:40.080,0:02:46.290
channel set the red to 200 green to
0:02:43.020,0:02:47.970
minus-50 and blue to minus-50 let's tell
0:02:46.290,0:02:49.380
Photoshop to regenerate the channel
0:02:47.970,0:02:51.750
using two hundred percent of the data
0:02:49.380,0:02:53.430
from the red channel minus fifty percent
0:02:51.750,0:02:54.870
from the green channel and line is
0:02:53.430,0:02:57.540
another fifty percent from the blue
0:02:54.870,0:02:59.580
channel we're going to repeat this for
0:02:57.540,0:03:01.050
the green and blue channels so going to
0:02:59.580,0:03:03.930
a green channel and apply the same
0:03:01.050,0:03:08.130
pattern of settings set the green to 200
0:03:03.930,0:03:10.110
and the rest to minus-50 do this one
0:03:08.130,0:03:13.860
more time for the blue channel so 200
0:03:10.110,0:03:15.420
for the Blues and minus 50 for drs now
0:03:13.860,0:03:18.209
you can see that this layer has major
0:03:15.420,0:03:20.040
photo more vibrant before we move on I
0:03:18.209,0:03:21.750
recommend saving this as a preset for
0:03:20.040,0:03:23.910
future use and you can do so by clicking
0:03:21.750,0:03:27.060
on the panel menu and selecting save
0:03:23.910,0:03:28.830
preset 1 sake you can access it from the
0:03:27.060,0:03:31.890
presets drop-down menu anytime you like
0:03:28.830,0:03:35.340
and there you go you just increase the
0:03:31.890,0:03:36.870
saturation using the channel mixer right
0:03:35.340,0:03:38.910
now the channel mixer is affecting the
0:03:36.870,0:03:40.860
entire image and although the colors are
0:03:38.910,0:03:42.630
really popping in the foliage it's also
0:03:40.860,0:03:45.630
making the stone wall look quite orange
0:03:42.630,0:03:48.090
and dirty to fix plus we can add a layer
0:03:45.630,0:03:50.489
mask based on the pharmacy here's how to
0:03:48.090,0:03:52.830
do it change the blend mode of this
0:03:50.489,0:03:54.150
layer two different let's will show you
0:03:52.830,0:03:56.670
the difference between your current
0:03:54.150,0:03:58.410
layer and the layers below and as you
0:03:56.670,0:04:00.090
can see the bright spots are the areas
0:03:58.410,0:04:01.980
where the most vibrant colors are and
0:04:00.090,0:04:03.040
the dark spots our wedding neutral
0:04:01.980,0:04:05.409
colors are
0:04:03.040,0:04:07.959
to create a fibrin see max we can simply
0:04:05.409,0:04:09.939
use the image as the layer mask to do
0:04:07.959,0:04:13.409
this select a layer math in your layers
0:04:09.939,0:04:15.819
panel and then go to image apply image
0:04:13.409,0:04:18.100
this tool lets you place an image onto
0:04:15.819,0:04:19.570
your current layer or layer math the
0:04:18.100,0:04:22.810
default settings are fine and you can
0:04:19.570,0:04:24.280
just click OK change the blending mode
0:04:22.810,0:04:26.289
is definitely your back to normal and
0:04:24.280,0:04:28.630
hold the alt or option key and then
0:04:26.289,0:04:30.570
click on the layer mask this will let
0:04:28.630,0:04:32.979
you see what your layer mask looks like
0:04:30.570,0:04:34.840
right now it's pretty dark so pest
0:04:32.979,0:04:37.380
control our convention of L and now
0:04:34.840,0:04:40.000
apply auto levels to balance things out
0:04:37.380,0:04:41.710
hold alt or option and then click on the
0:04:40.000,0:04:44.289
layer mask again to stop looking at your
0:04:41.710,0:04:46.150
lame at and if you hold the shift key
0:04:44.289,0:04:48.430
while clicking on the layer mask you can
0:04:46.150,0:04:51.310
enable or disable it to preview how it
0:04:48.430,0:04:54.520
look here's how the image looks like
0:04:51.310,0:04:56.110
before and after as you can see the
0:04:54.520,0:05:00.220
vibrancy max really helps to preserve
0:04:56.110,0:05:01.690
the neutral colors you can also use the
0:05:00.220,0:05:04.060
levels tool on the layer mask by
0:05:01.690,0:05:05.979
pressing ctrl or command l and dragging
0:05:04.060,0:05:08.550
the outer notes towards the center which
0:05:05.979,0:05:10.960
will increase the contrast like this if
0:05:08.550,0:05:12.789
there are any gaps that you want to fill
0:05:10.960,0:05:14.710
you can use the brush tool and paint
0:05:12.789,0:05:17.800
inside the mask with either black or
0:05:14.710,0:05:19.780
white if you want the opposite effect
0:05:17.800,0:05:21.159
you can import you am i's by pressing
0:05:19.780,0:05:23.669
the import button in the properties
0:05:21.159,0:05:26.050
panel or by pressing ctrl or command I
0:05:23.669,0:05:27.550
this will make your layer mask affecting
0:05:26.050,0:05:29.349
neutral colors more than the fibrin
0:05:27.550,0:05:31.479
colors and it's useful when you want to
0:05:29.349,0:05:33.520
increase the vibrancy very evening with
0:05:31.479,0:05:36.550
a flatter look and present colors from
0:05:33.520,0:05:38.409
being over saturated by the way if
0:05:36.550,0:05:40.449
you're using photoshop CC and you want
0:05:38.409,0:05:41.650
to blur the layer mask make sure you're
0:05:40.449,0:05:43.750
using a feather setting in the
0:05:41.650,0:05:46.090
properties panel and not get Gaussian
0:05:43.750,0:05:48.130
blur filter because once you blurt layer
0:05:46.090,0:05:50.229
max Wittek filter you can't under it
0:05:48.130,0:05:51.789
will excite our setting it will let you
0:05:50.229,0:05:54.520
adjust the floor as many times as you
0:05:51.789,0:05:58.630
like anytime you want and it's also much
0:05:54.520,0:06:00.250
easier to access we're done you can
0:05:58.630,0:06:02.320
lower the layer opacity can control how
0:06:00.250,0:06:03.970
much five mins you want to add here's
0:06:02.320,0:06:05.480
our the image looks like before and
0:06:03.970,0:06:07.360
after
0:06:05.480,0:06:09.590
[Music]
0:06:07.360,0:06:11.990
here are some more examples of what you
0:06:09.590,0:06:14.000
can achieve with this technique I know
0:06:11.990,0:06:15.710
that some people really like to pump the
0:06:14.000,0:06:18.320
vibrance and saturation to get that
0:06:15.710,0:06:20.120
intense vivid look I've seen gallery
0:06:18.320,0:06:22.460
prints like this and they look great in
0:06:20.120,0:06:23.870
real life but something that I noticed
0:06:22.460,0:06:26.930
was that if you keep parts of your photo
0:06:23.870,0:06:29.270
gray or neutral like the stones rock et
0:06:26.930,0:06:31.130
cetera if you keep the great stuff gray
0:06:29.270,0:06:33.980
it will make the colors around it look
0:06:31.130,0:06:35.330
even more vibrant so hopefully with
0:06:33.980,0:06:37.310
dissecting you can still get those
0:06:35.330,0:06:50.180
intense perfect colors put in a way
0:06:37.310,0:06:51.680
that's a little bit more natural hey
0:06:50.180,0:06:52.910
thanks for watching this video if you
0:06:51.680,0:06:54.860
liked it please let me kiss you like
0:06:52.910,0:06:56.570
button now I gotta admit I don't use
0:06:54.860,0:06:58.639
this technique all of the time most of
0:06:56.570,0:07:01.250
his time t5 into saturation you're good
0:06:58.639,0:07:02.840
enough if your photo has very consistent
0:07:01.250,0:07:04.820
privacy you're not going to notice that
0:07:02.840,0:07:07.070
big of a difference if your photo has
0:07:04.820,0:07:08.900
very fun and colorful errors on one side
0:07:07.070,0:07:10.030
and the opposite on the other then
0:07:08.900,0:07:11.960
you're going to notice a huge difference
0:07:10.030,0:07:14.270
so it depends on the photo without
0:07:11.960,0:07:15.650
you're working on anyway let me know
0:07:14.270,0:07:17.270
what you think in the comments subscribe
0:07:15.650,0:07:19.250
to my channel if you haven't already and
0:07:17.270,0:07:21.889
I'll see you again next week
0:07:19.250,0:07:21.889
[Music]
Screenshots
Profiles
Profile 1
| Purpose | Tutorial |
|---|---|
| Content | |
| Participants | |
| Form | Tutorial (how), Mid shot, music |
| Time | |
| Place |
Profile 2
| Purpose | |
|---|---|
| Content | Scene |
| Participants | nameless (f) model, Photoshop (m) geek |
| Form | |
| Time | |
| Place |