How to Dodge and Burn Nondestructively in Photoshop
Figuration: Tutorial
Description
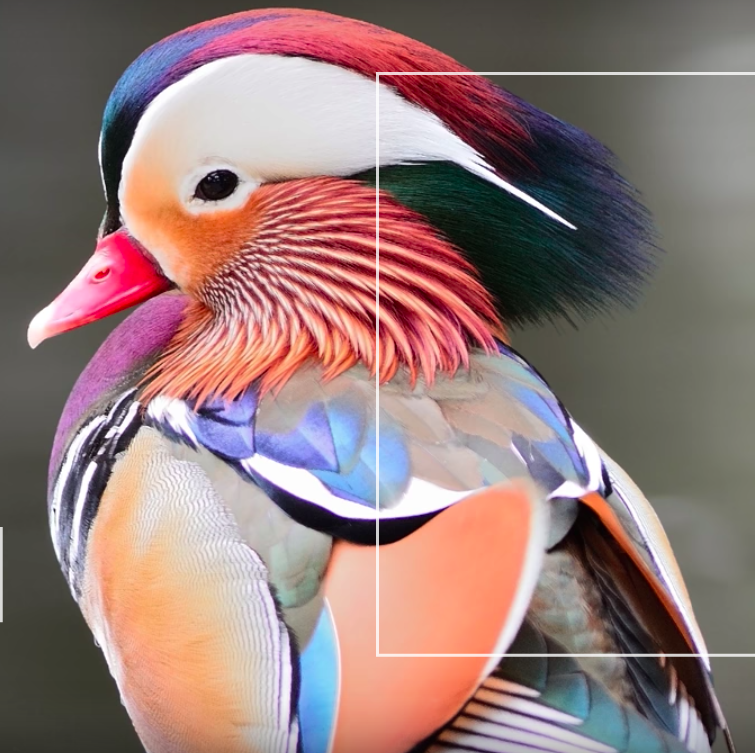
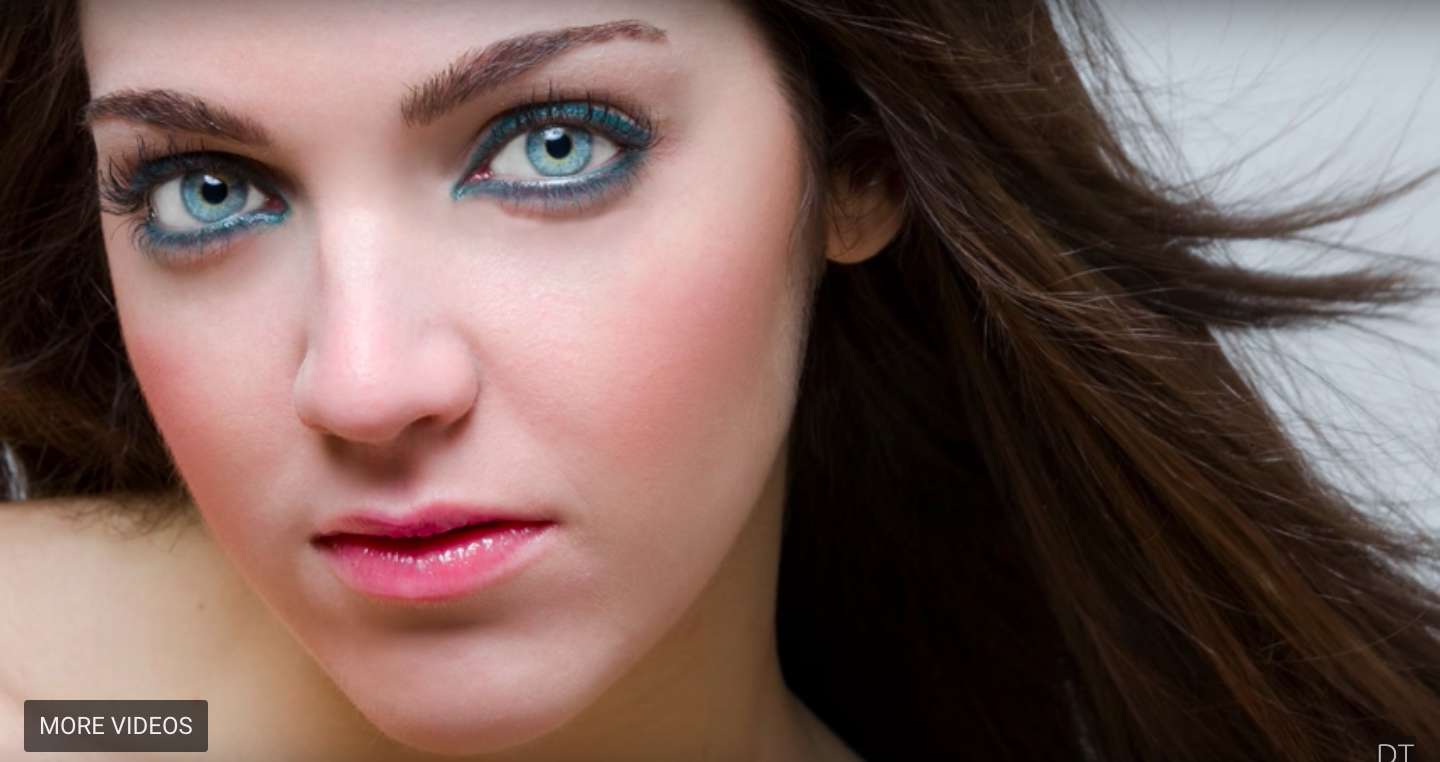
When used correctly, you can completely transform your photos. Photographers use this technique to give their landscape photos the dramatic look. You can even use it to contour a person’s face simply by changing the lighting. There’s a lot more you can do with this technique and in this tutorial, you’ll learn how to dodge and burn nondestructively and you’ll also learn how to combine it with another technique called luminosity masking for even better results.
Links:
? Written Tutorial: https://dennystips.com/dodging-and-burning/
? Photoshop & Lightroom Products: https://sparklestock.com
? Photoshop Books: http://amzn.to/2fDsVtZ
Subscribe:
?https://youtube.com/dennystips?sub_confirmation=1
Follow Me:
? Website: https://dennystips.com/
? Instagram: https://instagram.com/dennystips/
? Facebook: http://facebook.com/dennystips
? Snapchat: dennystips
?Twitter: https://twitter.com/dennystips
?? Did you like/dislike this video? Please let me know in the comments below.
Metadata
| Video ID | 634 | Youtube URL | How to Dodge and Burn Nondestructively in Photoshop |
|---|---|
| Captions Available | No |
| Captions Downloadable | Yes |
| Playlists | |
| Duration | 00:10:56 |
| Definition | hd |
| Keywords | |
| License | youtube |
| Embeddable | Yes |
| Views | 2860 |
| Likes | 58 |
| Dislikes | 0 |
| Favourites | 0 |
| Comments | 7 |
| Created | 2017-05-04 1:00:49 PM |
| Updated | 2017-05-04 1:15:54 PM |
Captions
ASR: en
0:00:02.600,0:00:07.020
hello and welcome to Danny's tips in
0:00:05.069,0:00:08.820
this episode you'll learn one of the
0:00:07.020,0:00:10.440
most popular retouching techniques that
0:00:08.820,0:00:12.929
can be used in landscape photography
0:00:10.440,0:00:15.420
portrait photography architecture and
0:00:12.929,0:00:17.910
more it's called dodging and burning and
0:00:15.420,0:00:19.590
with this technique you can selectively
0:00:17.910,0:00:22.109
choose which area of your photo should
0:00:19.590,0:00:24.029
be brighter or darker when used
0:00:22.109,0:00:26.369
correctly you can completely transform
0:00:24.029,0:00:28.109
your photos photographers use this
0:00:26.369,0:00:30.390
technique to get your landscape photos a
0:00:28.109,0:00:32.520
dramatic look you can even use it to
0:00:30.390,0:00:34.739
contours a person's face simply by
0:00:32.520,0:00:36.630
changing you lighting there's a lot more
0:00:34.739,0:00:38.219
you can do with this technique and in
0:00:36.630,0:00:40.320
this tutorial you'll learn how to dodge
0:00:38.219,0:00:41.610
and burn non-destructively and you'll
0:00:40.320,0:00:43.559
also learn how to combine it with
0:00:41.610,0:00:46.590
another technique called luminosity
0:00:43.559,0:00:48.210
masking or even better results so if
0:00:46.590,0:00:51.020
you're interested keep watching to find
0:00:48.210,0:00:51.020
out how it's done
0:00:58.870,0:01:02.960
you can find a Dodge and burn tool in
0:01:01.310,0:01:05.059
the toolbar by clicking and holding on
0:01:02.960,0:01:07.250
this button here let's start with the
0:01:05.059,0:01:08.960
Dodge tool in fact you probably never
0:01:07.250,0:01:11.000
need to use the burn tool and you'll see
0:01:08.960,0:01:12.650
why later but for now we're going to
0:01:11.000,0:01:16.040
stick with the Dodge tool and quickly go
0:01:12.650,0:01:18.020
over all of its important settings first
0:01:16.040,0:01:20.240
duplicate the layer by pressing ctrl or
0:01:18.020,0:01:22.970
command J so you have the original image
0:01:20.240,0:01:24.650
as a backup this is the most common way
0:01:22.970,0:01:26.630
beginners student on destructive editing
0:01:24.650,0:01:29.080
and technically it is non-destructive
0:01:26.630,0:01:31.280
but it's not the best way of doing it
0:01:29.080,0:01:32.780
we're just starting off with this site
0:01:31.280,0:01:34.399
you can learn how the tools work and
0:01:32.780,0:01:37.970
then after you'll learn a better way of
0:01:34.399,0:01:39.860
doing it so when you're dodging is
0:01:37.970,0:01:42.050
basically a brush that will brighten the
0:01:39.860,0:01:44.000
air as you paint in when you're burning
0:01:42.050,0:01:47.360
is doing the opposite which is darkening
0:01:44.000,0:01:48.860
the areas and by combining v2 you can
0:01:47.360,0:01:51.860
enhance your photo by manipulating
0:01:48.860,0:01:53.479
delighting for example in this image we
0:01:51.860,0:01:55.399
can burn the foreground which will dim
0:01:53.479,0:01:57.830
it and give more focus to the bright
0:01:55.399,0:01:59.840
area and detox center we can then
0:01:57.830,0:02:03.349
selectively dodge the areas that we want
0:01:59.840,0:02:05.300
to brighten back up let's start with
0:02:03.349,0:02:06.920
these settings in the options bar if you
0:02:05.300,0:02:09.860
can change the brush size and hardness
0:02:06.920,0:02:11.480
by clicking here 40 brush size most
0:02:09.860,0:02:13.040
people just set it by pressing the left
0:02:11.480,0:02:15.050
and right square bracket keys on your
0:02:13.040,0:02:17.180
keyboard you'll be changing your brush
0:02:15.050,0:02:20.240
size a lot so it's more efficient this
0:02:17.180,0:02:22.760
way do brush hardness is basically the
0:02:20.240,0:02:24.650
sharpness of the edge for example if you
0:02:22.760,0:02:27.340
set it to a hundred percent you'll get
0:02:24.650,0:02:30.230
really sharp and hard edges like this if
0:02:27.340,0:02:32.150
you set it to zero percent it will be
0:02:30.230,0:02:35.239
really soft and it's also safer to use
0:02:32.150,0:02:37.190
if you want to change your brush
0:02:35.239,0:02:38.630
hardness just hold the shift key while
0:02:37.190,0:02:42.260
pressing key left or right square
0:02:38.630,0:02:43.580
bracket keys this button here in the
0:02:42.260,0:02:46.970
options bar will bring up the brush
0:02:43.580,0:02:49.250
panel one thing that you should do is to
0:02:46.970,0:02:50.510
remove the spacing option I'm going to
0:02:49.250,0:02:52.280
set my brush hardness to one hundred
0:02:50.510,0:02:54.920
percent so you can see what's happening
0:02:52.280,0:02:57.440
right now when I paint a line it appears
0:02:54.920,0:02:59.900
choppy but in the brush panel simply
0:02:57.440,0:03:02.450
disable these facing option and now when
0:02:59.900,0:03:05.400
you paint it should be smooth like this
0:03:02.450,0:03:07.530
okay so that's the brush settings next
0:03:05.400,0:03:09.000
in the option bar is deranged it lets
0:03:07.530,0:03:11.700
you choose the tonal range that your
0:03:09.000,0:03:13.830
brush water effect for example if we set
0:03:11.700,0:03:15.780
it to shadows we can dodge this area
0:03:13.830,0:03:18.690
here and I'll affect more of the dark
0:03:15.780,0:03:20.580
areas and less of the light areas the
0:03:18.690,0:03:22.830
exposure setting is pretty much to brush
0:03:20.580,0:03:25.200
opacity so the higher the number the
0:03:22.830,0:03:26.940
stronger the effect will be I usually
0:03:25.200,0:03:28.770
like to keep it around fifty percent or
0:03:26.940,0:03:30.510
less because if you want a stronger
0:03:28.770,0:03:33.330
effect you can always just paint over
0:03:30.510,0:03:35.250
the same area again but to change the
0:03:33.330,0:03:37.890
setting on the fly just press the number
0:03:35.250,0:03:40.830
key on your keyboard so typing 25 will
0:03:37.890,0:03:42.270
set it to twenty-five percent the other
0:03:40.830,0:03:43.890
benefit of using a lower exposure
0:03:42.270,0:03:45.960
setting is that you can use a feature
0:03:43.890,0:03:49.710
called build up which is this button
0:03:45.960,0:03:51.660
right here here's how it works so with
0:03:49.710,0:03:53.820
the build-up option turned off when you
0:03:51.660,0:03:56.970
paint a stroke like this it's all one
0:03:53.820,0:03:59.310
consistent strange when you turn on
0:03:56.970,0:04:01.290
build up you can pause out a spot and
0:03:59.310,0:04:04.260
the longer you stay here the stronger
0:04:01.290,0:04:06.630
the effect will be next up is the
0:04:04.260,0:04:08.100
protect tones option with this enable it
0:04:06.630,0:04:09.930
will preserve the hue and some of the
0:04:08.100,0:04:11.790
tones so it's great for photographs if
0:04:09.930,0:04:13.590
you're doing stuff like digital
0:04:11.790,0:04:17.370
paintings you might want to turn it off
0:04:13.590,0:04:18.390
and finally the last button here only
0:04:17.370,0:04:20.130
matters if you're using a
0:04:18.390,0:04:22.470
pressure-sensitive pen instead of a
0:04:20.130,0:04:26.220
mouse for example a microsoft surface
0:04:22.470,0:04:27.720
tablet or a Wacom Intuos pen tablet this
0:04:26.220,0:04:29.580
option will make it set when you press
0:04:27.720,0:04:31.230
down harder with your pen instead of
0:04:29.580,0:04:33.930
increasing the strength it'll increase
0:04:31.230,0:04:35.610
the size instead so now that you know
0:04:33.930,0:04:38.520
all of these settings you can start
0:04:35.610,0:04:39.990
painting and see how it works the final
0:04:38.520,0:04:41.820
tip I want to give you is that instead
0:04:39.990,0:04:43.650
of switching to it burn tool you can
0:04:41.820,0:04:45.690
just hold the alt or option key instead
0:04:43.650,0:04:47.550
it's much easier and faster than
0:04:45.690,0:04:49.350
switching to burn tool and the other
0:04:47.550,0:04:53.160
bonus is that your brush settings will
0:04:49.350,0:04:56.040
stay the same so that's how you use the
0:04:53.160,0:04:57.420
dodge and burn tools but the problem
0:04:56.040,0:04:58.770
with this is that even though this is
0:04:57.420,0:05:00.480
technically non-destructive editing
0:04:58.770,0:05:02.130
because you have it on a separate layer
0:05:00.480,0:05:04.410
and you have the original image as a
0:05:02.130,0:05:06.570
backup it's not what I would call Foley
0:05:04.410,0:05:08.280
non-destructive because the more you
0:05:06.570,0:05:10.470
dodge and burn back and forth on a
0:05:08.280,0:05:13.420
particular spot the lower the image
0:05:10.470,0:05:14.910
quality will get so over time this is
0:05:13.420,0:05:17.170
what destructive to your image quality
0:05:14.910,0:05:19.480
plus you can't really see what you're
0:05:17.170,0:05:21.400
doing there's a better way of dodging
0:05:19.480,0:05:23.770
and burning and it is to do it on a
0:05:21.400,0:05:26.710
separate later but this layer isn't your
0:05:23.770,0:05:28.450
photo it's just a plain gray layer it's
0:05:26.710,0:05:30.190
a much better way to dodge and burn and
0:05:28.450,0:05:33.700
you should be using this method whenever
0:05:30.190,0:05:35.080
you can here's how it works I'm going to
0:05:33.700,0:05:36.610
delete this layer because we don't need
0:05:35.080,0:05:39.670
it anymore and then I'm going to create
0:05:36.610,0:05:42.370
a new layer press shift backspace to
0:05:39.670,0:05:44.080
bring up the fill tool select fifty
0:05:42.370,0:05:47.590
percent gray from the drop-down menu and
0:05:44.080,0:05:50.020
then click ok if we dodge and burn on
0:05:47.590,0:05:52.450
this layer yo Sita is basically creating
0:05:50.020,0:05:54.430
lighter and darker spots to make this
0:05:52.450,0:05:56.170
layer blend in with your photo set the
0:05:54.430,0:05:58.540
blending mode to either soft light or
0:05:56.170,0:06:00.190
overlay here's a comparison between
0:05:58.540,0:06:02.800
using these soft light and overlay
0:06:00.190,0:06:04.450
blending modes soft light is safer and
0:06:02.800,0:06:07.630
the results are closer to what the Dodge
0:06:04.450,0:06:09.550
and burn tools typically do but for
0:06:07.630,0:06:10.990
other photos like landscapes sometimes
0:06:09.550,0:06:14.200
setting it to overlay will give you
0:06:10.990,0:06:15.670
better colors using this method of
0:06:14.200,0:06:17.530
dodging and burning is a double-edged
0:06:15.670,0:06:19.440
sword because while you can do so much
0:06:17.530,0:06:22.420
more the tools don't work the same way
0:06:19.440,0:06:24.310
first disable de protect home option
0:06:22.420,0:06:26.320
this is because you're now painting our
0:06:24.310,0:06:29.320
gray layer and there's no tones to
0:06:26.320,0:06:32.170
protect the other one is arranged
0:06:29.320,0:06:34.150
setting just leave at mid-tones again
0:06:32.170,0:06:35.800
you're painting on a gray layer and it's
0:06:34.150,0:06:37.750
taking the tonal information from your
0:06:35.800,0:06:39.280
current dodging and burning layer not
0:06:37.750,0:06:42.460
the tonal information from your actual
0:06:39.280,0:06:45.100
photo so now that we got that out of the
0:06:42.460,0:06:46.630
way let's talk about the good stuff so
0:06:45.100,0:06:48.010
as you're dodging and burning you can
0:06:46.630,0:06:50.640
temporarily set the blending mode to
0:06:48.010,0:06:53.350
normal to see what your layer looks like
0:06:50.640,0:06:56.140
you can also use a brush tool and softly
0:06:53.350,0:06:58.630
dodging and burning tools you can change
0:06:56.140,0:07:01.060
the layer opacity or even use the levels
0:06:58.630,0:07:02.440
tool by pressing ctrl or command L this
0:07:01.060,0:07:04.510
tool is great for changing the
0:07:02.440,0:07:06.160
brightness and contrast of your layer so
0:07:04.510,0:07:07.870
if you want a stronger effect then you
0:07:06.160,0:07:09.880
can increase the contrast by striking
0:07:07.870,0:07:10.810
the two outer slider towards the middle
0:07:09.880,0:07:13.990
like this
0:07:10.810,0:07:15.280
and then adjusting the brightness so
0:07:13.990,0:07:17.590
that's how you dodge and burn on a
0:07:15.280,0:07:18.940
separate layer next I'm going to show
0:07:17.590,0:07:21.300
you how to combine you're dodging and
0:07:18.940,0:07:23.950
burning with a luminosity masks
0:07:21.300,0:07:26.290
luminosity masking is basically using
0:07:23.950,0:07:28.480
your photo as a layer mask so what this
0:07:26.290,0:07:30.210
does is it mixer layer visible according
0:07:28.480,0:07:32.560
to the brightness values of your photo
0:07:30.210,0:07:34.720
there's two ways to do luminosity
0:07:32.560,0:07:37.570
masking one is with a layer style and
0:07:34.720,0:07:38.950
the other with swiffer layer mask if you
0:07:37.570,0:07:40.840
want to learn more about luminosity
0:07:38.950,0:07:43.150
masking then click here to watch this
0:07:40.840,0:07:45.190
video if you already know how to do
0:07:43.150,0:07:47.440
luminosity masking then you can do it
0:07:45.190,0:07:49.180
with the layer style method but for this
0:07:47.440,0:07:51.280
tutorial I will be showing it with the
0:07:49.180,0:07:52.990
layer mask method so you can see what's
0:07:51.280,0:07:56.500
happening and it's also easier to
0:07:52.990,0:07:58.120
understand for beginners to start click
0:07:56.500,0:08:00.190
on the add layer mask button in the
0:07:58.120,0:08:01.930
layers panel make sure that you have the
0:08:00.190,0:08:03.700
layer mask selected and not the layer
0:08:01.930,0:08:07.590
itself it should have a white outline
0:08:03.700,0:08:10.330
around it next go to image apply image
0:08:07.590,0:08:13.600
this tool lets you place any layer into
0:08:10.330,0:08:15.490
your current layer or layer mask in the
0:08:13.600,0:08:17.530
drop down menu select the layer with
0:08:15.490,0:08:19.840
your photo for us it's the background
0:08:17.530,0:08:22.330
layer set the blending mode to either
0:08:19.840,0:08:24.310
multiply or normal make sure that the
0:08:22.330,0:08:27.640
opacity is a hundred percent then click
0:08:24.310,0:08:30.340
ok now we're using a photo as a layer
0:08:27.640,0:08:31.930
mask hold the alt or option key and then
0:08:30.340,0:08:35.650
click on the layer mask to see how it
0:08:31.930,0:08:37.300
looks so how it works is that the bright
0:08:35.650,0:08:39.490
areas are where the layers will be more
0:08:37.300,0:08:42.310
visible the dark areas are where it's
0:08:39.490,0:08:44.680
less visible if we invert the layer mask
0:08:42.310,0:08:47.020
by pressing ctrl or command I ill do the
0:08:44.680,0:08:48.940
opposite so right now my layer is more
0:08:47.020,0:08:51.670
visible in the dark areas which is what
0:08:48.940,0:08:53.350
I want for my image you can also use the
0:08:51.670,0:08:55.450
levels tool by pressing ctrl or command
0:08:53.350,0:08:58.300
L and then you can adjust the contrast
0:08:55.450,0:08:59.950
and brightness so if I drag you to outer
0:08:58.300,0:09:02.650
sliders towards the middle like this
0:08:59.950,0:09:04.500
it'll increase the contrast and then I
0:09:02.650,0:09:07.240
can tweet d brightness
0:09:04.500,0:09:09.070
so after the adjustment it looks much
0:09:07.240,0:09:11.110
better the layer will be visible in
0:09:09.070,0:09:12.880
these white areas here but it won't be
0:09:11.110,0:09:15.640
visible in the bright area of the photo
0:09:12.880,0:09:17.350
here now when we dodge and burn the
0:09:15.640,0:09:19.120
layer it will automatically mask itself
0:09:17.350,0:09:23.560
based on the brightness values of your
0:09:19.120,0:09:25.150
photo if you're doing luminosity masking
0:09:23.560,0:09:26.680
you might need to have more than one of
0:09:25.150,0:09:29.080
these dodging and burning layers to
0:09:26.680,0:09:30.700
target different tonal areas here are
0:09:29.080,0:09:33.300
some before-and-after examples of
0:09:30.700,0:09:33.300
dodging and burning
0:10:11.880,0:10:15.810
hey guys thanks for watching this video
0:10:13.650,0:10:17.700
there's a tip that I forgot to add and
0:10:15.810,0:10:19.440
that is that a lot of times when you're
0:10:17.700,0:10:21.330
dodging and burning you'll typically
0:10:19.440,0:10:24.090
have spots are way too strong and you
0:10:21.330,0:10:25.920
need to tone it down so to do that just
0:10:24.090,0:10:28.590
paint over it with your brush tool with
0:10:25.920,0:10:30.840
a 50-percent gray color I typically like
0:10:28.590,0:10:32.520
to set my brush opacity to around ten or
0:10:30.840,0:10:34.350
twenty percent and just keep painting
0:10:32.520,0:10:36.270
over a spot until it looks the way that
0:10:34.350,0:10:37.770
you wanted to anyways thanks for
0:10:36.270,0:10:39.660
subscribing to my channel guys I really
0:10:37.770,0:10:43.670
appreciate it I'm going to be making
0:10:39.660,0:10:43.670
more videos for you guys so stay tuned
Screenshots


Profiles
Profile 1
| Purpose | Tutorial |
|---|---|
| Content | Scene |
| Participants | nameless (f) model, nameless (m) model, Photoshop (m) geek, Animal |
| Form | Tutorial (how), Mid shot, screen grab, split-screen |
| Time | |
| Place |